Lincoln Navigator: Body Repairs - General Information / Special Repair Considerations for Aluminum Repairs. Description and Operation
Repair of aluminum vehicle components requires some specialized handling and the proper isolation of the work area from steel repairs and dedicated hand and power tools that will be used only for aluminum repair. The following details some of these considerations.
Isolation of Work Area
Galvanic corrosion is caused through dissimilar metals remaining in contact with one another. Eventually, the softer or more corrosively reactive metal will act as a sacrificial anode and accelerated corrosion will result. Working with dissimilar metals in the same environment increases the potential for galvanic corrosion which can cause repair and paint failures for either steel or aluminum systems
Because of this, it is necessary to create an isolation area dedicated to aluminum repairs. This isolation area can consist of an area walled off through the use of curtain walls, or a dedicated and separate working room or preparation booth.
In addition, a wet mix vacuum and air filtration system should be employed in the isolated work area to remove contaminates or dust particles caused by sanding and grinding, further reducing the potential for repair failures. The use of compressed air should also be avoided for cleaning (when possible) in all areas of the shop to reduce cross contamination of systems.
Specialized Tools
The hand and power tools utilized in the aluminum work area should be dedicated for use with aluminum only, and should be labeled and stored in a separate tool box. This will help minimize the potential for galvanic corrosion, which may create paint and repair failure.
Hand Tools
Hand tools, such as hammers and dollies, must be dedicated and labeled for each substrate worked on. Metal hand tools used in aluminum repairs must consist of polished surfaces and should be stored in a dedicated tool box when not in use. When possible, the use of rubber or wooden mallets is recommended providing these are also dedicated to aluminum repairs only.
Hammers and dollies used in steel component repair may create the concern of embedding steel particles in aluminum if used for both systems. In addition, tools used for steel repair may have a rougher than required surface created though regular use which may also result in cross contamination. Tools with serrated faces should never be used in aluminum repairs.
Power Tools
Equally important is the need for dedicated power tools when working with aluminum. Sanding and grinding discs and the associated dust build up on the power tool housing have a high potential for introducing dissimilar metals to repairs and may create galvanic corrosion concerns.
Ford Motor Company through Motorcraft® has published suggested hand tool and shop equipment lists for aluminum repair systems.
Use of Heat on Body Panels
Aluminum body panels are highly receptive to heat transfer. With the extensive use of structural adhesives and non-structural sealers used in vehicle construction, the potential of heat transfer could impact adhesives and sealers in non-associated panels during the repair process.
Many repair areas that utilize structural adhesive may be separated after rivet removal by using a panel chisel along the joint/flange. Using heat (not exceeding 425 °F ( 218.333 °C)) to loosen a rivet bonded panel should only be done when all panels in the joint will be replaced or separated and new adhesive applied.
Body Fasteners
Several types of fasteners are used in body construction. However, each of these fasteners have some similar characteristics.
All body fasteners are made of boron.
All body fasteners have a special coating to protect from galvanic corrosion (reaction to dissimilar metals).
FDS
This type of fastener is used in manufacturing only. These are a 1 use fastener and when removed are discarded and replaced with a solid rivet or a Hemlock® blind fastener. Whenever a FDS is removed, the remaining hole is enlarged to 6.5 mm before the replacement rivet is installed.
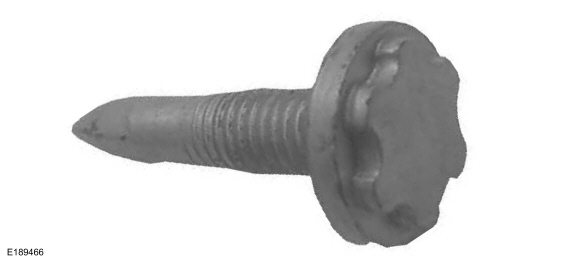
SPR
A SPR is the fastener most used in body construction. As its name implies, it is self-piercing, no pre-drilled hole is required. A SPR pierces the outer and any mid panels without exiting the lower panel. It enters the lower panel and expands to secure all affected sheet metal panels. This type of fastener results in a completely flush exterior surface when joining two or more body panels. A SPR cannot be reused. They are removed and installed with specialized equipment. In addition, if a SPR is to be installed during a repair, it must be placed adjacent to the original SPR . If no adjacent area is available, a solid rivet or Henrob® blind rivet must be used after enlarging the hole to 6.5 mm.
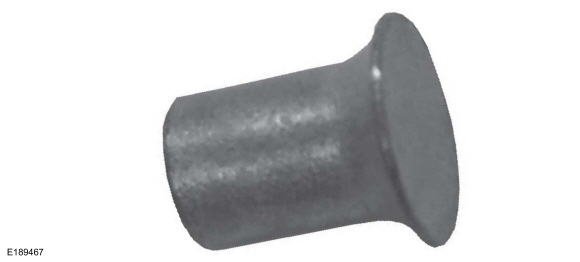
Solid Rivet
Solid rivets are used when a flush surface is required and a SPR cannot be installed due to access. This type of fastener requires a 6.5 mm hole in which the rivet is installed. The rivet is then secured thorough impact with rear support of a backing dolly to expand and tighten the rivet to associated panels.
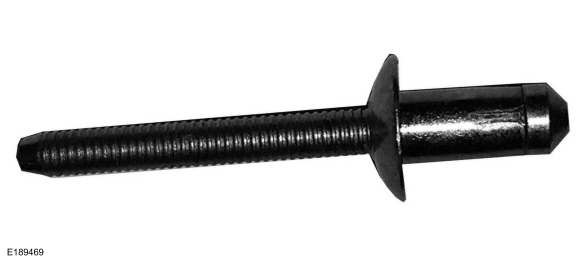
Henrob® Blind Rivet
This type of fastener is the most traditional looking of the types of rivets used in body construction. They may be installed in a 6.5 mm hole through the use of an air powered or hydraulic rivet gun and are used anywhere a flush surface is not required.
 Sealer, Underbody Protection Material and Adhesives. Description and Operation
Adhesives
The
correct adhesive bonding is essential to repairing the vehicle
correctly. Adhesives and mechanical fasteners are used in all areas of
the body structure in place of welding...
 Corrosion Prevention. General Procedures
Special Tool(s) /
General Equipment
Rust Protection Coating Gun
Undercoating Gun
Materials
Name
Specification
ValuGard™ Premium UndercoatingVG101, VG101A
-
ValuGard™ Rust InhibitorVG104, VG104A
-
Motorcraft® Metal Surface Prep WipesZC-31-B
-
Repair
NOTE:
Undercoating
NOTE:
The follo..
Other information:
Lincoln Navigator 2018-2026 Workshop Manual: Front Wheel Speed Sensor. Removal and Installation
Materials Name Specification Motorcraft® Metal Brake Parts CleanerPM-4-A, PM-4-B, APM-4-C - Removal NOTE: Removal steps in this procedure may contain installation details. Remove the brake disc shield. Refer to: Brake Disc Shield (206-03 Front Disc Brake, Removal and Installation). Disconnect the wheel speed..
Lincoln Navigator 2018-2026 Workshop Manual: Air Cleaner Outlet Pipe. Removal and Installation
Removal NOTICE: The turbocharger compressor vanes can be damaged by even the smallest particles. When removing any turbocharger or engine air intake system component, ensure that no debris enters the system. Failure to do so may result in damage to the turbocharger. NOTE: Removal steps in this procedure may contain installation details. Disconnect the IAT s..
Categories
- Manuals Home
- 4th Gen Lincoln Navigator Service Manual (2018 - 2026)
- Rear View Mirrors - System Operation and Component Description. Description and Operation
- Liftgate Trim Panel. Removal and Installation
- Body Control Module (BCM). Removal and Installation
- Transmission Fluid Level Check. General Procedures
- Front Bumper Cover. Removal and Installation
Front Driveshaft. Removal and Installation
Special Tool(s) / General Equipment
Crimping ToolMaterials
Name Specification Motorcraft® Premium Long-Life GreaseXG-1-E1 ESA-M1C75-B
Removal
With the vehicle in NEUTRAL, position the vehicle on a hoist.Refer to: Jacking and Lifting (100-02 Jacking and Lifting, Description and Operation).
Remove the bolts and the transmission shield.