Lincoln Navigator: Body Repairs - General Information / Corrosion Prevention. General Procedures
Lincoln Navigator 2018-2026 Workshop Manual / Body and Paint / Body Repairs - General Information / Corrosion Prevention. General Procedures
Special Tool(s) / General Equipment
| Rust Protection Coating Gun | |
| Undercoating Gun |
Materials
| Name | Specification |
|---|---|
| ValuGard™ Premium Undercoating VG101, VG101A |
- |
| ValuGard™ Rust Inhibitor VG104, VG104A |
- |
| Motorcraft® Metal Surface Prep Wipes ZC-31-B |
- |
Repair
NOTE: Undercoating
NOTE: The following illustrations are not vehicle specific and are intended for reference only.
-
Refer to: Body Repair Health and Safety and General Precautions (100-00 General Information, Description and Operation). WARNING:
Before beginning any service procedure in this
section, REFER to Safety Warnings in section 100-00 General Information.
Failure to follow this instruction may result in serious personal
injury.
-
Wire brush the area and make sure the surfaces are free
of oil, dirt and other foreign material. Carry out the undercoating
process in the following sequence.
-
Thoroughly clean and degrease metal surfaces to remove wax and grease.
Material: Motorcraft® Metal Surface Prep Wipes / ZC-31-B
-
For best results, the vehicle should be at room temperature.
-
Attach the undercoating canister to the dispensing gun.
Use the General Equipment: Undercoating Gun
Material: ValuGard™ Premium Undercoating / VG101, VG101A
-
Undercoating should be applied after the welding and refinishing process. Product cannot be welded through.
-
Air pressure setting for applicator gun is 552 kPa (80.06 psi) – 621 kPa (90.07 psi).
-
Apply light mist coats, applicator sprays in fogging pattern. Material displaces moisture.
-
Clean up any overspray with a mild solvent such as mineral spirits or bug and tar remover.
-
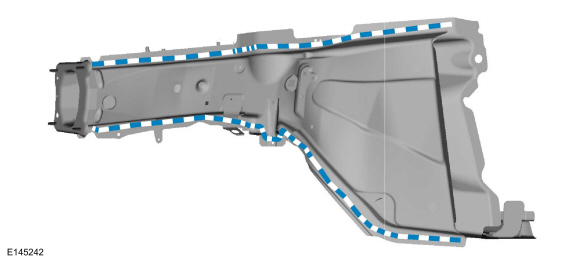
NOTE: Frame rail exterior spot-weld flange view.
Apply Premium Undercoating material to the exterior exposed edges after carrying out the welding and refinishing process.
 |
-
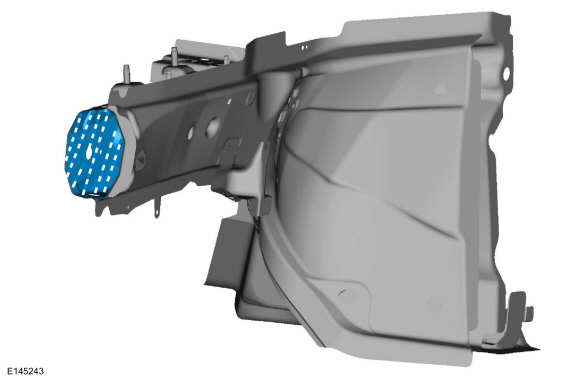
NOTE: Cross section view of typical unibody frame rail shown.
Apply Rust Inhibitor to the inner surfaces of the rail after carrying out welding process. Depress trigger and wait 2-3 seconds and slowly pull the wand to make sure the area is completely fogged.
 |
-
NOTE: Full frame vehicle, front rail-to-mid rail section repair shown.
Apply Premium Undercoating to the exposed surfaces after carrying out the welding process. Make sure to completely cover any bare metal areas.
 |
Repair
NOTE: Rust Inhibitor
-
The surfaces must be free of oil, dirt and other foreign
material. Carry out the process in the following sequence.
-
Thoroughly clean and degrease metal surfaces to remove wax and grease.
Material: Motorcraft® Metal Surface Prep Wipes / ZC-31-B
-
For best results, the vehicle should be at room
temperature. Attach the rust inhibitor canister to the dispensing gun.
Use the General Equipment: Rust Protection Coating Gun
Material: ValuGard™ Rust Inhibitor / VG104, VG104A
-
Rust inhibitor should be applied after the welding and refinishing process. Product cannot be welded through.
-
Air pressure setting for applicator gun is 448 kPa (64.97 psi) - 517 kPa (74.98 psi).
-
Use the appropriate length wand when spraying enclosed
areas. Insert the wand as far as possible into the access hole, pull the
trigger and wait 2-3 seconds and slowly pull the wand out of the access
hole. Apply the material in light mist coats. Material displaces
moisture.
-
Clean up any overspray with a mild solvent such as mineral spirits or bug and tar remover.
-
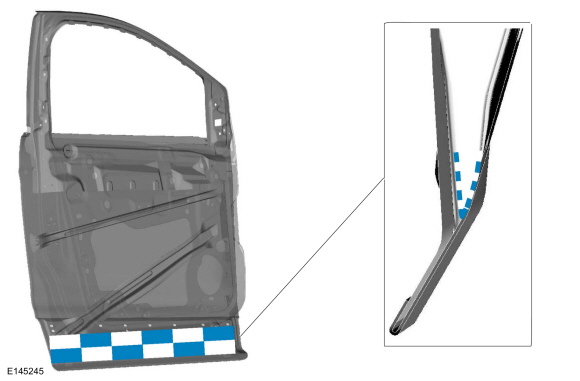
NOTE: Door assembly lower view.
Apply as shown to the inside of the door shell on all the interior metal surfaces using the most suitable applicator wand. Apply material to the exposed edges after carrying out the welding process. Make sure horizontal surfaces are well protected as they are more susceptible to corrosion. Keep door drain holes clear to prevent moisture buildup.
Material: ValuGard™ Rust Inhibitor / VG104, VG104A
 |
-
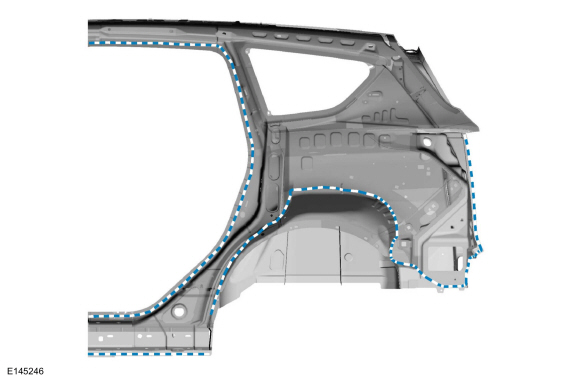
NOTE: Quarter panel inner view.
Apply to the closed channel portion of the spot weld flange areas. Apply to the exposed edges after carrying out the welding process. Make sure horizontal surfaces are well protected as they are more susceptible to corrosion.
Material: ValuGard™ Rust Inhibitor / VG104, VG104A
 |
-
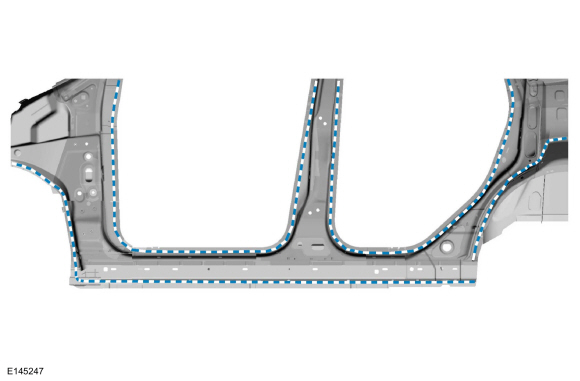
NOTE: Door frame opening view.
Apply to the closed channel portion of the spot weld flange areas. Make sure horizontal surfaces are well protected as they are more susceptible to corrosion.
Material: ValuGard™ Rust Inhibitor / VG104, VG104A
 |
 Special Repair Considerations for Aluminum Repairs. Description and Operation
Repair
of aluminum vehicle components requires some specialized handling and
the proper isolation of the work area from steel repairs and dedicated
hand and power tools that will be used only for aluminum repair...
 Inspection And Repair After Collision Without Supplemental Restraint Deployment. General Procedures
Inspection
If airbags deploy.
Refer to: Inspection and Repair after a Supplemental Restraint System (SRS) Deployment (501-20B)
.
NOTE:
Deployable devices such as airbags, pretensioners and
inflatable belt inflators, may deploy alone or in various combinations
depending on the impact event...
Other information:
Lincoln Navigator 2018-2026 Workshop Manual: Driver Side Footwell Air Discharge Temperature Sensor. Removal and Installation
Removal NOTE: Removal steps in this procedure may contain installation details. Remove the climate control housing. Refer to: Climate Control Housing (412-00 Climate Control System - General Information, Removal and Installation)...
Lincoln Navigator 2018-2026 Workshop Manual: A-Pillar Outer Panel. Removal and Installation
Special Tool(s) / General Equipment 6.5 mm Drill Bit Spherical Cutter Polydrive Bit Socket Self-Piercing Rivet (SPR) Remover/Installer Belt Sander Blind Rivet Gun Hot Air Gun Air Body Saw MIG/MAG Welding Equipment Locking Pliers Materials Name Specification Metal Bonding AdhesiveTA-1, TA-1-B, 3M..
Categories
- Manuals Home
- 4th Gen Lincoln Navigator Service Manual (2018 - 2026)
- Transmission Fluid Level Check. General Procedures
- Identification Codes. Description and Operation
- Vehicle Dynamics Control Module (VDM). Removal and Installation
- Body Control Module (BCM). Removal and Installation
- SYNC Module [APIM]. Removal and Installation
Rear Drive Halfshafts. Diagnosis and Testing
Preliminary Inspection
Visually inspect the CV joints, housing, boots, and clamps for obvious signs of mechanical damage.If an obvious cause for an observed or reported concern is found, correct the cause (if possible) before proceeding to the next step
If the cause is not visually evident, verify the symptom and REFER to Symptom Chart: NVH.
Copyright © 2026 www.linavigator4.com
