Lincoln Navigator: Automatic Transmission - 10-Speed Automatic Transmission – 10R80 / Transmission Fluid Level Check. General Procedures
Check
NOTICE: The vehicle should not be driven if the transmission fluid level is low. Internal failure could result.
NOTE: If the vehicle has been operated for an extended period at high highway speeds, in city traffic, during hot weather or while pulling a trailer, the transmission fluid must cool down to obtain an accurate reading.
NOTE: If a new transmission fluid cooler or new fluid cooler tubes have been installed, drive the vehicle to warm the transmission fluid to 96ºC-101ºC (206ºF-215ºF) in order to purge the air from the transmission fluid cooling system.
-
Connect the diagnostic scan tool and position the vehicle on a hoist.
Refer to: Jacking and Lifting (100-02 Jacking and Lifting, Description and Operation).
-
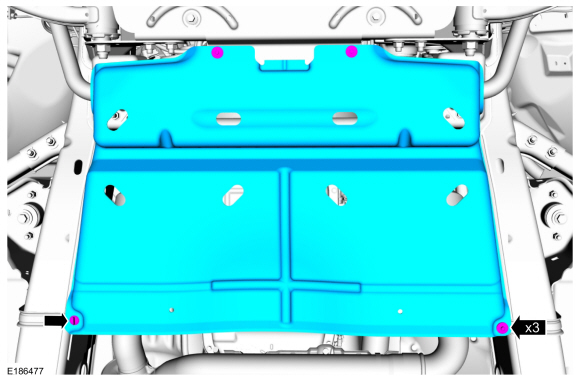
If equipped, release the retainers and remove the splash shield.
 |
-
With the engine running, place the transmission selector
in each gear position, holding approximately 5 seconds in each
position. Place the transmission selector in PARK.
-
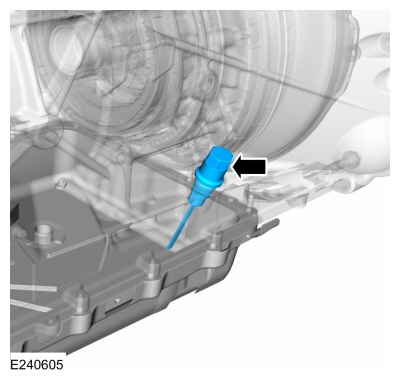
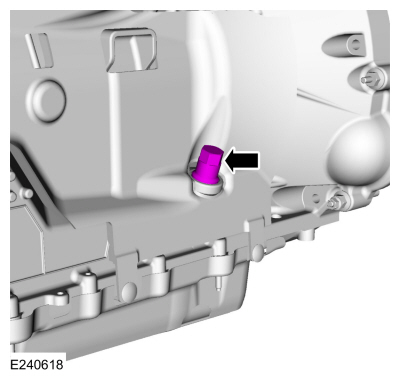
Remove the transmission fluid fill plug and remove the transmission fluid level indicator from the plug.
 |
-
Check the transmission fluid level using the transmission fluid level indicator.
 |
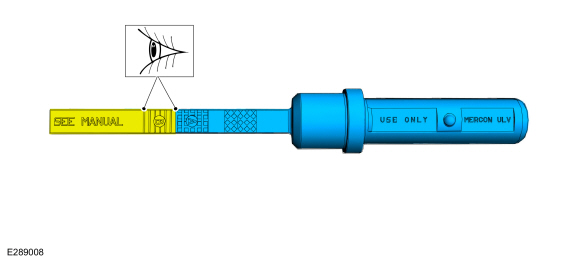
Fluid Level Indicators with Letters
-
NOTE: The transmission fluid level indicator uses A and B to indicate the fluid level. The different areas are for different vehicle models. The correct transmission fluid level is within the B area on the transmission fluid level indicator.
NOTE: Do not overfill the transmission.
Using the scan tool verify the transmission fluid temperature is between 96ºC - 101ºC (206ºF - 215ºF). The transmission fluid level must be within the B area on the transmission fluid level indicator.
 |
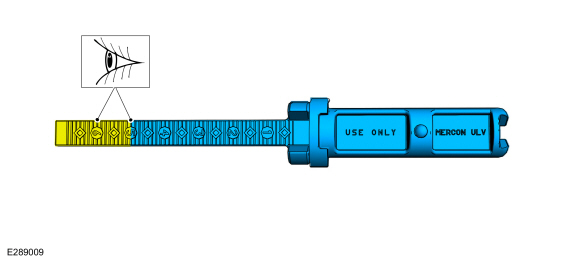
Fluid Level Indicators with Numbers
-
NOTE: The transmission fluid level indicator uses 1 through 6 to indicate the fluid level. The different numbers are for different vehicle models. Use the area between 5 and 6 when checking the transmission fluid level. The correct transmission fluid level is between 5 and 6 on the transmission fluid level indicator.
NOTE: Do not overfill the transmission.
Using the scan tool verify the transmission fluid temperature is between 96ºC - 101ºC (206ºF - 215ºF). The transmission fluid level must be between 5 and 6 on the transmission fluid level indicator.
 |
All vehicles
-
If the transmission fluid is not at the correct
level, follow the steps for adding or removing transmission fluid.
Refer to: Transmission Fluid Drain and Refill (307-01 Automatic Transmission - 10-Speed Automatic Transmission – 10R80, General Procedures).
-
Install the transmission fluid fill plug.
Torque: 35 lb.ft (47 Nm)
 |
-
If equipped, install the splash shield and the retainers.
Torque: 71 lb.in (8 Nm)
|
 Transmission Fluid Exchange. General Procedures
Special Tool(s) /
General Equipment
Fluid Exchanger
Materials
Name
Specification
Motorcraft® MERCON® ULV Automatic Transmission FluidXT-12-QULV
WSS-M2C949-A, MERCON® ULV
Connect
NOTICE:
Use transmission fluid specific for this transmission...
 Transmission Strategy Download. General Procedures
Programming
This procedure should be performed when a new
transmission or main control valve body is installed in the vehicle.
13 - digit solenoid body strategy
12 - digit solenoid body identification
If a new main control was installed, record the
13-digit solenoid body strategy from the replacement solenoid body tag
provided with the main ..
Other information:
Lincoln Navigator 2018-2026 Workshop Manual: Turbocharger Coolant Return Tube RH. Removal and Installation
Materials Name Specification Motorcraft® Metal Brake Parts CleanerPM-4-A, PM-4-B, APM-4-C - Removal NOTICE: The turbocharger compressor vanes can be damaged by even the smallest particles. When removing any turbocharger or engine air intake system component, ensure that no debris enters the system. Failure to do so may result in damage to the tur..
Lincoln Navigator 2018-2026 Workshop Manual: Wheel Studs. Removal and Installation
Special Tool(s) / General Equipment 211-023 (T74P-3044-A1) C-Frame and Screw Removal NOTICE: Suspension fasteners are critical parts that affect the performance of vital components and systems. Failure of these fasteners may result in major service expense. Use the same or equivalent parts if replacement is necessary. Do not use a replacement part of lesser ..
Categories
- Manuals Home
- 4th Gen Lincoln Navigator Service Manual (2018 - 2026)
- Head Up Display (HUD) Module Calibration. General Procedures
- Telematics Control Unit (TCU) Module. Removal and Installation
- Front Bumper Cover. Removal and Installation
- Body Control Module (BCM). Removal and Installation
- Identification Codes. Description and Operation
Axle Tube Bearing. Removal and Installation
Special Tool(s) / General Equipment
 205-123
(T78P-1177-A)
205-123
(T78P-1177-A)
Installer, Axle Shaft Oil Seal
 308-047
(T77F-1102-A)
308-047
(T77F-1102-A)
Remover, Bearing Cup Slide Hammer