Lincoln Navigator: Automatic Transmission - 10-Speed Automatic Transmission – 10R80 / Transmission Fluid Drain and Refill. General Procedures
Special Tool(s) / General Equipment
| Fluid Suction Gun | |
| Universal Fluid Dispenser |
Materials
| Name | Specification |
|---|---|
| Motorcraft® MERCON® ULV Automatic Transmission Fluid XT-12-QULV |
WSS-M2C949-A, MERCON® ULV |
Draining
-
NOTE: It is not necessary to remove the transmission fluid filter to drain the transmission fluid.
Remove the transmission fluid pan to drain the transmission fluid.
Refer to: Transmission Fluid Pan, Gasket and Filter (307-01 Automatic Transmission - 10-Speed Automatic Transmission – 10R80, Removal and Installation).
Refer to: Transmission Fluid Pan, Gasket and Filter (307-01 Automatic Transmission - 10-Speed Automatic Transmission – 10R80, Removal and Installation).
Filling
NOTICE: This procedure is NOT intended for use with the transmission fluid level check.
NOTICE: The vehicle should not be driven if the transmission fluid level is low, internal failure could result.
NOTICE: Using any transmission fluid other than what is specified can result in the transmission not operating normally or premature transmission failure.
NOTE: Check the transmission fluid level if the transmission starts to slip, shifts slowly or shows signs of transmission fluid leaking.
NOTE:
- Adding 4.8L (5 qt) of transmission fluid is an initial fill enabling the engine to be started.
- Filling the transmission to the transmission fluid level indicator area below the crosshatch mark allows the vehicle to be driven.
- Drive the vehicle to allow the transmission fluid temperature to reach 96ºC - 101ºC (206ºF - 215ºF) in order to purge the air from the transmission fluid cooling system.
- Fill the transmission fluid to the fill range on the transmission fluid level indicator at the normal operating temperature 96ºC - 101ºC (206ºF - 215ºF).
-
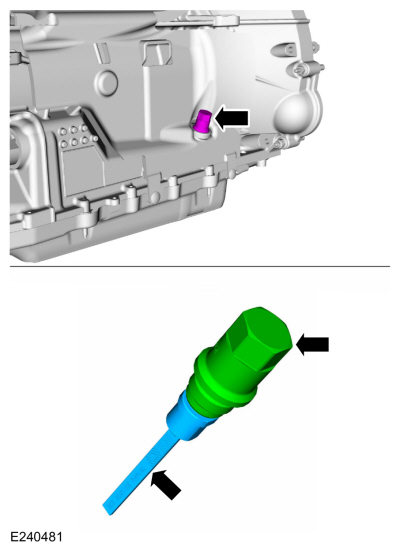
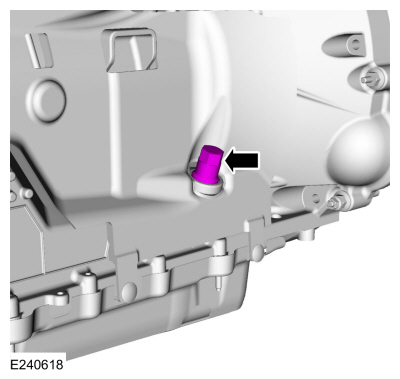
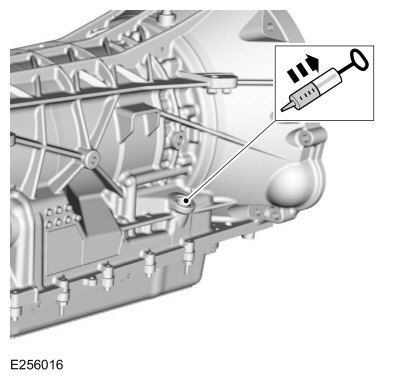
Remove the transmission fluid fill plug and remove the transmission fluid level indicator from the plug.
 |
-
NOTE: Add 4.8L (5 qt) of transmission fluid to the transmission as an initial fill if:
- a new main control has been installed.
- the transmission fluid pan or transmission fluid filter have been removed.
NOTE: Add 5.7L (6 qt) of transmission fluid to the transmission as an initial fill if the transmission has been overhauled.
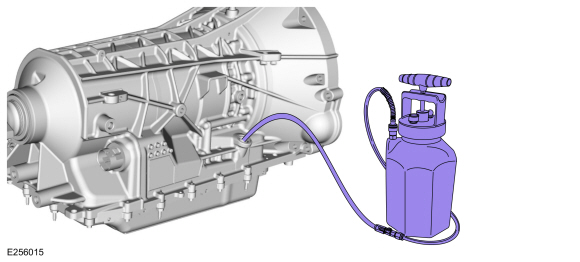
NOTE: The use of a pressurized fluid dispenser with 8-12 qt capacity such as the Mityvac MITMV6412, is recommended for this procedure.
Using the fluid dispenser, add the transmission fluid through the transmission fluid fill hole.
-
Use the General Equipment: Universal Fluid Dispenser
Material: Motorcraft® MERCON® ULV Automatic Transmission Fluid / XT-12-QULV (WSS-M2C949-A, ) (MERCON® ULV)
 |
-
-
Connect the diagnostic scan tool and monitor the transmission fluid temperature.
-
Start the engine.
-
Allow the engine to idle at 600-750 rpm.
-
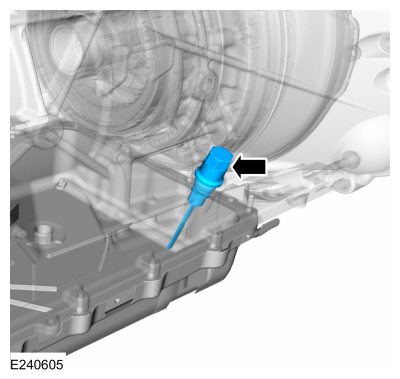
Check the transmission fluid level using the transmission fluid level indicator.
-
Connect the diagnostic scan tool and monitor the transmission fluid temperature.
 |
Fluid Level Indicators with Letters
-
NOTICE: The vehicle can be driven when the transmission is cold provided the transmission fluid level is below the B on the transmission fluid level indicator. Failure to add transmission fluid to this level can result in damage to the transmission.
Add transmission fluid until it reaches just below the B on the transmission fluid indicator.
 |
Fluid Level Indicators with Numbers
-
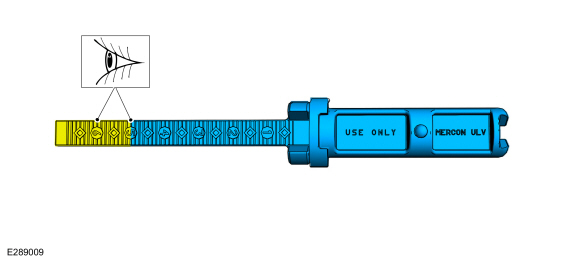
NOTICE: The vehicle can be driven when the transmission is cold provided the transmission fluid level is between the first hatch mark and 6 on the transmission fluid level indiator. Failure to add transmission fluid to this level can result in damage to the transmission.
Add transmission fluid until it reaches between the first hatch mark and 6 on the transmission fluid indicator.
 |
All vehicles
-
Install the transmission fluid fill plug.
Torque: 35 lb.ft (47 Nm)
 |
-
Drive the vehicle. While driving the vehicle, use
the scan tool to verify the transmission fluid has reached a temperature
of 96ºC - 101ºC (206ºF - 215ºF). This circulates the transmission fluid
through the torque converter and the transmission fluid cooling system,
eliminating any trapped air in the transmission fluid cooling system.
Place the vehicle in PARK and allow the engine to idle at 600-750 rpm.
Verify the transmission fluid temperature is between 96ºC - 101ºC (206ºF
- 215ºF) and lift the vehicle on a hoist.
Refer to: Jacking and Lifting (100-02 Jacking and Lifting, Description and Operation).
-
Remove the transmission fluid fill plug and remove the transmission fluid level indicator from the plug.
|
-
Check the transmission fluid level using the transmission fluid level indicator.
|
Fluid Level Indicators with Letters
-
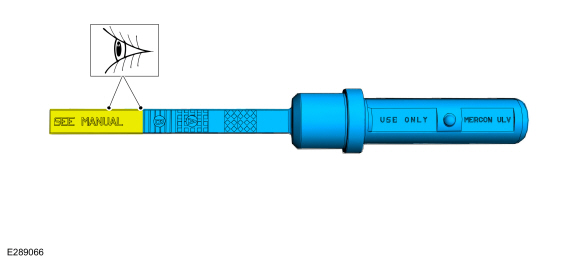
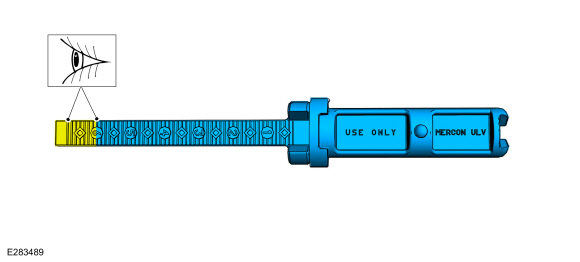
NOTE: The transmission fluid level indicator uses A and B to indicate the fluid level. The different areas are for different vehicle models. The correct transmission fluid level is within the B area on the transmission fluid level indicator.
NOTE: Do not overfill the transmission.
Using the scan tool verify the transmission fluid temperature is between 96ºC - 101ºC (206ºF - 215ºF). The transmission fluid level must be within the B area on the transmission fluid level indicator.
 |
Fluid Level Indicators with Numbers
-
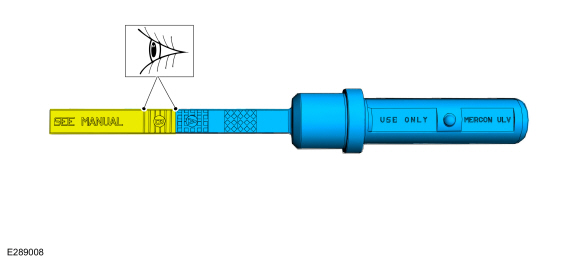
NOTE: The transmission fluid level indicator uses 1 through 6 to indicate the fluid level. The different numbers are for different vehicle models. Use the area between 5 and 6 when checking the transmission fluid level. The correct transmission fluid level is between 5 and 6 on the transmission fluid level indicator.
NOTE: Do not overfill the transmission.
Using the scan tool verify the transmission fluid temperature is between 96ºC - 101ºC (206ºF - 215ºF). The transmission fluid level must be between 5 and 6 on the transmission fluid level indicator.
 |
All vehicles
-
NOTE: The use of a pressurized fluid dispenser with 8-12 qt capacity such as the Mityvac MITMV6412, is recommended for this procedure.
If the transmission fluid level is low, add transmission fluid using the fluid dispenser.
-
Use the General Equipment: Universal Fluid Dispenser
Material: Motorcraft® MERCON® ULV Automatic Transmission Fluid / XT-12-QULV (WSS-M2C949-A, ) (MERCON® ULV)
-
Use the General Equipment: Universal Fluid Dispenser
|
-
If the transmission fluid is overfilled, remove the transmission fluid with a fluid suction gun.
Use the General Equipment: Fluid Suction Gun
 |
-
Install the transmission fluid fill plug.
Torque: 35 lb.ft (47 Nm)
|
-
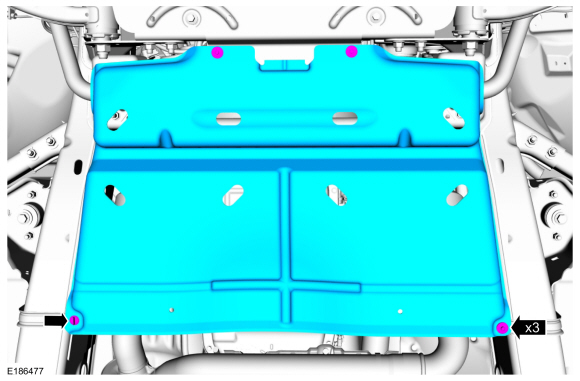
If equipped, install the shield, the retainer and the bolts.
Torque: 71 lb.in (8 Nm)
 |
 Adaptive Learning Drive Cycle. General Procedures
Programming
NOTE:
Perform the adaptive learning drive cycle on a level road surface.
Using the scan tool, clear the DTCs (Diagnostic Trouble Codes) and Transmission Adaptive Tables...
 Transmission Fluid Exchange. General Procedures
Special Tool(s) /
General Equipment
Fluid Exchanger
Materials
Name
Specification
Motorcraft® MERCON® ULV Automatic Transmission FluidXT-12-QULV
WSS-M2C949-A, MERCON® ULV
Connect
NOTICE:
Use transmission fluid specific for this transmission...
Other information:
Lincoln Navigator 2018-2026 Workshop Manual: Remote Keyless Entry (RKE) Exterior Sounder. Removal and Installation
Removal On the left side. Remove the fender splash shield. Refer to: Fender Splash Shield (501-02 Front End Body Panels, Removal and Installation). Remove the RKE exterior sounder. Disconnect the RKE exterior sounder electrical connector...
Lincoln Navigator 2018-2026 Workshop Manual: Floor Panel Section. Removal and Installation
Special Tool(s) / General Equipment 6.5 mm Drill Bit Scraper for Straight Edges Spherical Cutter Self-Piercing Rivet (SPR) Remover/Installer Belt Sander Blind Rivet Gun Hot Air Gun Air Body Saw Locking Pliers Materials Name Specification Metal Bonding AdhesiveTA-1, TA-1-B, 3M™ 08115, LORD Fusor® 108B..
Categories
- Manuals Home
- 4th Gen Lincoln Navigator Service Manual (2018 - 2026)
- Power Running Board (PRB). Diagnosis and Testing
- Neutral Flat Tow Activation and Deactivation. General Procedures
- Remote Function Actuator (RFA) Module. Removal and Installation
- Windshield Washer Pump. Removal and Installation
- Transmission Fluid Drain and Refill. General Procedures
Rear Stabilizer Bar Link. Removal and Installation
Removal
NOTE: Removal steps in this procedure may contain installation details.
With the vehicle in NEUTRAL, position it on a hoist.Refer to: Jacking and Lifting (100-02 Jacking and Lifting, Description and Operation).
NOTE: Use the hex-holding feature to prevent the stud from turning while removing the nut.
Remove and discard the 2 rear stabilizer bar link nuts and remove the rear stabilizer bar link.Torque: 46 lb.ft (63 Nm)
