Lincoln Navigator: Parking Aid - Vehicles With: Parking Aid Camera / Rear Parking Aid Camera. Removal and Installation
Removal
NOTE: Removal steps in this procedure may contain installation details.
-
Remove the reversing lamp.
Refer to: Reversing Lamp (417-01 Exterior Lighting, Removal and Installation).
-
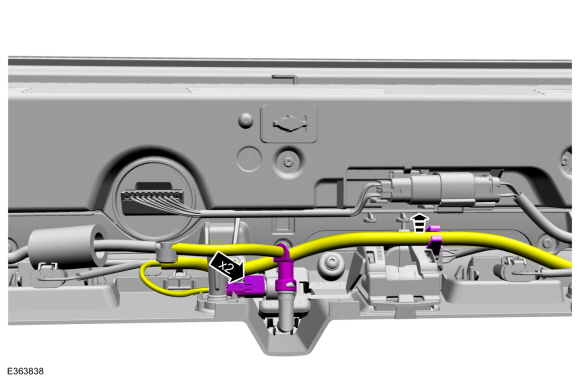
Disconnect the electrical connector , the washer hose and position the wiring harness.
 |
-
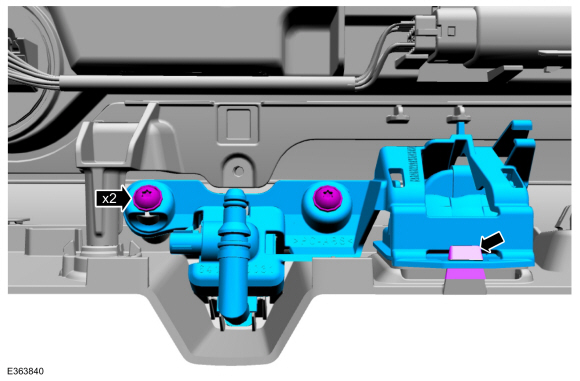
Remove the screws, release the tab and remove the camera bracket assembly.
 |
-
Remove the rear park aid camera and washer nozzle as an assembly.
-
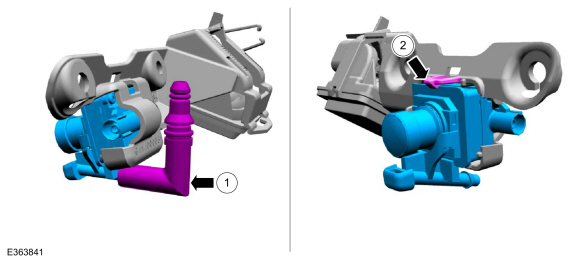
Remove the coupler.
-
Release the tab.
-
Remove the coupler.
 |
-
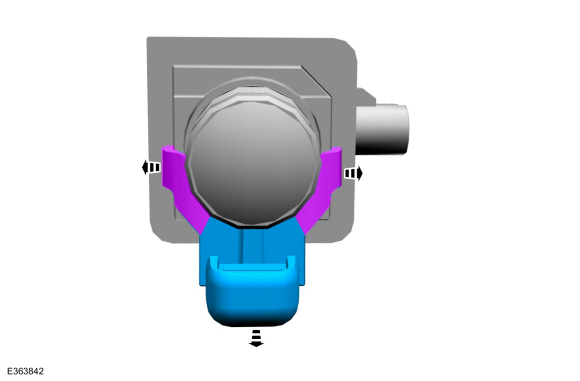
Release the arms and remove the rear parking aid camera washer nozzle.
 |
Installation
-
To install, reverse the removal procedure.
-
Align the camera.
Refer to: 360 Degree View Camera Alignment (413-13B Parking Aid - Vehicles With: Parking Aid Camera, General Procedures).
 Front Parking Aid Camera. Removal and Installation
Removal
Remove the front bumper cover.
Refer to: Front Bumper Cover (501-19 Bumpers, Removal and Installation).
Remove the screws and the bracket...
 Side Parking Aid Camera. Removal and Installation
Special Tool(s) /
General Equipment
Interior Trim Remover
Removal
Flush mounted camera
Release the tab and lower the side parking aid camera housing...
Other information:
Lincoln Navigator 2018-2026 Workshop Manual: Engine Ignition - System Operation and Component Description. Description and Operation
System Operation Cold Start Emission Reduction Monitor The cold start emission reduction monitor is an on board strategy designed for vehicles that meet the low emissions vehicle-II (LEV-II) emissions standards. The monitor works by detecting the lack of catalyst warm up resulting from a failure to apply sufficient cold start emission reduction during a cold start...
Lincoln Navigator 2018-2026 Workshop Manual: Engine Emission Control - Component Location. Description and Operation
Item Description 1 Differential pressure feedback EGR sensor. 2 EGR outlet tube. 3 EGR temperature sensor. 4 EGR back pressure sensor. 5 PCV valve...
Categories
- Manuals Home
- 4th Gen Lincoln Navigator Service Manual (2018 - 2026)
- Telematics Control Unit (TCU) Module. Removal and Installation
- Body and Paint
- Power Running Board (PRB). Diagnosis and Testing
- Vehicle Dynamics Control Module (VDM). Removal and Installation
- Windshield Washer Pump. Removal and Installation
Wheel to Hub Runout Minimization. General Procedures
Check
NOTE: Wheel-to-hub optimization is important. Clearance between the wheel and hub can be used to offset or neutralize the Road Force® or run-out of the wheel and tire assembly. For every 0.001 inch of wheel-to-hub clearance, the Road Force® can be affected between 1 and 3 pounds depending on the tire stiffness.
NOTE: The example below illustrates how the clearance between the wheel and the hub can be used to offset the high spot of radial run-out or Road Force®. Following the procedure will make sure of the best optimization.
Position the wheel and tire assembly on the vehicle so that the high spot location of radial run-out or Road Force® is at the 6 o'clock position and