Lincoln Navigator: Climate Control System - General Information / Blower Motor Control Module. Removal and Installation
Removal
NOTE: Removal steps in this procedure may contain installation details.
-
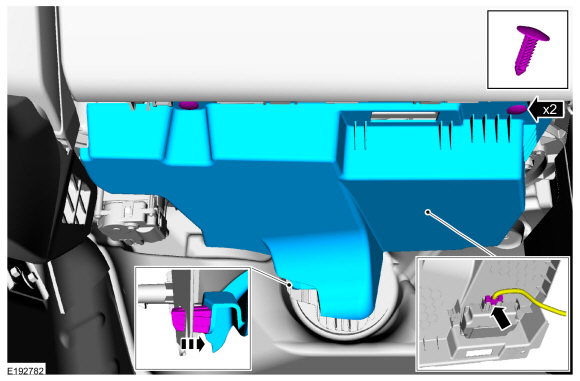
Remove the push pins and the RH insulation panel.
-
If equipped, disconnect the electrical connector.
-
If equipped, disconnect the electrical connector.
 |
-
NOTE: Vehicles equipped with TCCM .
Remove the BCM cover.
 |
-
NOTE: Vehicles equipped with TCCM .
NOTE: The TCCM has slotted mounting holes. It is not necessary to remove the LH TCCM nut when positioning aside the TCCM .
Loosen the LH nut and remove the RH (right-hand) nut.
 |
-
Disconnect the electrical connector, remove the retainers and the blower motor control module.
 |
Installation
-
To install, reverse the removal procedure.
 Ambient Air Temperature Sensor. Removal and Installation
Removal
NOTE:
Removal steps in this procedure may contain installation details.
Remove the front bumper cover.
Refer to: Front Bumper Cover (501-19 Bumpers, Removal and Installation)...
 Cabin Air Filter. Removal and Installation
Removal
NOTE:
Removal steps in this procedure may contain installation details.
Remove the glove compartment.
Refer to: Glove Compartment (501-12 Instrument Panel and Console, Removal and Installation)...
Other information:
Lincoln Navigator 2018-2026 Workshop Manual: Rear Blower Motor. Removal and Installation
Removal NOTE: Removal steps in this procedure may contain installation details. Remove the RH loadspace trim panel. Refer to: Loadspace Trim Panel (501-05 Interior Trim and Ornamentation, Removal and Installation). Disconnect the blower motor electrical connector...
Lincoln Navigator 2018-2026 Workshop Manual: Hood Alignment. General Procedures
Inspection Inspect the hood-to-body dimensions. Refer to: Body and Frame (501-26 Body Repairs - Vehicle Specific Information and Tolerance Checks, Description and Operation). All alignments Remove the hood latch...
Categories
- Manuals Home
- 4th Gen Lincoln Navigator Service Manual (2018 - 2026)
- Vehicle Dynamics Control Module (VDM). Removal and Installation
- Body Control Module (BCM). Removal and Installation
- Transmission Fluid Drain and Refill. General Procedures
- All Terrain Control Module (ATCM). Removal and Installation
- Front Seat. Removal and Installation
Wheel to Hub Runout Minimization. General Procedures
Check
NOTE: Wheel-to-hub optimization is important. Clearance between the wheel and hub can be used to offset or neutralize the Road Force® or run-out of the wheel and tire assembly. For every 0.001 inch of wheel-to-hub clearance, the Road Force® can be affected between 1 and 3 pounds depending on the tire stiffness.
NOTE: The example below illustrates how the clearance between the wheel and the hub can be used to offset the high spot of radial run-out or Road Force®. Following the procedure will make sure of the best optimization.
Position the wheel and tire assembly on the vehicle so that the high spot location of radial run-out or Road Force® is at the 6 o'clock position and