Lincoln Navigator: Front Seats / Front Seat. Removal and Installation
Removal
 WARNING:
The following procedure describes critical repair steps
required for correct seat component installation. Follow all notes and
steps carefully. Do not place any objects between the seat components
and the body of the vehicle, nor any objects within a joint internal to
the seat structure. Failure to follow step instructions may result in
incorrect operation of the seat components and increases the risk of
serious personal injury.
WARNING:
The following procedure describes critical repair steps
required for correct seat component installation. Follow all notes and
steps carefully. Do not place any objects between the seat components
and the body of the vehicle, nor any objects within a joint internal to
the seat structure. Failure to follow step instructions may result in
incorrect operation of the seat components and increases the risk of
serious personal injury.
NOTE: Removal steps in this procedure may contain installation details.
NOTE: Driver seat shown, passenger seat similar.
-
Move the seat to the full upward position and forward or rearward to access all the front seat bolts.
-
If a power seat cannot be positioned horizontally to
access the front seat bolts, diagnose the inoperative horizontal front
seat track motor.
Refer to: Front Seats (501-10A Front Seats, Diagnosis and Testing).
-
If a power seat cannot be positioned horizontally to
access the front seat bolts, diagnose the inoperative horizontal front
seat track motor.
 |
-
Depower the SRS .
Refer to: Supplemental Restraint System (SRS) Depowering (501-20B Supplemental Restraint System, General Procedures).
-
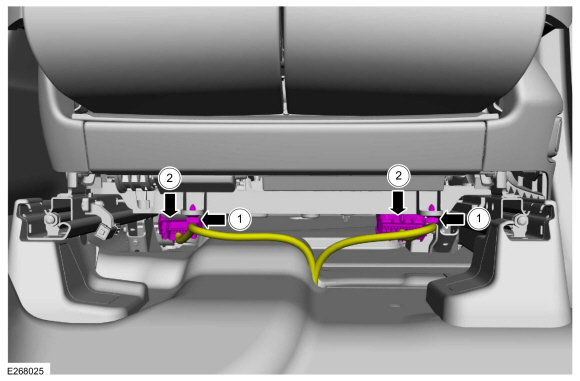
Disconnect the front seat harness electrical connector(s).
-
Detach the wiring harness pin-type retainer(s).
-
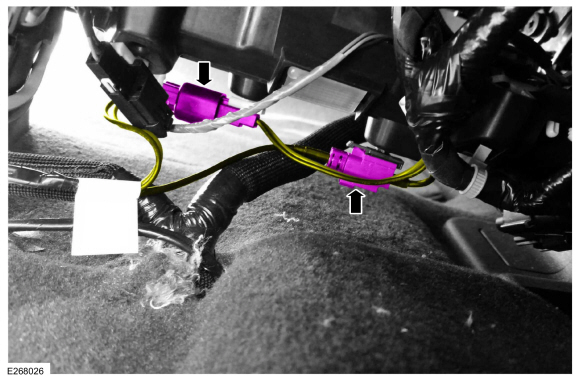
Disconnect the electrical connector(s).
-
Detach the wiring harness pin-type retainer(s).
 |
-
If equipped with video display.
Disconnect the video display electrical connectors
 |
-
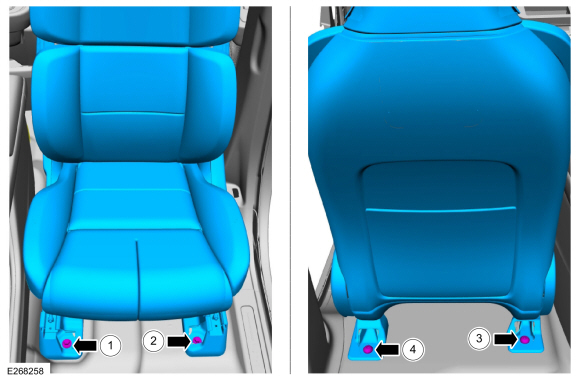
Remove the front seat bolt covers.
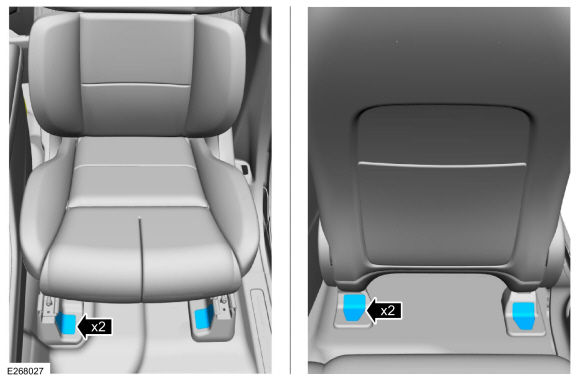 |
-
Remove the bolts and the front seat.
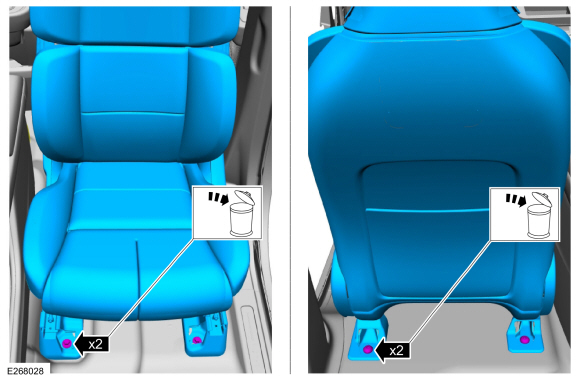 |
Installation
-
To install, reverse the removal procedure.
-
Install the front seat bolts in the following sequence.
-
Install the front inboard bolt.
Torque: 35 lb.ft (47 Nm)
-
Install the front outboard bolt.
Torque: 35 lb.ft (47 Nm)
-
Install the rear inboard bolt.
Torque: 35 lb.ft (47 Nm)
-
Install the rear outboard bolt.
Torque: 35 lb.ft (47 Nm)
-
Install the front inboard bolt.
 |
-
Repower the SRS .
Refer to: Supplemental Restraint System (SRS) Repowering (501-20B Supplemental Restraint System, General Procedures).
 Front Multi-Contour Control Pump - Vehicles With: Multi-Contour Seats. Removal and Installation
Removal
NOTE:
Removal steps in this procedure may contain installation details.
NOTE:
Driver seat shown, passenger seat similar.
Remove the front seat...
 Front Seat Backrest. Removal and Installation
Removal
WARNING:
The following procedure describes critical repair steps
required for correct seat component installation. Follow all notes and
steps carefully...
Other information:
Lincoln Navigator 2018-2026 Workshop Manual: Cruise Control Module (CCM). Removal and Installation
Special Tool(s) / General Equipment Interior Trim Remover Removal All vehicles NOTE: Removal steps in this procedure may contain installation details. NOTE: If installing a new CCM , it is necessary to upload the module configuration information to the scan tool prior to removing the module...
Lincoln Navigator 2018-2026 Workshop Manual: Engine Mount LH. Removal and Installation
Special Tool(s) / General Equipment 303-1246Engine Spreader BarTKIT-2006UF-FLMTKIT-2006UF-ROW 303-1654Lift Eyes 303-F070Support Bar, EngineTKIT-1999A-F/LTTKIT-1999A-FM/FLM Vehicle/Axle Stands Removal NOTICE: Use care when positioning the front axle housing or the vacuum lines to the axle solenoid may become disconnected or damaged...
Categories
- Manuals Home
- 4th Gen Lincoln Navigator Service Manual (2018 - 2026)
- Liftgate Trim Panel. Removal and Installation
- Rear Bumper. Removal and Installation
- Body Control Module (BCM). Removal and Installation
- All Terrain Control Module (ATCM). Removal and Installation
- Neutral Flat Tow Activation and Deactivation. General Procedures
Axle Tube Bearing. Removal and Installation
Special Tool(s) / General Equipment
 205-123
(T78P-1177-A)
205-123
(T78P-1177-A)
Installer, Axle Shaft Oil Seal
 308-047
(T77F-1102-A)
308-047
(T77F-1102-A)
Remover, Bearing Cup Slide Hammer