Lincoln Navigator: Cruise Control - Vehicles With: Adaptive Cruise Control / Cruise Control Module (CCM). Removal and Installation
Special Tool(s) / General Equipment
| Interior Trim Remover |
Removal
All vehicles
-
NOTE: Removal steps in this procedure may contain installation details.
NOTE: If installing a new CCM , it is necessary to upload the module configuration information to the scan tool prior to removing the module. This information must be downloaded into the new CCM after installation.
Using a diagnostic scan tool, begin the PMI process for the CCM following the on-screen instructions.
Cruise Control Module (CCM)
-
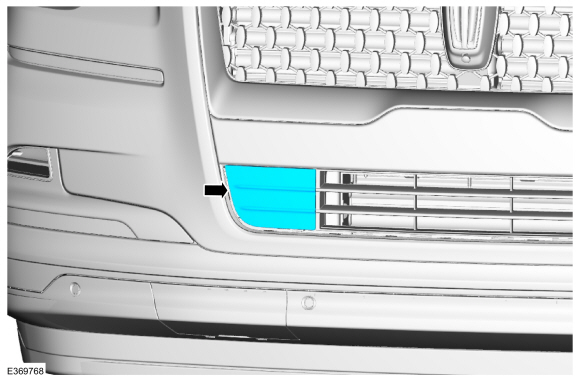
Using a non marring tool, remove the front bumper trim panel..
Use the General Equipment: Interior Trim Remover
 |
-
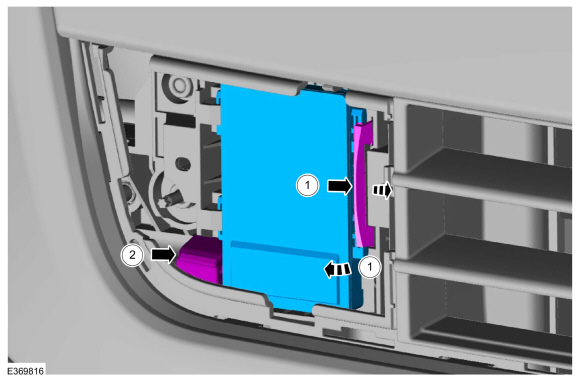
Remove the CCM .
-
Release the clip and remove the CCM from the bracket.
-
Disconnect the electrical connector and remove the CCM .
-
Release the clip and remove the CCM from the bracket.
 |
Cruise Control Module (CCM) bracket
-
Using a non marring tool, remove the front bumper trim panel..
Use the General Equipment: Interior Trim Remover
|
-
Remove the CCM .
-
Release the clip and remove the CCM from the bracket.
-
Disconnect the electrical connector and remove the CCM .
-
Release the clip and remove the CCM from the bracket.
|
-
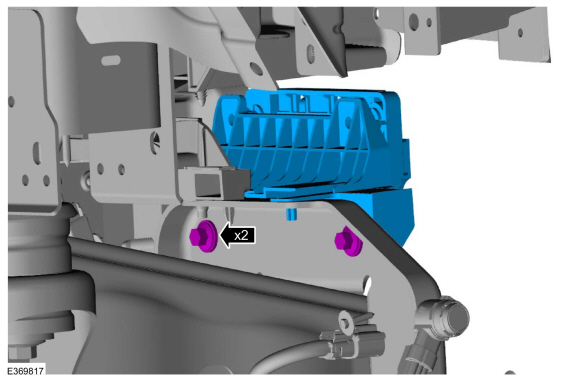
Remove the front bumper cover.
Refer to: Front Bumper Cover (501-19 Bumpers, Removal and Installation).
-
NOTE: Typical application shown.
Remove the CCM bracket bolts and remove the CCM bracket assembly.
Torque: 71 lb.in (8 Nm)
 |
Installation
-
To install, reverse the removal procedure.
-
NOTE: This step is only necessary when installing a new component.
Using a diagnostic scan tool, complete the PMI process for the CCM following the on-screen instructions.
-
Align the CCM .
Refer to: Cruise Control Radar Alignment (419-03A Cruise Control - Vehicles With: Adaptive Cruise Control, General Procedures).
 Cruise Control Radar Alignment. General Procedures
Special Tool(s) /
General Equipment
Interior Trim Remover
Adjustment
Vertical Alignment
NOTE:
In order to align the CCM
, the front bumper trim panel must be removed to access the sensor and
the vehicle must be in a wheel alignment bay station so that the vehicle
is level...

Other information:
Lincoln Navigator 2018-2026 Workshop Manual: Front Crossmember. Removal and Installation
Removal WARNING: Frame rail crush zones absorb crash energy during a collision and must be replaced if damaged. Prior to replacement of frame rail crush zones, straighten damaged frame rails to correct frame dimensions. Failure to follow these instructions may adversely affect frame rail crush zone performance and may result in serious personal injury to vehicle occupants..
Lincoln Navigator 2018-2026 Workshop Manual: Third Row Seatbelt Retractor Bracket - Long Wheelbase. Removal and Installation
Removal NOTE: Removal steps in this procedure may contain installation details. NOTE: LH shown, RH similar. Lower the headliner. Refer to: Headliner - Lowering (501-05 Interior Trim and Ornamentation, Removal and Installation). Remove the third row seatbelt retractor bracket. Position the side curtain airbag aside. ..
Categories
- Manuals Home
- 4th Gen Lincoln Navigator Service Manual (2018 - 2026)
- Front Bumper Cover. Removal and Installation
- Remote Function Actuator (RFA) Module. Removal and Installation
- Body and Paint
- Transmission Fluid Level Check. General Procedures
- SYNC Module [APIM]. Removal and Installation
Front Stabilizer Bar Link. Removal and Installation
Removal
NOTICE: Suspension fasteners are critical parts that affect the performance of vital components and systems. Failure of these fasteners may result in major service expense. Use the same or equivalent parts if replacement is necessary. Do not use a replacement part of lesser quality or substitute design. Tighten fasteners as specified.
NOTE: Removal steps in this procedure may contain installation details.
With the vehicle in NEUTRAL, position it on a hoist.Refer to: Jacking and Lifting (100-02 Jacking and Lifting, Description and Operation).
NOTICE: Do not use power tools to remove or install the stabilizer bar