Lincoln Navigator: Body Closures / Rear Gate Trunk Module (RGTM). Removal and Installation
Removal
NOTE: Removal steps in this procedure may contain installation details.
-
NOTE: This step is only necessary when installing a new component.
The PMI process must begin with the current RGTM installed. If the current RGTM does not respond to the diagnostic scan tool, the tool may prompt for As-Built Data as part of the repair. Using a diagnostic scan tool, begin the PMI process for the RGTM following the on-screen instructions.
-
Remove the LH loadspace trim panel.
Refer to: Loadspace Trim Panel (501-05 Interior Trim and Ornamentation, Removal and Installation).
-
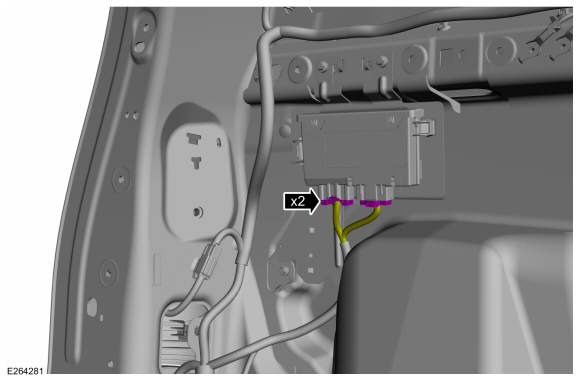
Disconnect the electrical connectors.
 |
-
-
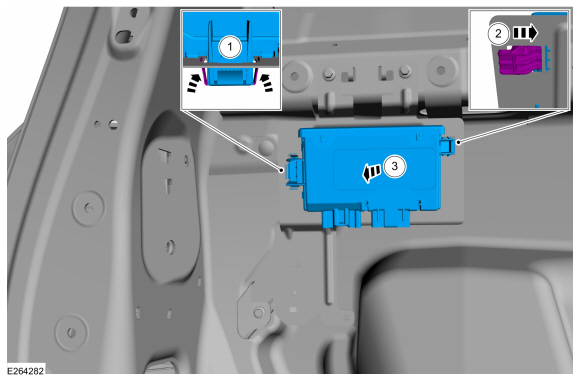
Release the retaining clips.
-
Slide the RGTM retaining tab from the bracket.
-
Remove the RGTM .
-
Release the retaining clips.
 |
Installation
-
To install, reverse the removal procedure.
-
Using a diagnostic scan tool, complete the PMI process for the RGTM following the on-screen instructions.
 Rear Door Weatherstrip. Removal and Installation
Special Tool(s) /
General Equipment
Interior Trim Remover
Removal
NOTE:
Removal steps in this procedure may contain installation details...

Other information:
Lincoln Navigator 2018-2026 Workshop Manual: Steering Gear. Removal and Installation
Special Tool(s) / General Equipment Tie Rod End Remover Removal NOTICE: Disconnect the battery ground cable anytime the steering linkage is being serviced or damage to the steering gear may occur resulting in steering gear replacement. If installing a new steering gear, connect the scan tool and upload the module configuration information from th..
Lincoln Navigator 2018-2026 Workshop Manual: Specifications
LUBRICANTS, FLUIDS AND CAPACITIES NOTE: Per the warranty and policy manual the Ford Engineering-approved refrigerant (see table for service part number) must be used for air conditioning repairs ITEM CAPACITIES US, Canada, PAG oil used with R1234YF: Material: Motorcraft® R-1234yf Refrigerant PAG Oil / YN-35 ..
Categories
- Manuals Home
- 4th Gen Lincoln Navigator Service Manual (2018 - 2026)
- Body Control Module (BCM). Removal and Installation
- Neutral Flat Tow Activation and Deactivation. General Procedures
- SYNC Module [APIM]. Removal and Installation
- Body and Paint
- Remote Function Actuator (RFA) Module. Removal and Installation
Differential Case Runout Check. General Procedures
Special Tool(s) / General Equipment
 205-1016
Installer, Differential Bearing
TKIT-2014D-ROW2
TKIT-2014D-FL_ROW
 205-153
(T80T-4000-W)
205-153
(T80T-4000-W)
Handle
 205-D061
(D83T-4205-C2)
205-D061
(D83T-4205-C2)
Step Plate Dial Indicator Three Leg Puller Punch