Lincoln Navigator: Handles, Locks, Latches and Entry Systems / Hood Latch. Removal and Installation
Removal
NOTE: Removal steps in this procedure may contain installation details.
-
-
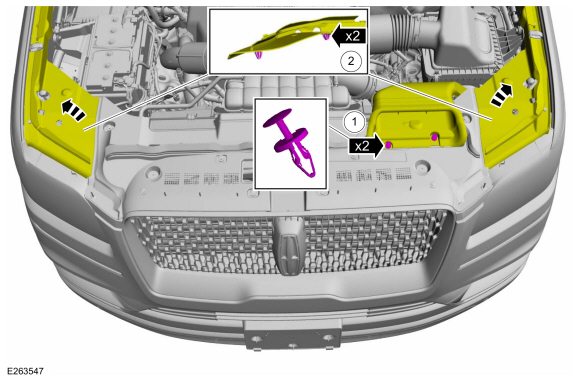
Remove the pin-type retainers and position the air cleaner panel aside
-
Release the clips and position the RH and LH cowl filler panels aside.
-
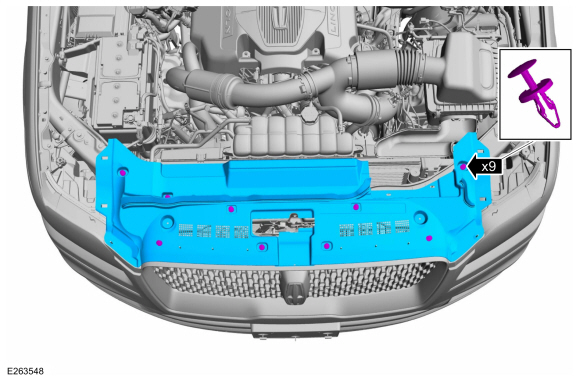
Remove the pin-type retainers and position the air cleaner panel aside
 |
-
Remove the pin-type retainers and the radiator sight shield.
 |
-
NOTE: If reinstalling the original hood latch, mark around the bolts to aid in alignment during installation.
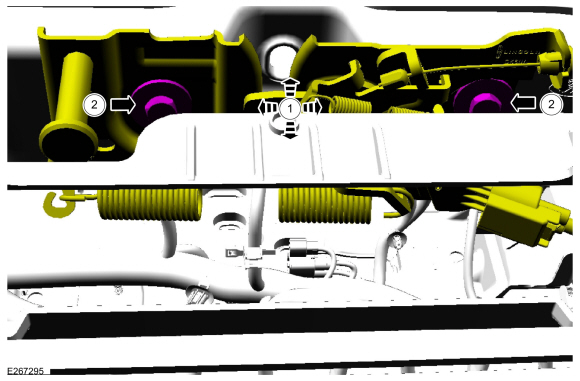
Remove the hood latch.
-
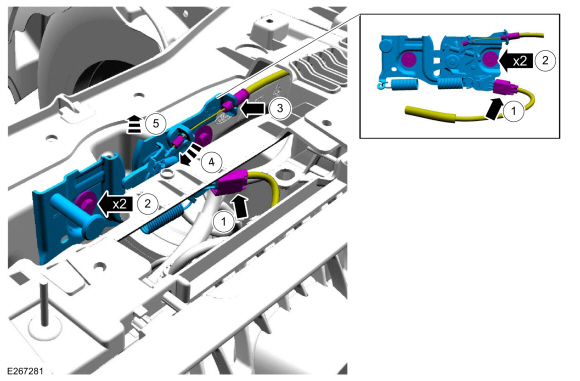
Disconnect the hood ajar switch.
-
Remove the bolts from the hood latch.
Torque: 80 lb.in (9 Nm)
-
Release the hood latch release cable from the mounting bracket.
-
Detach the hood latch release cable eyelet from the hood latch.
-
Remove the hood latch.
-
Disconnect the hood ajar switch.
 |
Installation
-
To install, reverse the removal procedure.
-
NOTE: If reinstalling the original hood latch, use the marks made during removal to aid in alignment.
Install the bolts and align the hood latch.
-
Align the hood latch.
-
Tighten the hood latch bolts.
Torque: 80 lb.in (9 Nm)
-
Align the hood latch.
 |
 Front Door Lock Control Switch. Removal and Installation
Removal
NOTE:
LH side shown, RH side similar.
Remove the front door trim panel.
Refer to: Front Door Trim Panel (501-05 Interior Trim and Ornamentation, Removal and Installation)...
 Hood Latch Release Cable. Removal and Installation
Removal
Remove the hood latch release handle.
Refer to: Hood Latch Release Handle (501-14 Handles, Locks, Latches and Entry Systems, Removal and Installation)...
Other information:
Lincoln Navigator 2018-2026 Workshop Manual: Power Running Board (PRB) Hinge. Removal and Installation
Removal NOTE: Removal steps in this procedure may contain installation details. With the vehicle in NEUTRAL, position it on a hoist. Refer to: Jacking and Lifting (100-02 Jacking and Lifting, Description and Operation). NOTE: LH side shown, RH side similar...
Lincoln Navigator 2018-2026 Workshop Manual: Parking, Rear and License Plate Lamps. Diagnosis and Testing
Diagnostic Trouble Code (DTC) Chart Diagnostics in this manual assume a certain skill level and knowledge of Ford-specific diagnostic practices. REFER to: Diagnostic Methods (100-00 General Information, Description and Operation). Module DTC Description Action BCM B10F3:11 Left front position light: Circuit Short To Ground GO to Pinpoint Test D BCM B10F3:..
Categories
- Manuals Home
- 4th Gen Lincoln Navigator Service Manual (2018 - 2026)
- Remote Function Actuator (RFA) Module. Removal and Installation
- Brake Service Mode Activation and Deactivation. General Procedures
- Body Control Module (BCM). Removal and Installation
- Vehicle Dynamics Control Module (VDM). Removal and Installation
- Front Seat. Removal and Installation
Wheel to Hub Runout Minimization. General Procedures
Check
NOTE: Wheel-to-hub optimization is important. Clearance between the wheel and hub can be used to offset or neutralize the Road Force® or run-out of the wheel and tire assembly. For every 0.001 inch of wheel-to-hub clearance, the Road Force® can be affected between 1 and 3 pounds depending on the tire stiffness.
NOTE: The example below illustrates how the clearance between the wheel and the hub can be used to offset the high spot of radial run-out or Road Force®. Following the procedure will make sure of the best optimization.
Position the wheel and tire assembly on the vehicle so that the high spot location of radial run-out or Road Force® is at the 6 o'clock position and