Lincoln Navigator: Handles, Locks, Latches and Entry Systems / Approach Detection Antenna. Removal and Installation
Special Tool(s) / General Equipment
| Rivet Gun |
Removal
NOTE: Removal steps in this procedure may contain installation details.
-
Remove the front bumper cover.
Refer to: Front Bumper Cover (501-19 Bumpers, Removal and Installation).
-
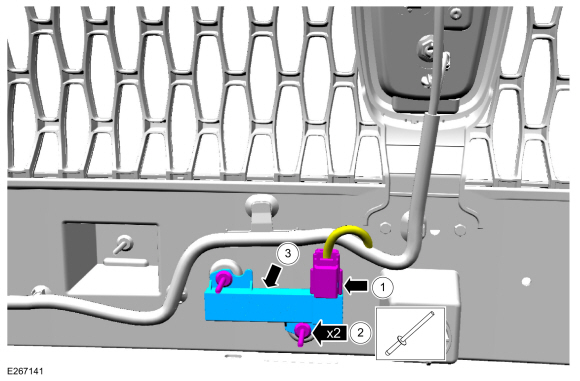
Remove the approach detection antenna.
-
Disconnect the approach detection antenna electrical connector.
-
Remove the rivets from the approach detection antenna.
Use the General Equipment: Rivet Gun
-
Remove the approach detection antenna.
-
Disconnect the approach detection antenna electrical connector.
 |
Installation
-
To install, reverse the removal procedure.
 Staged Unlock Programming. General Procedures
Programming
WARNING:
Before beginning any service procedure in this
manual, refer to health and safety warnings in section 100-00 General
Information...
 Door Lock Cylinder. Removal and Installation
Removal
NOTE:
Removal steps in this procedure may contain installation details.
NOTE:
Repair individual door lock cylinders by discarding the
inoperative door lock cylinder and building a new door lock cylinder
using the appropriate lock repair service kit...
Other information:
Lincoln Navigator 2018-2026 Workshop Manual: Condenser. Removal and Installation
Removal NOTICE: During the removal of components, cap, tape or otherwise appropriately protect all openings to prevent the ingress of dirt or other contamination. Remove protective materials prior to installation. NOTE: Removal steps in this procedure may contain installation details...
Lincoln Navigator 2018-2026 Workshop Manual: Refrigerant Oil Adding. General Procedures
Filling Refer to the Refrigerant Oil Adding (when new components are installed) chart below for refrigerant oil adding amounts and methods of installation. For the correct Refrigerant Management Center special tool, Refer to: Climate Control Tools and Equipment (412-00 Climate Control System - General Information, General Procedures)...
Categories
- Manuals Home
- 4th Gen Lincoln Navigator Service Manual (2018 - 2026)
- Front Bumper Cover. Removal and Installation
- Rear Bumper. Removal and Installation
- Brake Service Mode Activation and Deactivation. General Procedures
- Transmission Fluid Level Check. General Procedures
- Body Control Module (BCM). Removal and Installation
Wheel to Hub Runout Minimization. General Procedures
Check
NOTE: Wheel-to-hub optimization is important. Clearance between the wheel and hub can be used to offset or neutralize the Road Force® or run-out of the wheel and tire assembly. For every 0.001 inch of wheel-to-hub clearance, the Road Force® can be affected between 1 and 3 pounds depending on the tire stiffness.
NOTE: The example below illustrates how the clearance between the wheel and the hub can be used to offset the high spot of radial run-out or Road Force®. Following the procedure will make sure of the best optimization.
Position the wheel and tire assembly on the vehicle so that the high spot location of radial run-out or Road Force® is at the 6 o'clock position and