Lincoln Navigator: Engine Cooling - 3.5L EcoBoost (272kW/370PS) / Thermostat. Removal and Installation
Materials
| Name | Specification |
|---|---|
| Motorcraft® Yellow Concentrated Antifreeze/Coolant VC-13-G |
WSS-M97B57-A1 |
| Motorcraft® Orange Concentrated Antifreeze/Coolant VC-3-B |
WSS-M97B44-D |
Removal
NOTE: Removal steps in this procedure may contain installation details.
-
Drain the cooling system.
Refer to: Engine Cooling System Draining, Vacuum Filling and Bleeding (303-03 Engine Cooling - 3.5L EcoBoost (272kW/370PS), General Procedures).
-
Remove the air cleaner outlet pipe.
Refer to: Air Cleaner Outlet Pipe (303-12 Intake Air Distribution and Filtering - 3.5L EcoBoost (272kW/370PS), Removal and Installation).
-
NOTICE: Cover the accessory drive belts to prevent coolant contamination of the belts.
Completely cover the accessory drive belts with waterproof plastic.
-
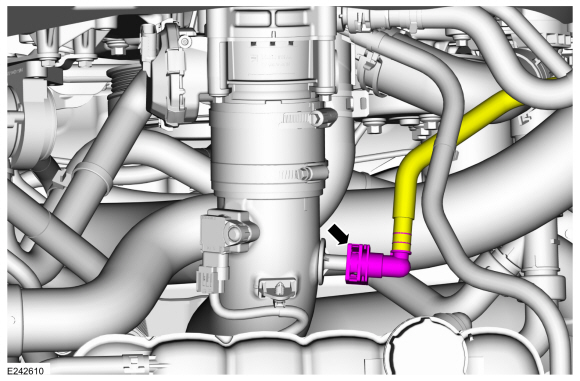
Disconnect PCV hose from CAC outlet tube.
 |
-
NOTE: During installation, make sure the coolant outlet connection is fully seated on the thermostat housing before tightening the bolts.
Remove the bolts and position the coolant outlet connector aside.
Torque: 89 lb.in (10 Nm)
 |
-
Remove the thermostat and discard the O-ring seal.
 |
Installation
-
-
NOTICE: Use Motorcraft® Orange Antifreeze/Coolant for vehicles built up to 08-July-2018 and Motorcraft® Yellow Antifreeze/Coolant for vehicles built from 09-July-2018. Failure to use the correct coolant can degrade corrosion protection.
Install a new O-ring seal and lubricate it with clean engine coolant.
Material: Motorcraft® Orange Concentrated Antifreeze/Coolant / VC-3-B (WSS-M97B44-D)
Material: Motorcraft® Yellow Concentrated Antifreeze/Coolant / VC-13-G (WSS-M97B57-A1)
-
To install, reverse the removal procedure.
-
-
Fill and bleed the cooling system.
Refer to: Engine Cooling System Draining, Vacuum Filling and Bleeding (303-03 Engine Cooling - 3.5L EcoBoost (272kW/370PS), General Procedures).
 Radiator. Removal and Installation
Removal
NOTE:
Removal steps in this procedure may contain installation details.
Drain the cooling system.
Refer to: Engine Cooling System Draining, Vacuum Filling and Bleeding
(303-03 Engine Cooling - 3...
 Thermostat Housing. Removal and Installation
Special Tool(s) /
General Equipment
Hose Clamp Remover/Installer
Materials
Name
Specification
Motorcraft® Yellow Concentrated Antifreeze/CoolantVC-13-G
WSS-M97B57-A1
Motorcraft® Orange Concentrated Antifreeze/CoolantVC-3-B
WSS-M97B44-D
Removal
NOTE:
Removal steps in this procedure may contain installation details...
Other information:
Lincoln Navigator 2018-2026 Workshop Manual: Starting System. Diagnosis and Testing
Diagnostic Trouble Code (DTC) Chart Diagnostics in this manual assume a certain skill level and knowledge of Ford-specific diagnostic practices. REFER to: Diagnostic Methods (100-00 General Information, Description and Operation). Module DTC Description Action BCM B15DB:09 Vehicle Starter Motor: Component Failures GO to Pinpoint Test G BCM C113A:11 Wake..
Lincoln Navigator 2018-2026 Workshop Manual: Specifications
Lubricants, Fluids, Sealers and Adhesives Item Specifications Motorcraft® Premium Long-Life Grease / XG-1-E1 ESA-M1C75-B 2WD (Two-Wheel Drive) U-joint Operating Angles Item Front U joint Center U joint Rear U joi..
Categories
- Manuals Home
- 4th Gen Lincoln Navigator Service Manual (2018 - 2026)
- Body and Paint
- Head Up Display (HUD) Module Calibration. General Procedures
- Brake Service Mode Activation and Deactivation. General Procedures
- Transmission Fluid Drain and Refill. General Procedures
- Rear Bumper. Removal and Installation
Front Stabilizer Bar Link. Removal and Installation
Removal
NOTICE: Suspension fasteners are critical parts that affect the performance of vital components and systems. Failure of these fasteners may result in major service expense. Use the same or equivalent parts if replacement is necessary. Do not use a replacement part of lesser quality or substitute design. Tighten fasteners as specified.
NOTE: Removal steps in this procedure may contain installation details.
With the vehicle in NEUTRAL, position it on a hoist.Refer to: Jacking and Lifting (100-02 Jacking and Lifting, Description and Operation).
NOTICE: Do not use power tools to remove or install the stabilizer bar