Lincoln Navigator: Front End Sheet Metal Repairs / Radiator Support Assembly. Removal and Installation
Special Tool(s) / General Equipment
| 6.5 mm Drill Bit | |
| Polydrive Bit Socket | |
| Rivet Gun | |
| Self-Piercing Rivet (SPR) Remover/Installer | |
| Belt Sander | |
| Hot Air Gun |
Materials
| Name | Specification |
|---|---|
| Seam Sealer TA-2-B, 3M™ 08308, LORD Fusor® 803DTM |
- |
Removal
NOTE: Aluminum body panels are highly receptive to heat transfer. With the extensive use of structural adhesives and non-structural sealers used in vehicle construction, the potential of heat transfer could impact adhesives and sealers in non-associated panels during the repair process. Many repairs areas that utilize structural adhesive may be separated after fastener removal by using a panel chisel along the joint/flange. Using heat not exceeding 425° F to loosen a bonded panel should only be done when all panels in the joint will be replaced and new adhesive applied.
NOTE: Flow drill screw (FDS) fasteners are not to be reused. Remove and discard.
NOTE: Adequately protect all adjacent areas against cutting and grinding procedures.
-
Depower the SRS .
Refer to: Supplemental Restraint System (SRS) Depowering (501-20B Supplemental Restraint System, General Procedures).
-
On Both Sides:
Remove the headlamp assembly.
Refer to: Headlamp Assembly (417-01 Exterior Lighting, Removal and Installation).
-
Remove the front bumper.
Refer to: Front Bumper (501-19 Bumpers, Removal and Installation).
-
On Both Sides:
Remove the fender and splash shield.
Refer to: Fender (501-02 Front End Body Panels, Removal and Installation).
Refer to: Fender Splash Shield (501-02 Front End Body Panels, Removal and Installation).
-
Remove the grille.
-
Remove the radiator.
Refer to: Radiator (303-03 Engine Cooling - 3.5L EcoBoost (272kW/370PS), Removal and Installation).
-
Remove the A/C condenser.
Refer to: Condenser (412-00 Climate Control System - General Information, Removal and Installation).
-
If Required:
Dimensionally restore the vehicle to pre-damage condition.
Refer to: Body and Frame (501-26 Body Repairs - Vehicle Specific Information and Tolerance Checks, Description and Operation).
-
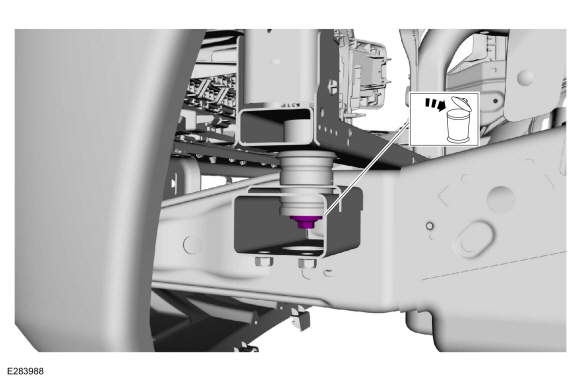
Remove and discard the front end sheet metal (FESM) body mount bolts.
 |
-
NOTE: Flow drill screw (FDS) fasteners are not to be reused. Remove and discard.
On Both Sides:
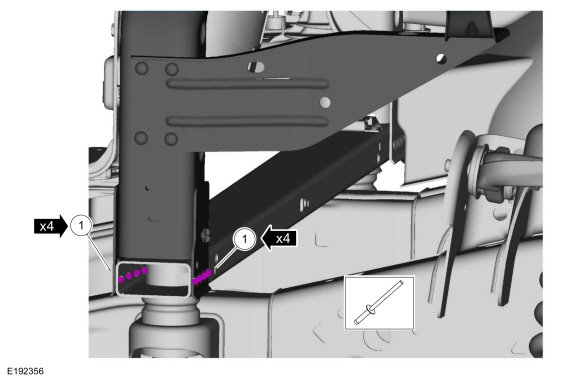
Remove the fasteners.
Use the General Equipment: Polydrive Bit Socket
Use the General Equipment: Self-Piercing Rivet (SPR) Remover/Installer
Use the General Equipment: Belt Sander
 |
-
NOTE: Pay particular attention to the location of adhesive and sealer to aid in installation.
On Both Sides:
Slightly raise the body front end sheet metal and remove the radiator support.
Use the General Equipment: Hot Air Gun
 |
Installation
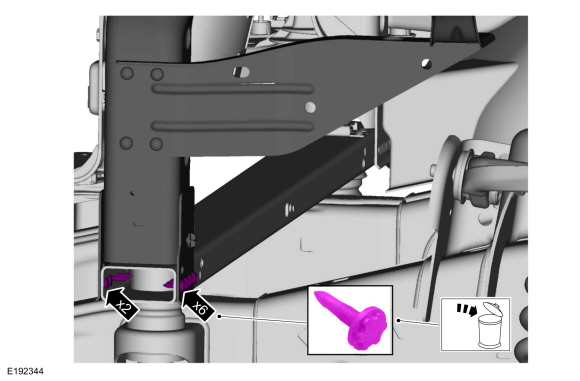
NOTE: Self-Piercing Rivet (SPR) fasteners may not be placed directly over original self-piercing rivet (SPR) fastener location. They must be placed adjacent to original location matching original quantity.
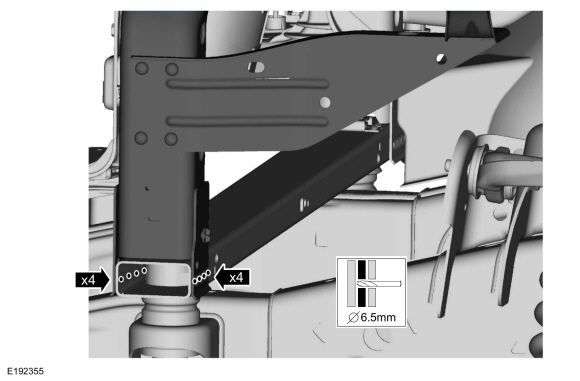
NOTE: Blind or solid rivets may be used in place of self-piercing rivet (SPR) fasteners in the original self-piercing rivet (SPR) fasteners location after enlarging hole to 6.5 mm.
NOTE: Adequately protect all adjacent areas against cutting and grinding and sanding procedures.
-
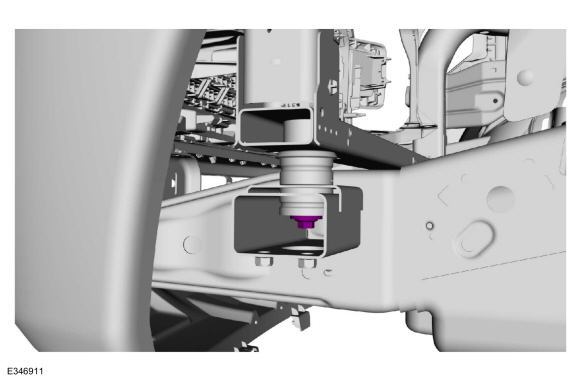
On Both Sides:
Install, properly position the radiator support and lower the body front end sheet metal (FESM).
 |
-
On Both Sides:
Install new front end sheet metal (FESM) body mount bolts.
Torque: 85 lb.ft (115 Nm)
 |
-
On Both Sides:
Drill for fasteners.
Use the General Equipment: 6.5 mm Drill Bit
 |
-
On Both Sides:
Install the fasteners.
Use the General Equipment: Rivet GunItem SPR Number SPR Code Henrob®, Car-O-Liner®, CMO®, Chief®, Spanesi®, Wielander and Schill® Mandrel Pro-Spot® Mandrel Blind Rivet Solid Rivet Rivnut® 1 - - - - W708777-S900C - -
 |
-
All seams must be sealed to production level.
Material: Seam Sealer / TA-2-B, 3M™ 08308, LORD Fusor® 803DTM
-
Refinish the entire repair using a Ford approved paint system.
-
Restore corrosion protection.
Refer to: Corrosion Prevention (501-25 Body Repairs - General Information, General Procedures).
-
Install the A/C condenser.
Refer to: Condenser (412-00 Climate Control System - General Information, Removal and Installation).
-
Install the radiator.
Refer to: Radiator (303-03 Engine Cooling - 3.5L EcoBoost (272kW/370PS), Removal and Installation).
-
On both Sides:
Install the fender and splash shield.
Refer to: Fender (501-02 Front End Body Panels, Removal and Installation).
Refer to: Fender Splash Shield (501-02 Front End Body Panels, Removal and Installation).
-
Install the grille.
-
On Both Sides:
Install the headlamp assembly.
Refer to: Headlamp Assembly (417-01 Exterior Lighting, Removal and Installation).
-
Install the bumper.
Refer to: Front Bumper (501-19 Bumpers, Removal and Installation).
Refer to: Front Bumper Cover (501-19 Bumpers, Removal and Installation).
-
Repower the SRS .
Refer to: Supplemental Restraint System (SRS) Repowering (501-20B Supplemental Restraint System, General Procedures).


Other information:
Lincoln Navigator 2018-2026 Workshop Manual: F Clutch. Description and Operation
Overview Item Description 1 SSF 2 F clutch control valve 3 F clutch latch valve 4 F clutch apply circuit 5 F clutch piston 6 F clutch assembly 7 Ring gear No. 4 ..
Lincoln Navigator 2018-2026 Workshop Manual: Roof Opening Panel - System Operation and Component Description. Description and Operation
System Operation Item Description 1 BCM 2 Sliding Glass Motor 3 Roof Opening Panel Control Switch 4 Shield Motor 5 K Bus (not used for external communication) Switch Operation There are three switches located in the overhead console. The RH switch is for the front sliding glass panel an..
Categories
- Manuals Home
- 4th Gen Lincoln Navigator Service Manual (2018 - 2026)
- Telematics Control Unit (TCU) Module. Removal and Installation
- Body Control Module (BCM). Removal and Installation
- Power Running Board (PRB). Diagnosis and Testing
- All Terrain Control Module (ATCM). Removal and Installation
- Body and Paint
Rear Drive Axle and Differential. Diagnosis and Testing
Symptom Chart(s)
Diagnostics in this manual assume a certain skill level and knowledge of Ford-specific diagnostic practices.
REFER to: Diagnostic Methods (100-00 General Information, Description and Operation).
Symptom Chart - Differential
Symptom Chart - Differential
Condition Actions Axle overheating GO to Pinpoint Test A Broken gear teeth on the ring gear or pinion GO to Pi