Lincoln Navigator: Roof Opening Panel / Roof Opening Panel - System Operation and Component Description. Description and Operation
System Operation
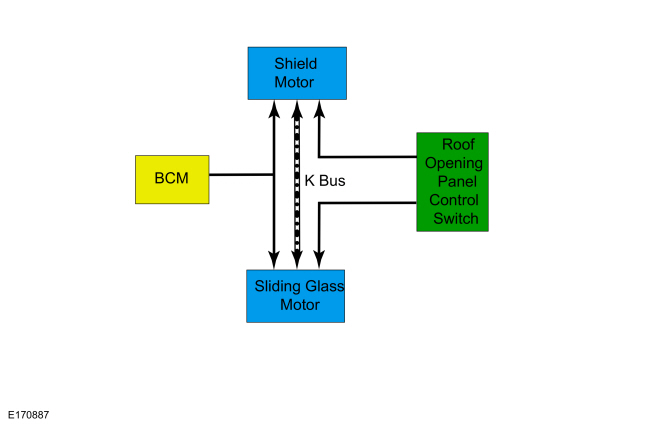
| Item | Description |
|---|---|
| 1 | BCM |
| 2 | Sliding Glass Motor |
| 3 | Roof Opening Panel Control Switch |
| 4 | Shield Motor |
| 5 | K Bus (not used for external communication) |
Switch Operation
There are three switches located in the overhead console. The RH switch is for the front sliding glass panel and the LH switch is for the shield (sunshade). Both switches are double detent switches in both directions (OPEN, CLOSE) with the first detent being manual control and the second detent being one-touch operation. When the front sliding glass panel is in the fully closed position, the front sliding glass panel CLOSE switch becomes a vent OPEN switch if pressed. When the front sliding glass panel is in any vent position, the front sliding glass panel OPEN switch becomes a vent CLOSE switch if pressed.
Shield (Sunshade) Operation
When the either of front over head console shield (sunshade) OPEN switch or shield (sunshade) switch rear OPEN is pressed and released the shield will automatically open the roof opening panel fixed glass to a full open position. One touch will take the shade to a full open position. If user wants to stop it at any position, the either of front over head console shield (sunshade) switch or shield (sunshade) switch rear should be pressed again. When the sliding glass panel is closed, the shield is open to any position beyond comfort stop and the shield CLOSE switch is pressed and released, the shield moves forward to the comfort stop position and stops. After stopping at the comfort stop position, pressing and releasing the shield Close switch again will fully close the shield. If the shield is in the closed position and the front sliding glass panel OPEN switch is pressed, the shield will perform a one-touch open operation automatically which will then be followed by the front sliding glass panel operation that was requested. To partially open or close the shield while it is moving, press shield OPEN or CLOSE switch again to stop the shield in the desired position.
Front Sliding Glass Panel Operation
When the front sliding glass panel OPEN switch is pressed to the second detent, the front sliding glass panel will automatically open and stop at a predetermined position before the fully open position (comfort position). Pressing the front sliding glass panel OPEN switch to the second detent a second time (after the initial stop) will open the front sliding glass panel to the full open position. To fully close the front sliding glass panel, press and release the front sliding glass panel CLOSE switch to the second detent. The front sliding glass panel will fully close. The front sliding glass panel movement can be stopped at any time in either direction by pressing the front sliding glass panel switch in either direction. The vent position can only be requested when the front sliding glass panel is in the fully closed position. To open to the vent position, press and release the front sliding glass panel CLOSE switch to the second detent. The front sliding glass panel will move to the vent position automatically. The front sliding glass panel can be fully closed from the vent position by pressing the front sliding glass panel OPEN switch to the second detent. If the shield is in the closed position and the front sliding glass panel OPEN switch is pressed, the shield will perform a one-touch open operation automatically which will then be followed by the front sliding glass panel operation that was requested. To partially open or close the front sliding glass panel from any position, press the front sliding glass panel OPEN or CLOSE switch only to the first detent and release at the desired position.
Bounce Back - Front Sliding Glass Panel And Shield
The front sliding glass panel and shield has a bounce back feature. If an obstacle has been detected as the front sliding glass panel or shield is closing, operation will automatically reverse and stop at a predetermined position.
Security Override
To override a bounce back condition (to overcome the resistance of ice on the front sliding glass panel seal for example), within 2 seconds of a bounce back event, press and hold the front sliding glass panel CLOSE switch. The front sliding glass panel will operate in manual mode with bounce back detection disabled until the switch is released.
Vista Roof Panel Glass
The roof opening panel system on this vehicle includes a fixed vista roof panel glass behind the front sliding glass panel. Any time this panel is removed or adjusted the front sliding glass panel will need to be initialized.
Jumper Harness and Communication
There is a jumper harness between roof opening panel C921 and both roof opening panel assembly motors (shield and front sliding glass panel motors) which includes a communication circuit that is used only for communication between the motors. If the communication circuit between the front sliding glass panel motor and shield motor is open or shorted the front sliding glass panel motor will only fully close the front sliding glass panel one time, then not operate. Also, if the communication circuit is open or shorted the shield motor will open fully, then only operate between fully open and the front of the fixed glass panel.
K Bus Communication
There is a communication circuit (K Bus) between the roof opening panel motor and the shield motor that is only for communication between the motors and not for service diagnostics. If this circuit is opened or shorted the sunroof system will not operate. When the K Bus circuit is repaired, normal system function will return.

 Roof Opening Panel. Diagnosis and Testing
Global Customer Symptom Code (GCSC) Chart
Diagnostics in this manual assume a certain skill level and knowledge of Ford-specific diagnostic practices...
Other information:
Lincoln Navigator 2018-2026 Workshop Manual: Air Conditioning (A/C) System Recovery, Evacuation and Charging. General Procedures
Recovery NOTICE: Use an A/C refrigerant analyzer before recovering any of the vehicle's A/C refrigerant. Failure to do so puts the shop's bulk refrigerant at risk of contamination. If the vehicle's A/C refrigerant is contaminated, refer the customer to the service facility that carried out the last A/C service...
Lincoln Navigator 2018-2026 Workshop Manual: Climate Control Housing. Removal and Installation
Removal NOTICE: During the removal or installation of components, cap, tape or otherwise appropriately protect all openings and tubes/fittings to prevent the ingress of dirt or other contamination. Remove caps, tape and other protective materials prior to installation...
Categories
- Manuals Home
- 4th Gen Lincoln Navigator Service Manual (2018 - 2026)
- Identification Codes. Description and Operation
- Vehicle Dynamics Control Module (VDM). Removal and Installation
- Front Bumper Cover. Removal and Installation
- Head Up Display (HUD) Module Calibration. General Procedures
- Body Control Module (BCM). Removal and Installation
Differential Case Runout Check. General Procedures
Special Tool(s) / General Equipment
 205-1016
Installer, Differential Bearing
TKIT-2014D-ROW2
TKIT-2014D-FL_ROW
 205-153
(T80T-4000-W)
205-153
(T80T-4000-W)
Handle
 205-D061
(D83T-4205-C2)
205-D061
(D83T-4205-C2)
Step Plate Dial Indicator Three Leg Puller Punch