Lincoln Navigator: Rear Drive Axle/Differential - Vehicles With: Ford 9.75 Inch Ring Gear / Hydraulic Actuator. Removal and Installation
Special Tool(s) / General Equipment
 |
205-1049 Socket, 9.75 Plenum 4 pin |
 |
205-153
(T80T-4000-W)
Handle |
 |
205-D044
(D81T-4221-A)
Installer, Differential Carrier Bearing |
 |
205-D061
(D83T-4205-C2)
Step Plate |
 |
205-D072
(D97L-4221-A)
2 Jaw Puller |
 |
307-003
(T57L-500-B)
Holding Fixture, Transmission |
| Cable Ties | |
Removal
-
Remove the differential carrier.
Refer to: Differential Carrier - Vehicles With: Electronic Limited-Slip Differential (205-02 Rear Drive Axle/Differential - Vehicles With: Ford 9.75 Inch Ring Gear, Removal and Installation).
-
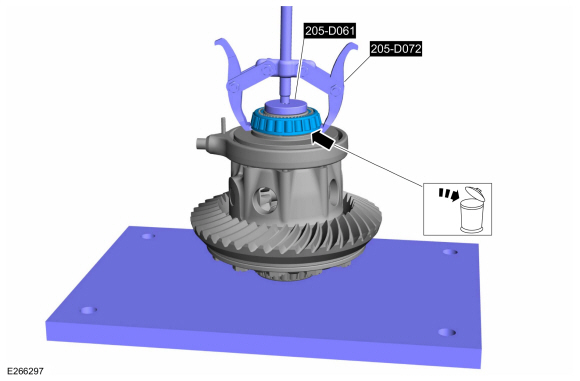
Using the general equipment, remove and discard the differential bearing.
Use Special Service Tool: 205-D072 (D97L-4221-A) 2 Jaw Puller. , 205-D061 (D83T-4205-C2) Step Plate.
 |
-
NOTE: Do not use power tools to remove the component.
NOTE: The retainer threads are left handed.
-
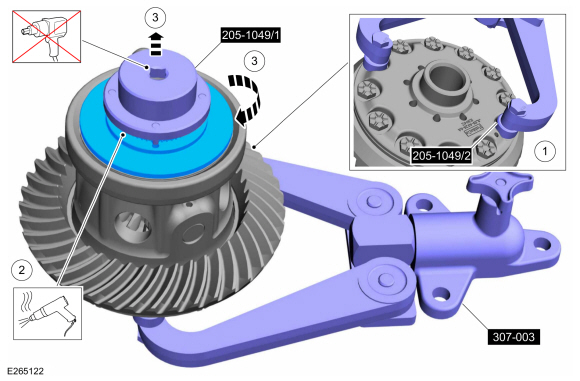
Remove two bolts of ring gear mounting to install the special tool.
Use Special Service Tool: 307-003 (T57L-500-B) Holding Fixture, Transmission. , 205-1049 Socket, 9.75 Plenum 4 pin.
-
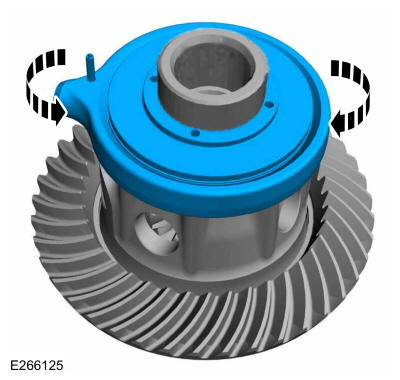
Apply heat to the hydraulic actuator area to soften the Loctite before using the special service tool.
-
Using the special tool, remove the hydraulic actuator retainer by turning in the direction shown.
Use Special Service Tool: 307-003 (T57L-500-B) Holding Fixture, Transmission.
-
Remove two bolts of ring gear mounting to install the special tool.
 |
-
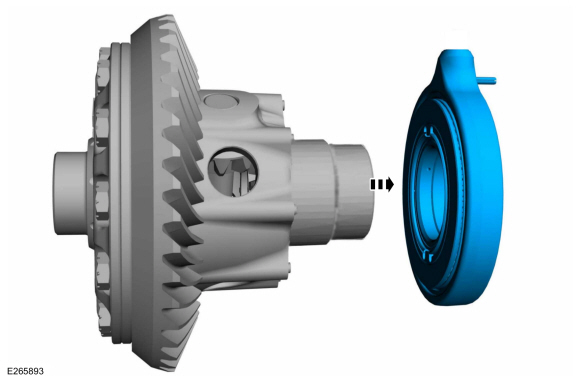
NOTICE: Do not disassemble the hydraulic actuator bearing stack or damage to the bearings can occur.
Remove the hydraulic actuator assembly from the eLSD carrier.
 |
-
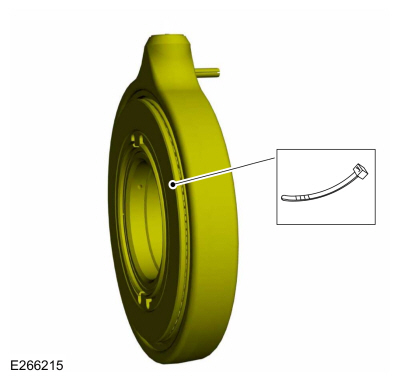
NOTE: Do dot mix the hydraulic actuator bearings and washers or damage to the bearings can occur.
NOTE: The hydraulic actuator can be reused if the differential carrier is being inspected for gear noise issue.
NOTE: Always properly secure the hydraulic actuator assembly with cable ties to prevent the disassembly of the component.
Using general equipment, secure the hydraulic actuator assembly.
Use the General Equipment: Cable Ties
 |
Installation
-
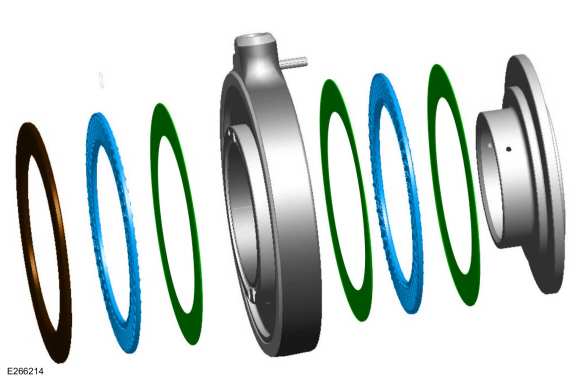
NOTE: Do dot mix the hydraulic actuator bearings and washers. The hydraulic actuator bearings and washers must be reassembled in the same sequence.
NOTE: If bearing found damaged, make sure a new hydraulic actuator assembly is installed.
If disassemble.
Assemble the hydraulic actuator assembly bearings and washers in the sequence shown.
 |
-
NOTE: Do dot mix the hydraulic actuator bearings and washers or damage to the bearings can occur.
NOTE: The hydraulic actuator can be reused if the differential carrier is being inspected for gear noise issue.
Remove the cable tie before installing the hydraulic actuator.
Use the General Equipment: Cable Ties
|
-
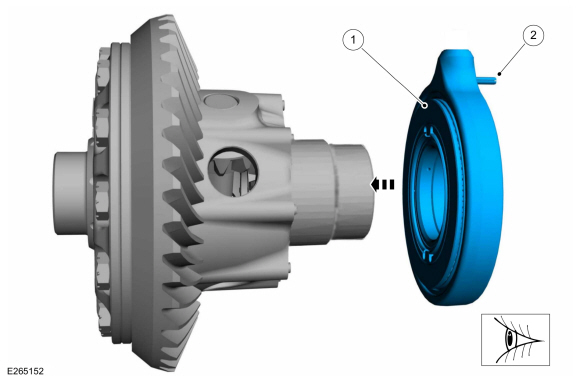
NOTE: Verify the eLSD hydraulic actuator orientation is correct.
NOTE: Verify the eLSD hydraulic actuator bearing stack is correct.
NOTE: Replace the eLSD hydraulic actuator if necessary.
Install the new hydraulic actuator assembly to the electronic limited-slip differential carrier.
-
The eLSD hydraulic actuator piston side and thick washer towards the eLSD .
-
Alignment pin faces away from eLSD .
-
The eLSD hydraulic actuator piston side and thick washer towards the eLSD .
 |
-
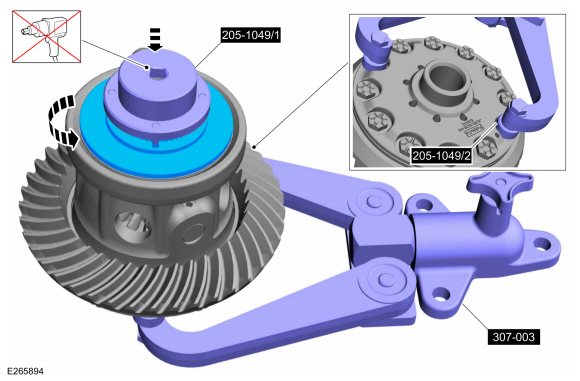
NOTE: Do not use power tools to install the component.
NOTE: The retainer threads are left handed.
Using the special tool, install a new hydraulic actuator retainer and torque it by turning in the direction shown.
Use Special Service Tool: 205-1049 Socket, 9.75 Plenum 4 pin. , 307-003 (T57L-500-B) Holding Fixture, Transmission.
Torque: 125 lb.ft (169 Nm)
 |
-
-
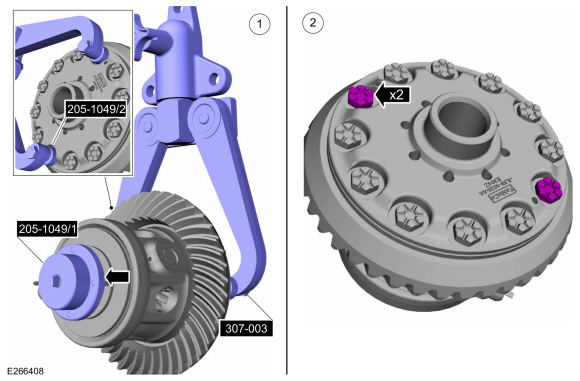
Remove special tools.
Remove Special Service Tool: 205-1049 Socket, 9.75 Plenum 4 pin. , 307-003 (T57L-500-B) Holding Fixture, Transmission.
-
Install two bolts to the ring gear.
Torque: 140 lb.ft (190 Nm)
-
Remove special tools.
 |
-
NOTE: Make sure that the eLSD hydraulic actuator rotates freely on the eLSD assembly in both directions.
Verify free rotation of the eLSD hydraulic actuator on eLSD and that bearing washers are not pinched.
 |
-
Using the special tool, install the new differential bearings.
Use Special Service Tool: 205-D044 (D81T-4221-A) Installer, Differential Carrier Bearing. , 205-153 (T80T-4000-W) Handle.
 |
-
Install the differential carrier.
Refer to: Differential Carrier - Vehicles With: Electronic Limited-Slip Differential (205-02 Rear Drive Axle/Differential - Vehicles With: Ford 9.75 Inch Ring Gear, Removal and Installation).
 Drive Pinion Seal. Removal and Installation
Special Tool(s) /
General Equipment
205-208
(T83T-4676-A)
Installer, Drive Pinion Oil SealTKIT-1983-FTKIT-1983-FLMTKIT-1983-FX
Flat-Bladed Screwdriver
Materials
Name
Specification
Motorcraft® Premium Long-Life GreaseXG-1-E1
ESA-M1C75-B
Removal
Remove the drive pinion flange...
 Hydraulic Control Unit (HCU). Removal and Installation
Materials
Name
Specification
Motorcraft® MERCON® ULV Automatic Transmission FluidXT-12-QULV
WSS-M2C949-A, MERCON® ULV
Removal
Using a diagnostic scan tool, carry-out the de-pressurization of the eLSD hydraulic system located in the FDRS under Toolbox...
Other information:
Lincoln Navigator 2018-2026 Workshop Manual: Thermostatic Expansion Valve Manifold and Tube Assembly. Removal and Installation
Special Tool(s) / General Equipment Flat Headed Screw Driver Locking Pliers Removal NOTICE: During the removal of components, cap, tape or otherwise appropriately protect all openings to prevent the ingress of dirt or other contamination...
Lincoln Navigator 2018-2026 Workshop Manual: Brake Service Mode Activation and Deactivation. General Procedures
Activation WARNING: Service actions on vehicles equipped with electronic parking brakes may cause unexpected parking brake application, which could result in injury to hands or fingers. Put the electronic parking brake system into service mode prior to servicing or removing rear brake components...
Categories
- Manuals Home
- 4th Gen Lincoln Navigator Service Manual (2018 - 2026)
- Front Bumper Cover. Removal and Installation
- Brake Service Mode Activation and Deactivation. General Procedures
- Windshield Washer Pump. Removal and Installation
- Transmission Fluid Level Check. General Procedures
- Identification Codes. Description and Operation
Rear Camber Adjustment. General Procedures
Special Tool(s) / General Equipment
Wheel Alignment SystemActivation
NOTICE: Suspension fasteners are critical parts that affect the performance of vital components and systems. Failure of these fasteners may result in major service expense. Use the same or equivalent parts if replacement is necessary. Do not use a replacement part of lesser quality or substitute design. Tighten fasteners as specified.
Using alignment equipment and the manufacturer's instructions, measure the rear camber.Use the General Equipment: Wheel Alignment System