Lincoln Navigator: Rear Drive Axle/Differential - Vehicles With: Ford 9.75 Inch Ring Gear / Drive Pinion Seal. Removal and Installation
Special Tool(s) / General Equipment
 |
205-208
(T83T-4676-A)
Installer, Drive Pinion Oil Seal TKIT-1983-F TKIT-1983-FLM TKIT-1983-FX |
| Flat-Bladed Screwdriver | |
Materials
| Name | Specification |
|---|---|
| Motorcraft® Premium Long-Life Grease XG-1-E1 |
ESA-M1C75-B |
Removal
-
Remove the drive pinion flange.
Refer to: Drive Pinion Flange (205-02 Rear Drive Axle/Differential - Vehicles With: Ford 9.75 Inch Ring Gear, Removal and Installation).
-
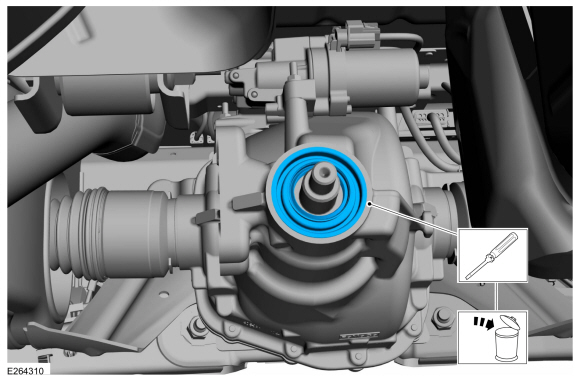
Using a flat blade screwdriver, remove and discard the drive pinion seal.
Use the General Equipment: Flat-Bladed Screwdriver
 |
-
lean and inspect the pinion flange mating surfaces and pinion seal surface.
 |
Installation
-
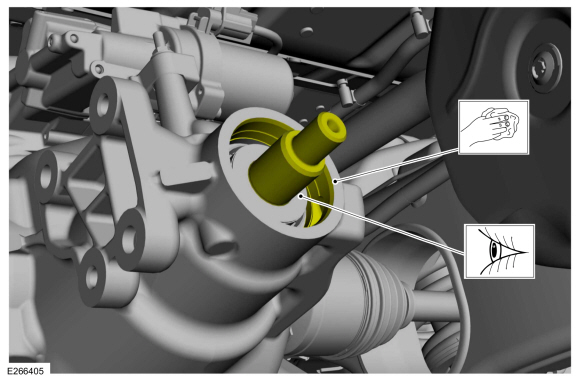
Lubricate the new drive pinion seal lip with grease.
Material: Motorcraft® Premium Long-Life Grease / XG-1-E1 (ESA-M1C75-B)
 |
-
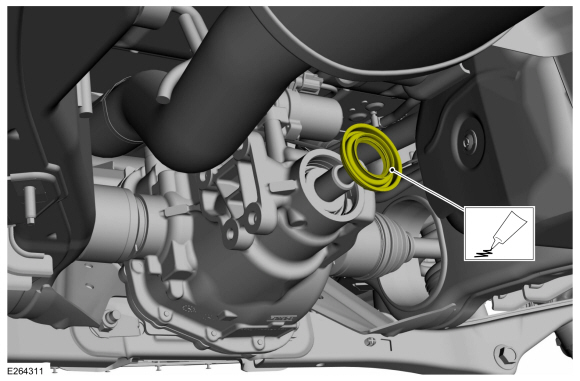
Using the special tool, install the new drive pinion seal.
Use Special Service Tool: 205-208 (T83T-4676-A) Installer, Drive Pinion Oil Seal.
 |
-
Install the drive pinion flange.
Refer to: Drive Pinion Flange (205-02 Rear Drive Axle/Differential - Vehicles With: Ford 9.75 Inch Ring Gear, Removal and Installation).

 Hydraulic Actuator. Removal and Installation
Special Tool(s) /
General Equipment
205-1049Socket, 9.75 Plenum 4 pin
205-153
(T80T-4000-W)
Handle
205-D044
(D81T-4221-A)
Installer, Differential Carrier Bearing
205-D061
(D83T-4205-C2)
Step Plate
205-D072
(D97L-4221-A)
2 Jaw Puller
307-003
(T57L-500-B)
Holding Fixture, Transmission
Cable Ties
..
Other information:
Lincoln Navigator 2018-2026 Workshop Manual: Muffler and Tailpipe. Removal and Installation
Removal NOTICE: Do not use oil or grease-based lubricants on the isolators. These lubricants may cause deterioration of the isolator. This can lead to separation of the isolator from the exhaust hanger bracket during vehicle operation. Remove the load floor cover. Position the load floor storage compartment cover up...
Lincoln Navigator 2018-2026 Workshop Manual: Bearing Inspection. General Procedures
Inspection Cratering - fatigue failure Spot glazing - incorrect seating Scratching - dirty engine oil Base exposed - poor lubrication Both edges worn - journal damaged One edge worn - journal tapered or bearing not seated ..
Categories
- Manuals Home
- 4th Gen Lincoln Navigator Service Manual (2018 - 2026)
- Liftgate Trim Panel. Removal and Installation
- Brake Service Mode Activation and Deactivation. General Procedures
- Body Control Module (BCM). Removal and Installation
- Rear View Mirrors - System Operation and Component Description. Description and Operation
- Head Up Display (HUD) Module Calibration. General Procedures
Wheel to Hub Runout Minimization. General Procedures
Check
NOTE: Wheel-to-hub optimization is important. Clearance between the wheel and hub can be used to offset or neutralize the Road Force® or run-out of the wheel and tire assembly. For every 0.001 inch of wheel-to-hub clearance, the Road Force® can be affected between 1 and 3 pounds depending on the tire stiffness.
NOTE: The example below illustrates how the clearance between the wheel and the hub can be used to offset the high spot of radial run-out or Road Force®. Following the procedure will make sure of the best optimization.
Position the wheel and tire assembly on the vehicle so that the high spot location of radial run-out or Road Force® is at the 6 o'clock position and