Lincoln Navigator: Fuel Tank and Lines - 3.5L EcoBoost (272kW/370PS) / Fuel Lines. Removal and Installation
Removal
NOTE: Removal steps in this procedure may contain installation steps.
-
With the vehicle in NEUTRAL, position it on a hoist.
Refer to: Jacking and Lifting (100-02 Jacking and Lifting, Description and Operation).
-
Disconnect the battery ground cable.
Refer to: Battery Disconnect and Connect (414-01 Battery, Mounting and Cables, General Procedures).
-
Release the fuel system pressure.
Refer to: Fuel System Pressure Release (310-00 Fuel System - General Information - 3.5L EcoBoost (272kW/370PS), General Procedures).
-
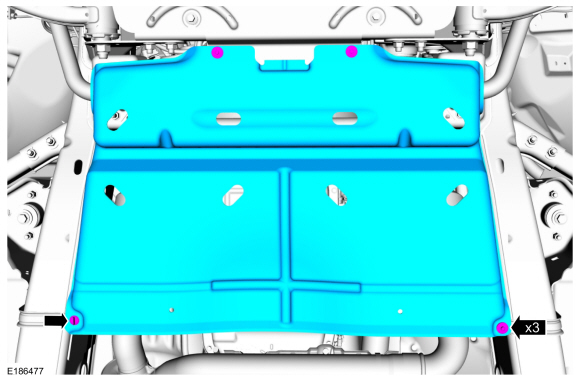
Remove the engine appearance cover retainers, release
the engine appearance cover from the rear retainers and then remove the
engine appearance cover.
Torque: 97 lb.in (11 Nm)
 |
-
-
If equipped, remove the bolts.
-
Release the retainer and remove the transmission housing cover.
-
If equipped, remove the bolts.
 |
-
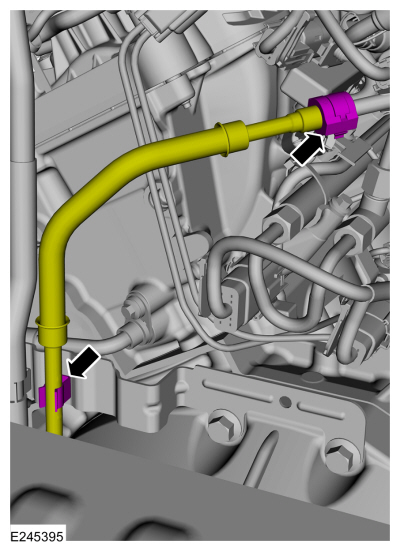
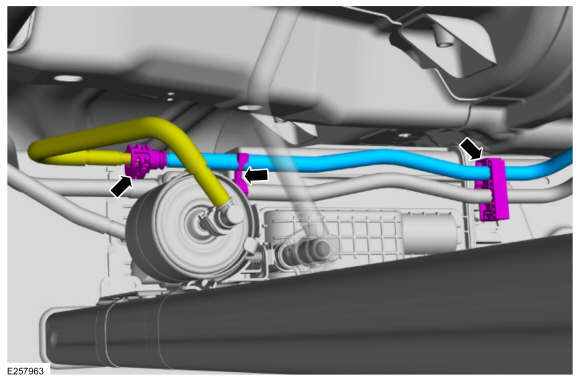
Release the quick connect coupling.
 |
-
Release the retainer clip on the rear of the transmission and position aside the fuel supply line.
 |
-
-
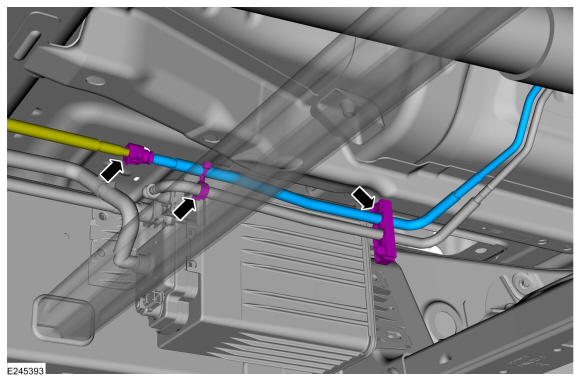
Disconnect the front fuel supply line-to-fuel tank fuel supply line quick connect coupling.
Refer to: Quick Release Coupling (310-00 Fuel System - General Information - 3.5L EcoBoost (272kW/370PS), General Procedures).
-
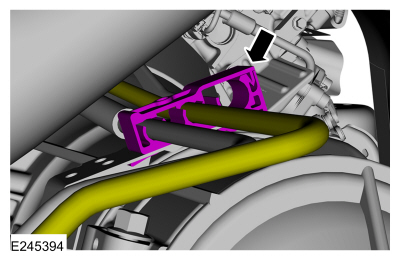
Release the retainer clips.
-
Remove the fuel feed line from the bottom of the vehicle.
-
Disconnect the front fuel supply line-to-fuel tank fuel supply line quick connect coupling.
 |
-
If equipped
-
Disconnect the front fuel supply line-to-fuel tank fuel supply line quick connect coupling.
Refer to: Quick Release Coupling (310-00 Fuel System - General Information - 3.5L EcoBoost (272kW/370PS), General Procedures).
-
Release the retainer clips.
-
Remove the fuel feed line from the bottom of the vehicle.
-
Disconnect the front fuel supply line-to-fuel tank fuel supply line quick connect coupling.
 |
Installation
-
To install, reverse the removal procedure.
 Fuel Level Sender. Removal and Installation
Removal
NOTE:
Removal steps in this procedure may contain installation details.
Remove the Fuel Pump and Sender Unit.
Refer to: Fuel Pump and Sender Unit (310-01 Fuel Tank and Lines - 3...
 Fuel Pump and Sender Unit. Removal and Installation
Special Tool(s) /
General Equipment
310-123Locking Ring, Fuel TankTKIT-2004J-FTKIT-2005U-LM
Removal
NOTE:
Removal steps in this procedure may contain installation steps...
Other information:
Lincoln Navigator 2018-2026 Workshop Manual: Liquefied Petroleum Gas (LPG) and Compressed Natural Gas (CNG) Fuel Systems Health and Safety Precautions. Description and Operation
WARNING: Service of Compressed Natural Gas (CNG) or Liquefied Petroleum Gas (LPG) vehicle systems is restricted to qualified personnel and authorized workshops. The required qualifications vary by region. Always observe local laws and legislative directives regarding CNG or LPG vehicle service...
Lincoln Navigator 2018-2026 Workshop Manual: Universal Transmitter. Diagnosis and Testing
Global Customer Symptom Code (GCSC) Chart Diagnostics in this manual assume a certain skill level and knowledge of Ford-specific diagnostic practices.REFER to: Diagnostic Methods (100-00 General Information, Description and Operation). Symptom Action Driver Aid & Information > Universal Remote > Performance > Inoperative GO to Pinpoint Test A ..
Categories
- Manuals Home
- 4th Gen Lincoln Navigator Service Manual (2018 - 2026)
- Head Up Display (HUD) Module Calibration. General Procedures
- Identification Codes. Description and Operation
- Vehicle Dynamics Control Module (VDM). Removal and Installation
- Brake Service Mode Activation and Deactivation. General Procedures
- Liftgate Trim Panel. Removal and Installation
Rear Camber Adjustment. General Procedures
Special Tool(s) / General Equipment
Wheel Alignment SystemActivation
NOTICE: Suspension fasteners are critical parts that affect the performance of vital components and systems. Failure of these fasteners may result in major service expense. Use the same or equivalent parts if replacement is necessary. Do not use a replacement part of lesser quality or substitute design. Tighten fasteners as specified.
Using alignment equipment and the manufacturer's instructions, measure the rear camber.Use the General Equipment: Wheel Alignment System