Lincoln Navigator: Fuel Charging and Controls - 3.5L EcoBoost (272kW/370PS) / Fuel Charging and Controls - Component Location. Description and Operation
3.5L EcoBoost
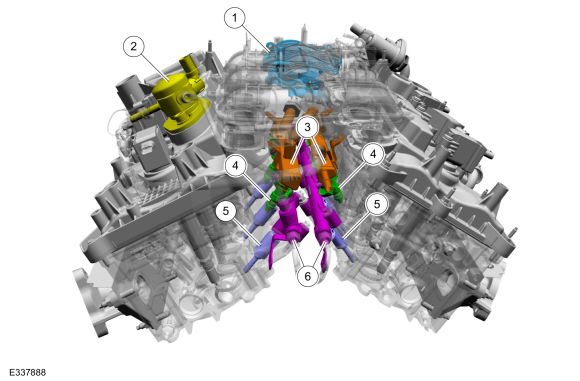
| Item | Description |
|---|---|
| 1 | Throttle body |
| 2 | High-pressure fuel pump |
| 3 | Port injection fuel rail assembly |
| 4 | Port injection fuel injector |
| 5 | Direct injection fuel injector |
| 6 | Direct injection fuel rail |
Fuel Pump Driver Module
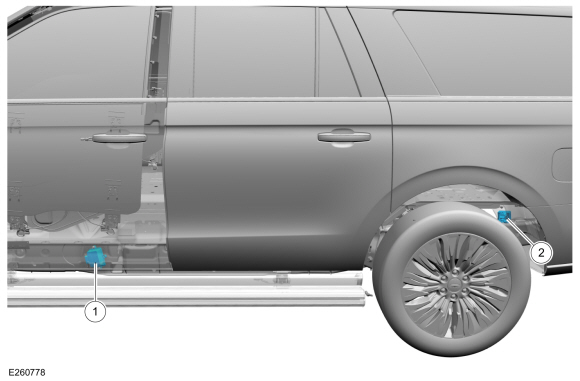
| Item | Description |
|---|---|
| 1 | Side frame mounted fuel pump driver module. |
| 2 | Top frame mounted fuel pump driver module. |

 Fuel Charging and Controls - System Operation and Component Description. Description and Operation
System Operation
Air Fuel Ratio Imbalance Monitor
The air fuel ratio imbalance monitor is an on board diagnostic strategy designed to monitor the air fuel ratio...
Other information:
Lincoln Navigator 2018-2026 Workshop Manual: Front Display Interface Module (FDIM). Removal and Installation
Special Tool(s) / General Equipment Interior Trim Remover Removal NOTE: Removal steps in this procedure may contain installation details. Release the clips and remove the FDIM bracket cover. Use the General Equipment: Interior Trim Remover Remove the bolt and disconnect the LVDS connector...
Lincoln Navigator 2018-2026 Workshop Manual: Charge Air Cooler (CAC) Outlet Pipe. Removal and Installation
Removal NOTICE: The turbocharger compressor vanes can be damaged by even the smallest particles. When removing any turbocharger or engine air intake system component, ensure that no debris enters the system. Failure to do so may result in damage to the turbocharger...
Categories
- Manuals Home
- 4th Gen Lincoln Navigator Service Manual (2018 - 2026)
- Head Up Display (HUD) Module Calibration. General Procedures
- Rear View Mirrors - System Operation and Component Description. Description and Operation
- Front Seat. Removal and Installation
- Front Bumper Cover. Removal and Installation
- Neutral Flat Tow Activation and Deactivation. General Procedures
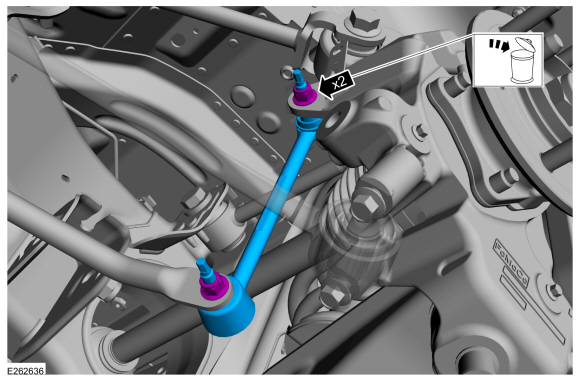
Rear Stabilizer Bar Link. Removal and Installation
Removal
NOTE: Removal steps in this procedure may contain installation details.
With the vehicle in NEUTRAL, position it on a hoist.Refer to: Jacking and Lifting (100-02 Jacking and Lifting, Description and Operation).
NOTE: Use the hex-holding feature to prevent the stud from turning while removing the nut.
Remove and discard the 2 rear stabilizer bar link nuts and remove the rear stabilizer bar link.Torque: 46 lb.ft (63 Nm)