Lincoln Navigator: Rear Disc Brake / Brake Pads. Removal and Installation
Special Tool(s) / General Equipment
| Brake Caliper Piston Retractor |
Removal
NOTE: Removal steps in this procedure may contain installation details.
-
Activate the brake service mode. WARNING:
Service actions on vehicles equipped with electronic
parking brakes may cause unexpected parking brake application, which
could result in injury to hands or fingers. Put the electronic parking
brake system into service mode prior to servicing or removing rear brake
components. Failure to follow this instruction may result in serious
personal injury.
WARNING:
Service actions on vehicles equipped with electronic
parking brakes may cause unexpected parking brake application, which
could result in injury to hands or fingers. Put the electronic parking
brake system into service mode prior to servicing or removing rear brake
components. Failure to follow this instruction may result in serious
personal injury.
Refer to: Parking Brake - Overview (206-05 Parking Brake and Actuation, Description and Operation).
-
Remove the wheel and tire.
Refer to: Wheel and Tire (204-04A Wheels and Tires, Removal and Installation).
-
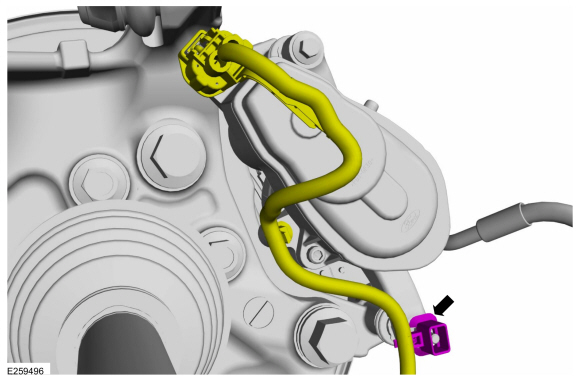
Detach the wiring retainer.
 |
-
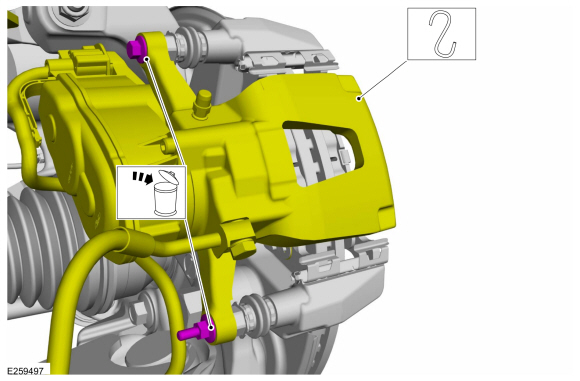
NOTICE: Do not pry in the caliper sight hole to retract the pistons as this can damage the pistons and boots.
NOTICE: Do not allow the brake caliper to hang from the brake hose or damage to the hose can occur.
Remove the bolt, stud bolt and position the brake caliper aside. Discard the retainers.
Torque: 26 lb.ft (35 Nm)
 |
-
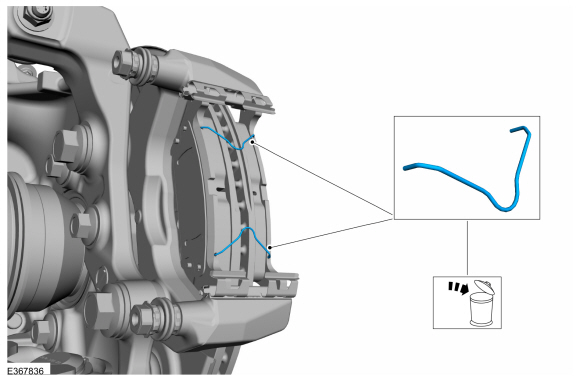
NOTE: This step is only necessary when installing a new component.
Remove and discard the brake pad holding clips.
 |
-
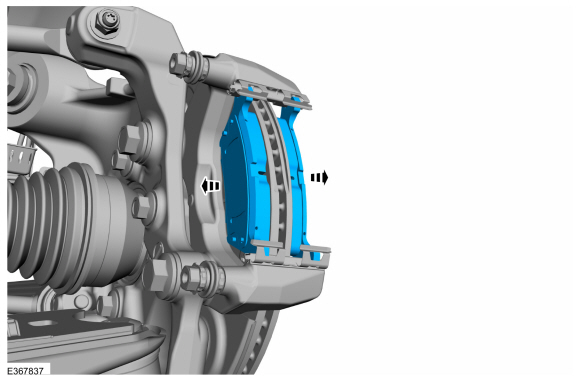
Remove the brake pads.
 |
-
NOTE: This step is only necessary when installing a new component.
Remove and discard the brake pad clips.
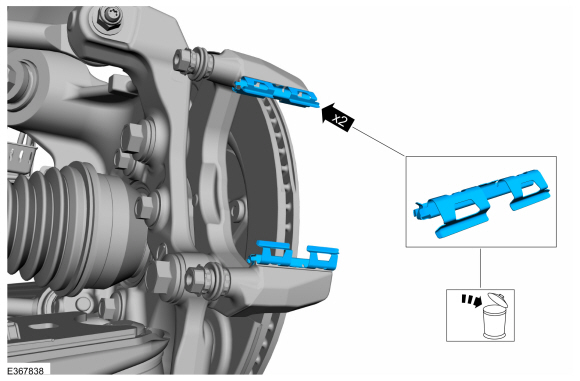 |
Installation
-
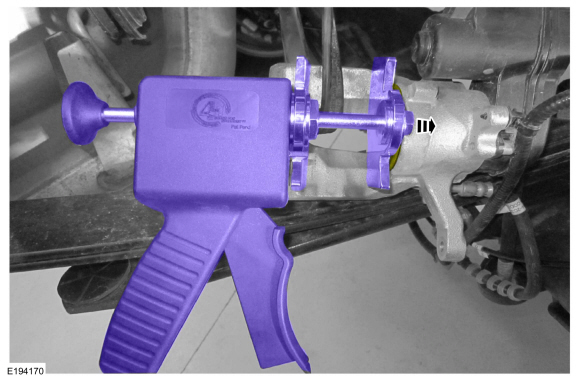
NOTICE: Do not use a C-clamp to compress the brake caliper piston or damage the parking brake actuator motor may occur.
Compress the disk brake caliper pistons into the brake caliper bore until the piston bottoms out in the brake caliper bore.
-
NOTICE: Do not apply greater than 133 lb.in ( 15 Nm) of torque when rotating the disk brake caliper piston or internal damage to the brake caliper may occur.
If the brake caliper piston bottoms out and the piston is not fully compressed, gently rotate the piston clockwise until resistance is felt and then re-apply the brake caliper piston retractor until the piston is fully compressed.
Use the General Equipment: Brake Caliper Piston Retractor
-
 |
-
Clean the brake pad clips to anchor plate contact points.
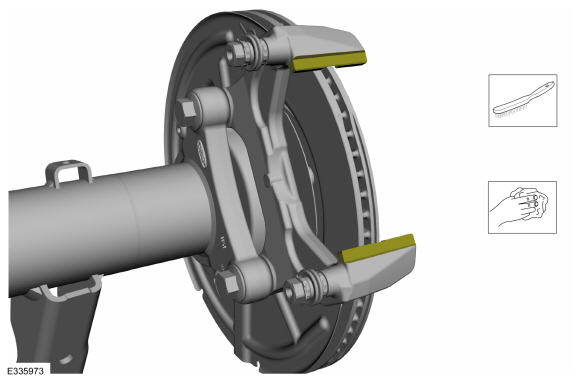 |
-
NOTICE: Make sure that the brake hose is not twisted when installing the brake caliper or damage to the brake flexible hose may occur.
NOTE: If installing new brake pads, make sure to install all new hardware supplied with the brake pad kit.
To install, reverse the removal procedure.
-
Deactivate the brake service mode.
Refer to: Parking Brake - Overview (206-05 Parking Brake and Actuation, Description and Operation).
-
Depress the brake pedal, check the brake fluid level in
the brake fluid reservoir and top up as necessary with brake fluid.
Refer to: Specifications (206-00 Brake System - General Information, Specifications).
-
Apply the brake pedal several times to verify correct brake system operation.
 Brake Disc Shield. Removal and Installation
Removal
NOTE:
Removal steps in this procedure may contain installation details.
Remove the brake disc.
Refer to: Brake Disc (206-04 Rear Disc Brake, Removal and Installation)...
 Rear Brake Flexible Hose. Removal and Installation
Removal
NOTICE:
Do not allow the brake fluid to come in contact with the
adhesive backing on the brake pads. This may prevent the brake pad
adhesive surface from bonding with the brake caliper...
Other information:
Lincoln Navigator 2018-2026 Workshop Manual: Turbocharger. Diagnosis and Testing
Pinpoint Tests PINPOINT TEST A: BLUE SMOKE FROM EXHAUST Possible Sources Oil leak Air cleaner Air intake Crankcase ventilation system Internal engine damage Turbocharger A1 CHECK THE EXHAUST Start the engine...
Lincoln Navigator 2018-2026 Workshop Manual: Rear Air Discharge Temperature Sensor. Removal and Installation
Removal NOTE: Removal steps in this procedure may contain installation details. Remove the RH c-pillar trim panel. Refer to: C-Pillar Trim Panel (501-05 Interior Trim and Ornamentation, Removal and Installation). Disconnect the electrical connector and remove the rear air discharge temperature sensor...
Categories
- Manuals Home
- 4th Gen Lincoln Navigator Service Manual (2018 - 2026)
- All Terrain Control Module (ATCM). Removal and Installation
- SYNC Module [APIM]. Removal and Installation
- Windshield Washer Pump. Removal and Installation
- Brake Service Mode Activation and Deactivation. General Procedures
- Front Seat. Removal and Installation
Rear Drive Axle and Differential. Diagnosis and Testing
Symptom Chart(s)
Diagnostics in this manual assume a certain skill level and knowledge of Ford-specific diagnostic practices.
REFER to: Diagnostic Methods (100-00 General Information, Description and Operation).
Symptom Chart - Differential
Symptom Chart - Differential
Condition Actions Axle overheating GO to Pinpoint Test A Broken gear teeth on the ring gear or pinion GO to Pi