Lincoln Navigator: Front Disc Brake / Brake Disc. Removal and Installation
Materials
| Name | Specification |
|---|---|
| Motorcraft® Metal Brake Parts Cleaner PM-4-A, PM-4-B, APM-4-C |
- |
Removal
NOTE: Removal steps in this procedure may contain installation details.
-
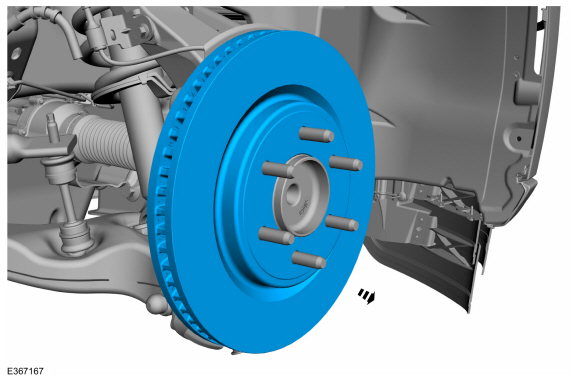
Remove the wheel and tire.
Refer to: Wheel and Tire (204-04A Wheels and Tires, Removal and Installation).
-
NOTICE: Do not pry in the caliper sight hole to retract the pistons as this can damage the pistons and boots.
NOTICE: Do not allow the brake caliper and anchor plate assembly to hang from the brake hose or damage to the hose can occur.
Remove the anchor plate bolts and position the brake caliper and anchor plate assembly aside. Discard the bolts.
Torque: 184 lb.ft (250 Nm)
 |
-
Remove the brake disc.
 |
Installation
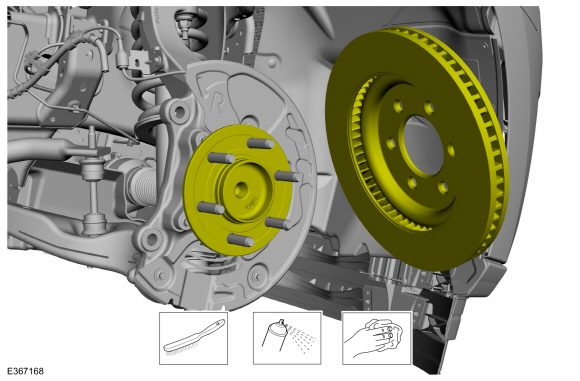
-
Clean the brake disc mating surfaces using a wire brush and the specified material.
Material: Motorcraft® Metal Brake Parts Cleaner / PM-4-A, PM-4-B, APM-4-C
 |
-
NOTICE: Make sure that the brake hose is not twisted when installing the brake caliper or damage to the brake flexible hose may occur.
To install, reverse the removal procedure.
- Apply the brake pedal several times to verify correct brake system operation.
 Brake Caliper Anchor Plate. Removal and Installation
Removal
NOTE:
Removal steps in this procedure may contain installation details.
Remove the brake pads.
Refer to: Brake Pads (206-03 Front Disc Brake, Removal and Installation)...
 Brake Disc Shield. Removal and Installation
Removal
NOTE:
Removal steps in this procedure may contain installation details.
Remove the brake disc.
Refer to: Brake Disc (206-03 Front Disc Brake, Removal and Installation)...
Other information:
Lincoln Navigator 2018-2026 Workshop Manual: Third Row Single Seat Seatbelt Buckle. Removal and Installation
Removal NOTE: Removal steps in this procedure may contain installation details. Remove the third row single seat. Refer to: Third Row Seat (501-10C Third Row Seats, Removal and Installation). Remove the third row single seat seatbelt buckle...
Lincoln Navigator 2018-2026 Workshop Manual: Crankshaft Rear Seal. Removal and Installation
Materials Name Specification Motorcraft® High Performance Engine RTV SiliconeTA-357 WSE-M4G323-A6 Engine Oil - SAE 5W-30 - Synthetic Blend Motor OilXO-5W30-Q1SP WSS-M2C946-B1 Removal NOTICE: During engine repair procedures, cleanliness is extremely important...
Categories
- Manuals Home
- 4th Gen Lincoln Navigator Service Manual (2018 - 2026)
- Brake Service Mode Activation and Deactivation. General Procedures
- All Terrain Control Module (ATCM). Removal and Installation
- Liftgate Trim Panel. Removal and Installation
- Vehicle Dynamics Control Module (VDM). Removal and Installation
- Body Control Module (BCM). Removal and Installation
Wheel to Hub Runout Minimization. General Procedures
Check
NOTE: Wheel-to-hub optimization is important. Clearance between the wheel and hub can be used to offset or neutralize the Road Force® or run-out of the wheel and tire assembly. For every 0.001 inch of wheel-to-hub clearance, the Road Force® can be affected between 1 and 3 pounds depending on the tire stiffness.
NOTE: The example below illustrates how the clearance between the wheel and the hub can be used to offset the high spot of radial run-out or Road Force®. Following the procedure will make sure of the best optimization.
Position the wheel and tire assembly on the vehicle so that the high spot location of radial run-out or Road Force® is at the 6 o'clock position and