Lincoln Navigator: Body Closures / Rear Door Alignment. General Procedures
Inspection
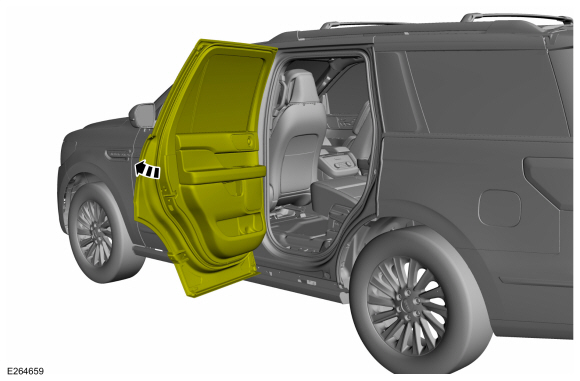
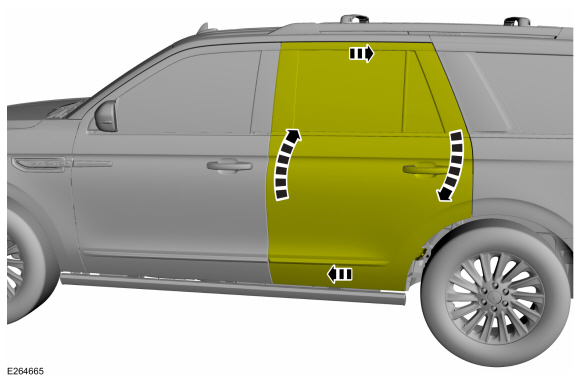
NOTE: LH side shown, RH side similar.
NOTE: Short wheelbase shown, long wheelbase similar.
-
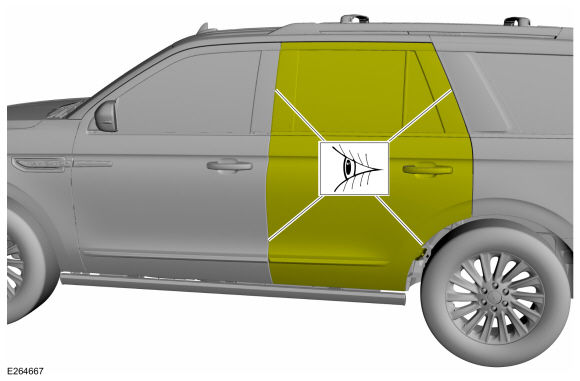
Inspect the rear door-to-body dimensions.
Refer to: Body and Frame (501-26 Body Repairs - Vehicle Specific Information and Tolerance Checks, Description and Operation).
Adjustment
All alignments
-
Open the rear door.
 |
-
Remove the bolts and the striker assembly.
 |
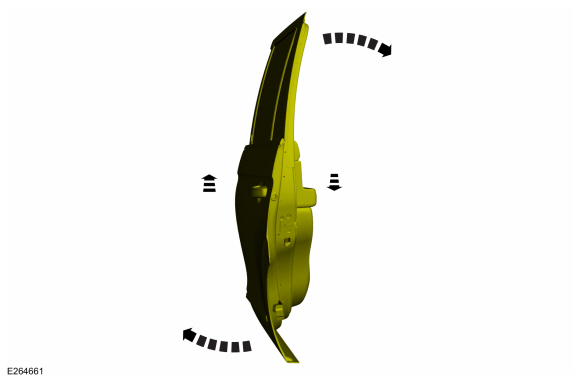
Rear door in and out, up and down alignment
-
Loosen the bolts to permit movement of the door.
 |
-
Adjust the door to specification.
Refer to: Body and Frame (501-26 Body Repairs - Vehicle Specific Information and Tolerance Checks, Description and Operation).
 |
-
Tighten the bolts.
Torque: 35 lb.ft (48 Nm)
|
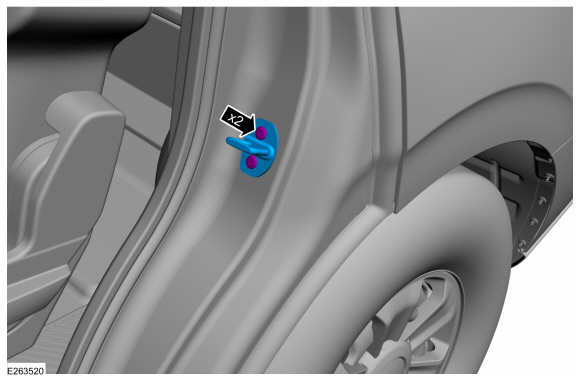
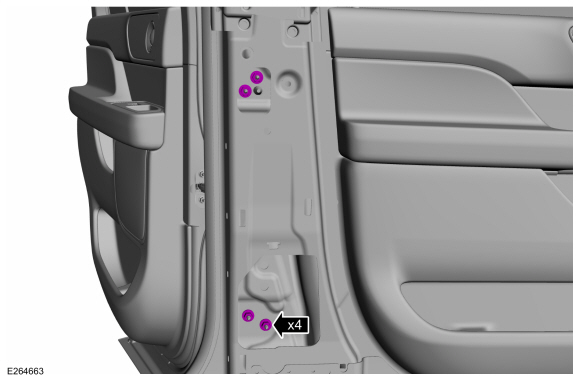
Rear door fore, aft and tilt alignment
-
Remove the lower B-pillar trim panel.
Refer to: B-Pillar Trim Panel (501-05 Interior Trim and Ornamentation, Removal and Installation).
-
Depower the SRS .
Refer to: Supplemental Restraint System (SRS) Depowering (501-20B Supplemental Restraint System, General Procedures).
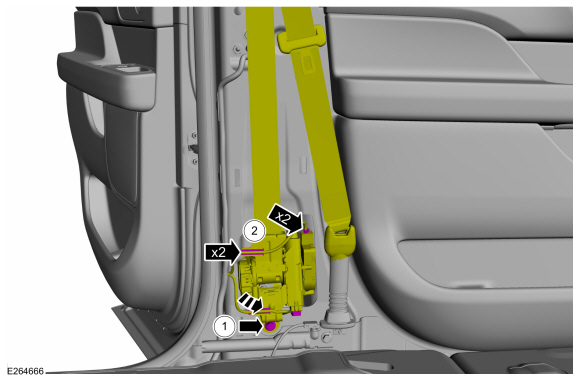
-
Position aside the safety belt retractor.
-
Detach the wire harness retainers and disconnect the electrical connectors.
-
Remove the screw.
-
Detach the wire harness retainers and disconnect the electrical connectors.
 |
-
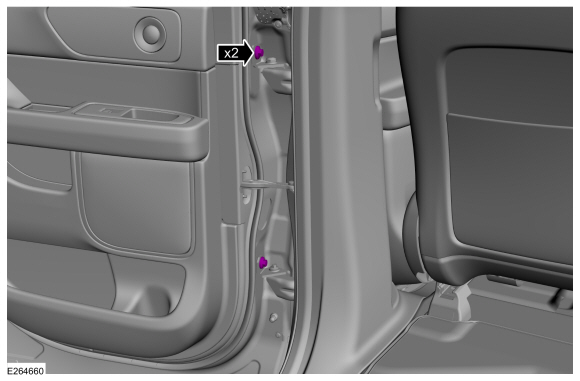
Loosen the nuts to permit movement of the door.
 |
-
Carefully close the rear door.
 |
-
Adjust the door to specification.
Refer to: Body and Frame (501-26 Body Repairs - Vehicle Specific Information and Tolerance Checks, Description and Operation).
 |
-
Carefully open the rear door.
|
-
Tighten the nuts.
Torque: 24 lb.ft (32 Nm)
|
-
NOTE: During installation, make sure the safety belt webbing is not twisted and the safety belts and buckles are accessible to the occupants.
Position the safety belt retractor.
-
Position the safety belt retractor and install the screw.
Torque: 30 lb.ft (40 Nm)
-
Connect the electrical connectors and attach the wire harness retainers.
-
Position the safety belt retractor and install the screw.
 |
-
Install the lower B-pillar trim panel.
Refer to: B-Pillar Trim Panel (501-05 Interior Trim and Ornamentation, Removal and Installation).
-
Repower the SRS .
Refer to: Supplemental Restraint System (SRS) Repowering (501-20B Supplemental Restraint System, General Procedures).
-
Check the active restraint system for correct operation.
Refer to: Seatbelt Systems (501-20A Seatbelt Systems, Diagnosis and Testing).
All alignments
-
Install the striker assembly.
Torque: 18 lb.ft (25 Nm)
|
-
Inspect the body-to-rear door dimensions.
Refer to: Body and Frame (501-26 Body Repairs - Vehicle Specific Information and Tolerance Checks, Description and Operation).
 |
 Power Liftgate Initialization. General Procedures
Initialization
Disconnect the battery or remove the RGTM fuse(s).
Refer to: Battery Disconnect and Connect (414-01 Battery, Mounting and Cables, General Procedures)...
 Front Door. Removal and Installation
Special Tool(s) /
General Equipment
Door Lift
Removal
NOTE:
Removal steps in this procedure may contain installation details.
NOTE:
LH side shown, RH side similar...
Other information:
Lincoln Navigator 2018-2026 Workshop Manual: Power Liftgate Motor. Removal and Installation
Removal NOTE: Removal steps in this procedure may contain installation details. NOTE: LH side shown, RH side similar. Remove the loadspace trim panel. Refer to: Loadspace Trim Panel (501-05 Interior Trim and Ornamentation, Removal and Installation)...
Lincoln Navigator 2018-2026 Workshop Manual: Evaporative Emissions. Diagnosis and Testing
Diagnostic Trouble Code (DTC) Chart Diagnostics in this manual assume a certain skill level and knowledge of Ford-specific diagnostic practices. REFER to: Diagnostic Methods (100-00 General Information, Description and Operation). Module DTC Description Action PCM P00FE:00 EVAP System Tank Vapor Line Restricted/Blocked: No Sub Type Information GO to Pinpoint Test H..
Categories
- Manuals Home
- 4th Gen Lincoln Navigator Service Manual (2018 - 2026)
- Telematics Control Unit (TCU) Module. Removal and Installation
- Front Bumper Cover. Removal and Installation
- Transmission Fluid Level Check. General Procedures
- SYNC Module [APIM]. Removal and Installation
- Remote Function Actuator (RFA) Module. Removal and Installation
Rear Drive Halfshafts. Diagnosis and Testing
Preliminary Inspection
Visually inspect the CV joints, housing, boots, and clamps for obvious signs of mechanical damage.If an obvious cause for an observed or reported concern is found, correct the cause (if possible) before proceeding to the next step
If the cause is not visually evident, verify the symptom and REFER to Symptom Chart: NVH.