Lincoln Navigator: Rear Suspension / Lower Arm. Removal and Installation
Special Tool(s) / General Equipment
 |
204-592/1 Adapter for 204-592 |
Removal
NOTICE: Suspension fasteners are critical parts that affect the performance of vital components and systems. Failure of these fasteners may result in major service expense. Use the same or equivalent parts if replacement is necessary. Do not use a replacement part of lesser quality or substitute design. Tighten fasteners as specified.
-
Remove the wheel and tire.
Refer to: Wheel and Tire (204-04A Wheels and Tires, Removal and Installation).
-
NOTE: If equipped with dynamic suspension.
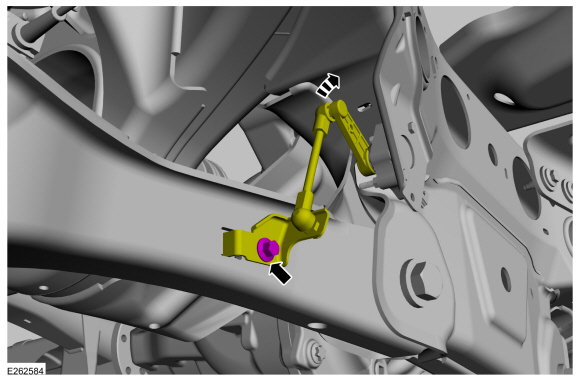
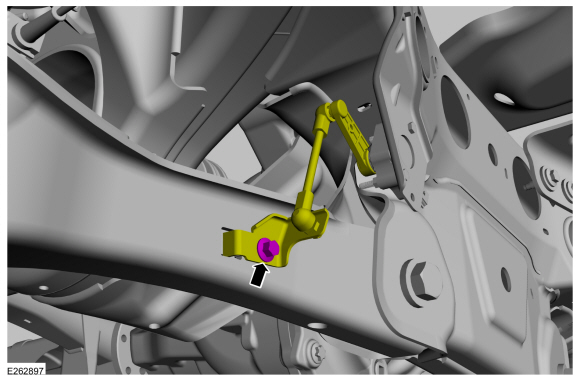
Remove the ride height sensor arm bracket bolt and position the bracket aside.
 |
-
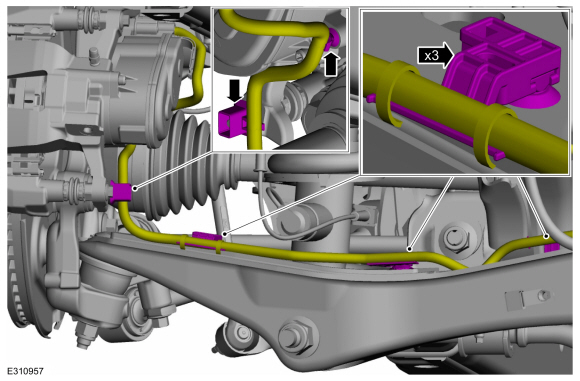
Detach the parking brake wiring harness retainers and position aside the harness.
 |
-
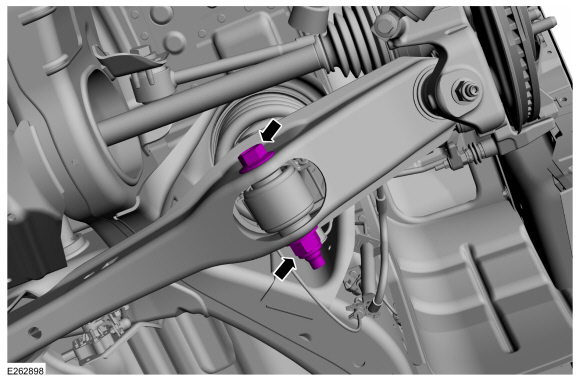
Remove and discard the rear shock absorber lower bolt and flagnut.
 |
-
Remove and discard the lower arm-to-frame bolt and flagnut.
 |
-
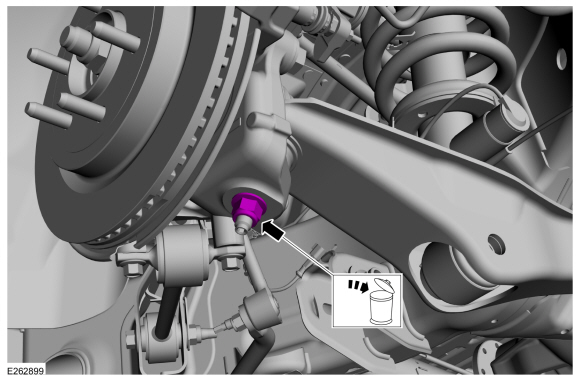
Remove and discard the lower arm ball joint nut.
 |
-
NOTICE: Do not use a prying device or separator fork between the ball joint and the wheel knuckle. Damage to the ball joint or ball joint seal may result.
NOTICE: Use care when releasing the lower arm and wheel knuckle into the resting position or damage to the ball joint seal may occur.
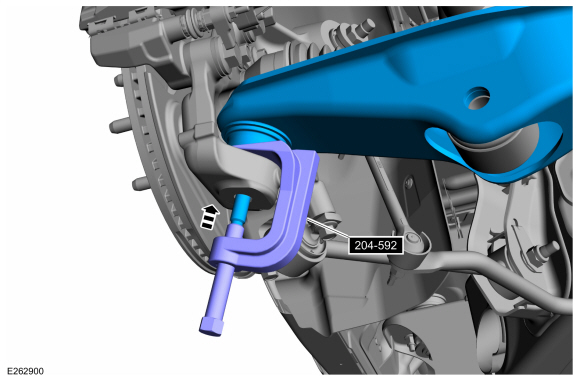
Separate the lower ball joint from the wheel knuckle and remove the lower arm.
Use Special Service Tool: 204-592/1 Adapter for 204-592.
 |
Installation
-
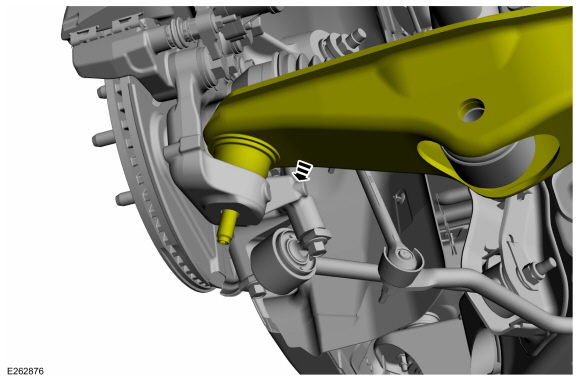
Position the lower arm ball joint onto the wheel knuckle.
 |
-
Install the new lower arm ball joint nut.
Torque: 76 lb.ft (103 Nm)
 |
-
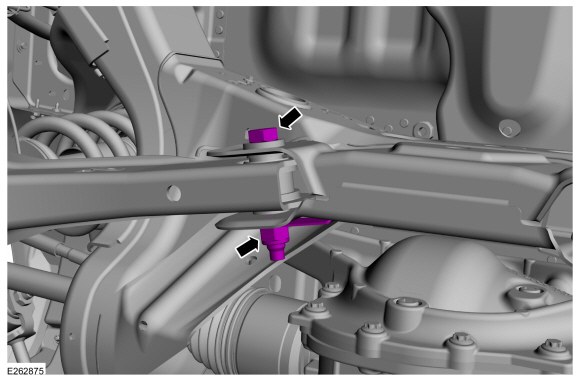
NOTE: Do not fully tighten the lower arm-to-frame bolt at this time.
Install the new lower arm-to-frame bolt and flagnut.
Torque: 37 lb.ft (50 Nm)
 |
-
NOTE: Only tighten the nut and bolt finger tight at this stage.
Position the lower arm and install a new rear shock absorber lower bolt and flagnut.
 |
-
Install the wheel and tire.
Refer to: Wheel and Tire (204-04A Wheels and Tires, Removal and Installation).
- Lower the vehicle so that the weight of the vehicle is on the wheel and tire assemblies.
-
Tighten the new lower arm-to-frame bolt and flagnut.
Torque: 166 lb.ft (225 Nm)
|
-
Tighten the shock absorber lower bolt and flagnut.
Torque: 406 lb.ft (550 Nm)
|
-
Position the parking brake wiring harness and attach the parking brake wiring harness retainers.
|
-
NOTE: If equipped with dynamic suspension.
Position the ride height sensor arm bracket and install the bolt.
Torque: 177 lb.in (20 Nm)
 |
-
Check and if necessary adjust rear camber.
Refer to: Rear Camber Adjustment (204-00 Suspension System - General Information, General Procedures).
-
NOTE: If equipped with dynamic suspension.
Calibrate the suspension height sensor. Connect the scan tool and carry out the Ride Height Calibration routine. Follow the scan tool directions.

 Lower Trailing Arm. Removal and Installation
Removal
NOTICE:
Suspension fasteners are critical parts that affect the
performance of vital components and systems. Failure of these fasteners
may result in major service expense...
Other information:
Lincoln Navigator 2018-2026 Workshop Manual: Electronic Engine Controls. Diagnosis and Testing
Diagnostic Trouble Code (DTC) Chart Diagnostics in this manual assume a certain skill level and knowledge of Ford-specific diagnostic practices. REFER to: Diagnostic Methods (100-00 General Information, Description and Operation). Module DTC Description Action PCM P0298:00 Engine Oil Overtemperature Condition: No Sub Type Information GO to Pinpoint Test DY ..
Lincoln Navigator 2018-2026 Workshop Manual: Toe Link. Removal and Installation
Removal NOTICE: Suspension fasteners are critical parts that affect the performance of vital components and systems. Failure of these fasteners may result in major service expense. Use the same or equivalent parts if replacement is necessary. Do not use a replacement part of lesser quality or substitute design. Tighten fasteners as specified. Remove the wheel and t..
Categories
- Manuals Home
- 4th Gen Lincoln Navigator Service Manual (2018 - 2026)
- Brake Service Mode Activation and Deactivation. General Procedures
- Neutral Flat Tow Activation and Deactivation. General Procedures
- Remote Function Actuator (RFA) Module. Removal and Installation
- Telematics Control Unit (TCU) Module. Removal and Installation
- Body Control Module (BCM). Removal and Installation
Front Stabilizer Bar Link. Removal and Installation
Removal
NOTICE: Suspension fasteners are critical parts that affect the performance of vital components and systems. Failure of these fasteners may result in major service expense. Use the same or equivalent parts if replacement is necessary. Do not use a replacement part of lesser quality or substitute design. Tighten fasteners as specified.
NOTE: Removal steps in this procedure may contain installation details.
With the vehicle in NEUTRAL, position it on a hoist.Refer to: Jacking and Lifting (100-02 Jacking and Lifting, Description and Operation).
NOTICE: Do not use power tools to remove or install the stabilizer bar