Lincoln Navigator: Front End Sheet Metal Repairs / Cowl Side Panel. Removal and Installation
Special Tool(s) / General Equipment
| 6.5 mm Drill Bit | |
| 11 mm Drill Bit | |
| Rivet Gun | |
| Self-Piercing Rivet (SPR) Remover/Installer | |
| Belt Sander | |
| Hot Air Gun | |
| 8 mm Drill Bit | |
| Locking Pliers |
Materials
| Name | Specification |
|---|---|
| Metal Bonding Adhesive TA-1, TA-1-B, 3M™ 08115, LORD Fusor® 108B, Henkel Teroson EP 5055 |
- |
| Seam Sealer TA-2-B, 3M™ 08308, LORD Fusor® 803DTM |
- |
Removal
NOTE: Aluminum body panels are highly receptive to heat transfer. With the extensive use of structural adhesives and non-structural sealers used in vehicle construction, the potential of heat transfer could impact adhesives and sealers in non-associated panels during the repair process. Many repairs areas that utilize structural adhesive may be separated after fastener removal by using a panel chisel along the joint/flange. Using heat not exceeding 425° F to loosen a bonded panel should only be done when all panels in the joint will be replaced and new adhesive applied.
NOTE: Left hand (LH) side shown, right hand (RH) side similar.
NOTE: Flow drill screw (FDS) fasteners are not to be reused. Remove and discard.
NOTE: Adequately protect all adjacent areas against cutting and grinding procedures.
-
Depower the SRS .
Refer to: Supplemental Restraint System (SRS) Depowering (501-20B Supplemental Restraint System, General Procedures).
-
If Required:
Dimensionally restore the vehicle to pre-damage condition.
Refer to: Body and Frame (501-26 Body Repairs - Vehicle Specific Information and Tolerance Checks, Description and Operation).
-
Remove the A-pillar outer panel section and reinforcement.
Refer to: A-Pillar Outer Panel Section and Reinforcement (501-29 Side Panel Sheet Metal Repairs, Removal and Installation).
-
Remove the rocker panel.
Refer to: Rocker Panel (501-29 Side Panel Sheet Metal Repairs, Removal and Installation).
-
Remove the roof side rail.
Refer to: Roof Side Rail (501-28 Roof Sheet Metal Repairs, Removal and Installation).
Refer to: Roof Side Rail Section (501-28 Roof Sheet Metal Repairs, Removal and Installation).
-
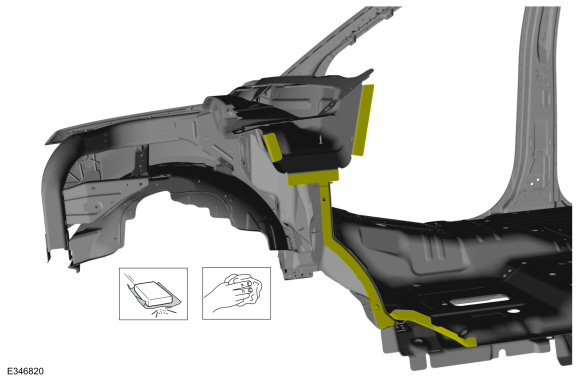
NOTE: Pay particular attention to the location of adhesives or sealers to aid in installation.
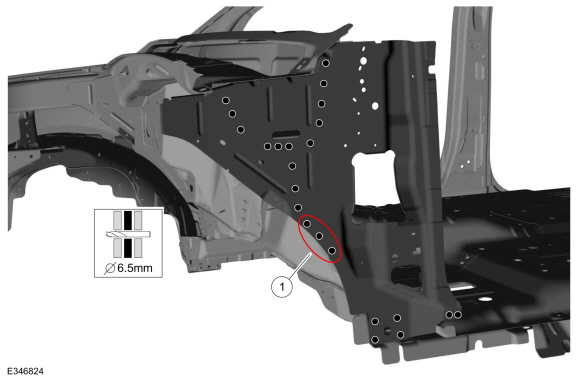
Remove the fasteners and the cowl side panel.
Use the General Equipment: Self-Piercing Rivet (SPR) Remover/Installer
Use the General Equipment: Belt Sander
Use the General Equipment: Hot Air Gun
 |
Installation
NOTE: Left hand (LH) side shown, right hand (RH) side similar.
NOTE: Self-Piercing Rivet (SPR) fasteners may not be placed directly over original self-piercing rivet (SPR) fastener location. They must be placed adjacent to original location matching original quantity.
NOTE: Blind or solid rivets may be used in place of self-piercing rivet (SPR) fasteners in the original self-piercing rivet (SPR) fasteners location after enlarging hole to 6.5 mm.
NOTE: Adequately protect all adjacent areas against cutting and grinding procedures.
-
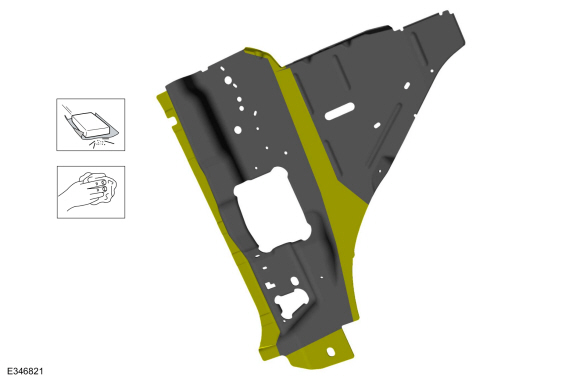
80-120 grit sand paper.
Sand to remove old adhesive and clean.
 |
-
80-120 grit sand paper.
Sand to remove e-coat and clean.
 |
-
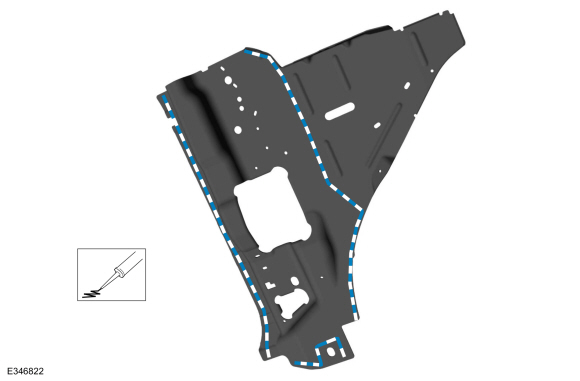
Apply adhesive.
Material: Metal Bonding Adhesive / TA-1, TA-1-B, 3M™ 08115, LORD Fusor® 108B, Henkel Teroson EP 5055
 |
-
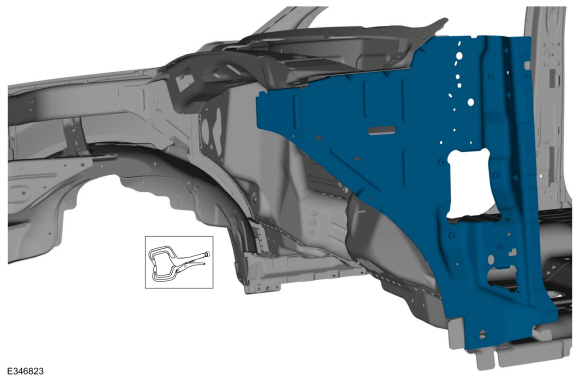
Install, properly position and clamp the cowl side panel.
Use the General Equipment: Locking Pliers
 |
-
NOTE: Do not drill item 1 if using self-piercing rivet (SPR) fasteners.
Drill for fasteners.
Use the General Equipment: 6.5 mm Drill Bit
 |
-
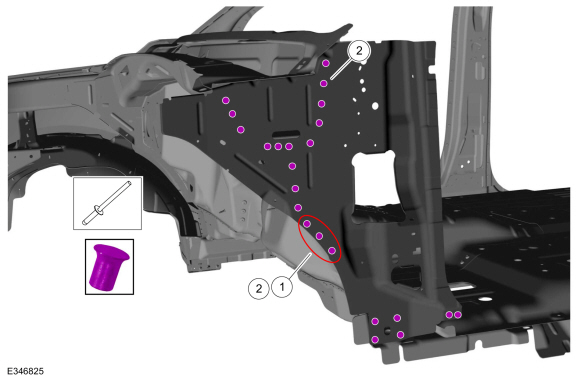
Install the fasteners.
Use the General Equipment: Self-Piercing Rivet (SPR) Remover/InstallerItem SPR Number SPR Code Henrob®, Car-O-Liner®, CMO®, Chief®, Spanesi®, Wielander and Schill® Mandrel Pro-Spot® Mandrel Blind Rivet Solid Rivet Rivnut® 1 W710246-S900 BN DG10-200/H SA-0400/SA-0402 W702512-S900C - - 2 - - - - W702512-S900C - -
Use the General Equipment: Rivet Gun
 |
-
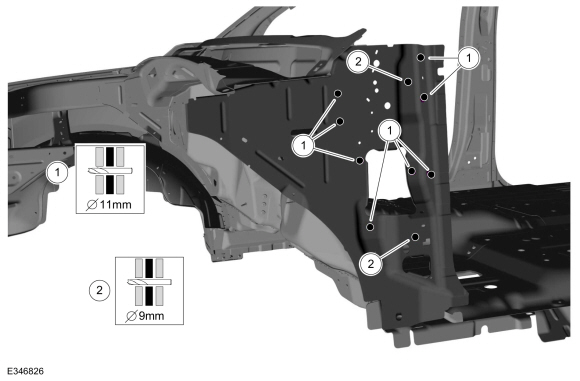
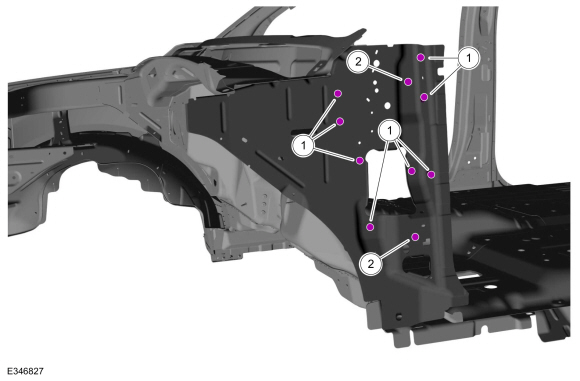
Drill for Rivnut® fasteners.
Use the General Equipment: 11 mm Drill Bit
Use the General Equipment: 8 mm Drill Bit
 |
-
Install Rivnut® fasteners.
Item SPR Number SPR Code Henrob®, Car-O-Liner®, CMO®, Chief®, Spanesi®, Wielander and Schill® Mandrel Pro-Spot® Mandrel Blind Rivet Solid Rivet Rivnut® 1 - - - - - - W716421-S450 2 - - - - - - W716422-S450
 |
-
Install the roof side rail.
Refer to: Roof Side Rail (501-28 Roof Sheet Metal Repairs, Removal and Installation).
Refer to: Roof Side Rail Section (501-28 Roof Sheet Metal Repairs, Removal and Installation).
-
Install the rocker panel.
Refer to: Rocker Panel (501-29 Side Panel Sheet Metal Repairs, Removal and Installation).
-
Install the A-pillar outer panel section and reinforcement.
Refer to: A-Pillar Outer Panel Section and Reinforcement (501-29 Side Panel Sheet Metal Repairs, Removal and Installation).
-
All seams must be sealed to production level.
Material: Seam Sealer / TA-2-B, 3M™ 08308, LORD Fusor® 803DTM
-
Refinish the entire repair using a Ford approved paint system.
-
Restore corrosion protection.
Refer to: Corrosion Prevention (501-25 Body Repairs - General Information, General Procedures).
-
Repower the SRS .
Refer to: Supplemental Restraint System (SRS) Repowering (501-20B Supplemental Restraint System, General Procedures).

 Dash Panel. Removal and Installation
Special Tool(s) /
General Equipment
6.5 mm Drill Bit
Polydrive Bit Socket
Rivet Gun
Self-Piercing Rivet (SPR) Remover/Installer
Belt Sander
Hot Air Gun
Locking Pliers
Materials
Name
Specification
Metal Bonding AdhesiveTA-1, TA-1-B, 3M™ 08115, LORD Fusor® 108B, Henkel Teroson EP 5055
-
Seam SealerT..
Other information:
Lincoln Navigator 2018-2026 Workshop Manual: Evaporative Emission System Leak Test. General Procedures
Activation Phase 1 - Leak Verification Run the EVAP Test with the scan tool. NOTE: Some small leaks may not be detected using the EVAP Test. If the system has passed the test but a leak is still suspected, then proceed to Phase 2. If the EVAP system failed the EVAP Test, then proceed to Phase 2. Phase 2 - System Leak Check Disc..
Lincoln Navigator 2018-2026 Workshop Manual: Jacking and Lifting. Description and Operation
Stay in Neutral Mode NOTE: Always put your vehicle in Stay in Neutral mode when entering an automatic car wash. Failure to do this could result in vehicle damage not covered by warranty. Stay in Neutral mode allows your vehicle to stay in Neutral when you exit your vehicle. Your vehicle must be stationary to enter this mode. To enter Stay in Neutral mode - Move the tra..
Categories
- Manuals Home
- 4th Gen Lincoln Navigator Service Manual (2018 - 2026)
- Front Seat. Removal and Installation
- Transmission Fluid Level Check. General Procedures
- Body Control Module (BCM). Removal and Installation
- Neutral Flat Tow Activation and Deactivation. General Procedures
- Rear Bumper. Removal and Installation
Rear Drive Halfshafts. Diagnosis and Testing
Preliminary Inspection
Visually inspect the CV joints, housing, boots, and clamps for obvious signs of mechanical damage.If an obvious cause for an observed or reported concern is found, correct the cause (if possible) before proceeding to the next step
If the cause is not visually evident, verify the symptom and REFER to Symptom Chart: NVH.