Lincoln Navigator: Information and Entertainment System - General Information - Vehicles With: SYNC 4 / Front Door Speaker. Removal and Installation
Removal
NOTE: Removal steps in this procedure may contain installation details.
All door speakers
-
Remove the front door trim panel.
Refer to: Front Door Trim Panel (501-05 Interior Trim and Ornamentation, Removal and Installation).
Mid range speaker
-
Remove the screws and the front door defroster duct.
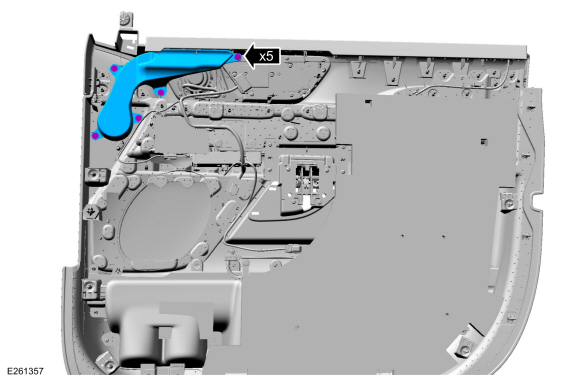 |
-
Remove the screws, disconnect the electrical connector and remove the mid range speaker.
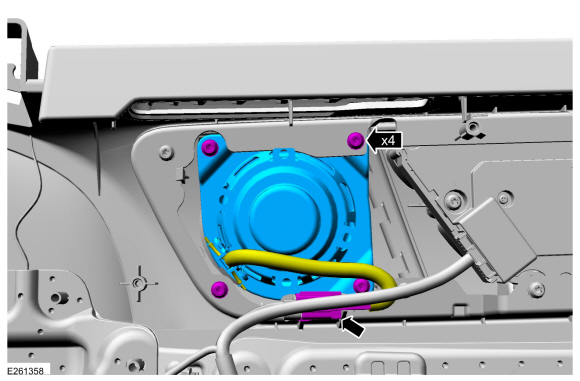 |
Woofer speaker
-
Disconnect the electrical connector, remove the screws and the front door speaker.
Torque: 13 lb.in (1.5 Nm)
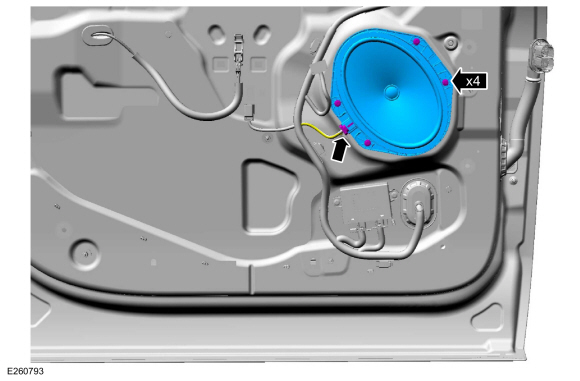 |
Installation
-
To install, reverse the removal procedure.
 Front Display Interface Module (FDIM). Removal and Installation
Special Tool(s) /
General Equipment
Interior Trim Remover
Removal
NOTE:
Removal steps in this procedure may contain installation details...
 Front Door Tweeter Speaker. Removal and Installation
Special Tool(s) /
General Equipment
Interior Trim Remover
Removal
Release the clips, disconnect the electrical connector and remove the front door sail trim panel...
Other information:
Lincoln Navigator 2018-2026 Workshop Manual: Turbocharger Coolant Return Tube LH. Removal and Installation
Materials Name Specification Motorcraft® Metal Brake Parts CleanerPM-4-A, PM-4-B, APM-4-C - Removal NOTICE: The turbocharger compressor vanes can be damaged by even the smallest particles. When removing any turbocharger or engine air intake system component, ensure that no debris enters the system...
Lincoln Navigator 2018-2026 Workshop Manual: Front Fog Lamp. Removal and Installation
Removal NOTE: Removal steps in this procedure may contain installation details. NOTE: LH (left-hand) front fog lamp shown, RH (right-hand) front fog lamp similar. Remove the front wheel and tire. Refer to: Wheel and Tire (204-04A Wheels and Tires, Removal and Installation)...
Categories
- Manuals Home
- 4th Gen Lincoln Navigator Service Manual (2018 - 2026)
- Rear View Mirrors - System Operation and Component Description. Description and Operation
- Telematics Control Unit (TCU) Module. Removal and Installation
- Rear Bumper. Removal and Installation
- Identification Codes. Description and Operation
- Vehicle Dynamics Control Module (VDM). Removal and Installation
Wheel to Hub Runout Minimization. General Procedures
Check
NOTE: Wheel-to-hub optimization is important. Clearance between the wheel and hub can be used to offset or neutralize the Road Force® or run-out of the wheel and tire assembly. For every 0.001 inch of wheel-to-hub clearance, the Road Force® can be affected between 1 and 3 pounds depending on the tire stiffness.
NOTE: The example below illustrates how the clearance between the wheel and the hub can be used to offset the high spot of radial run-out or Road Force®. Following the procedure will make sure of the best optimization.
Position the wheel and tire assembly on the vehicle so that the high spot location of radial run-out or Road Force® is at the 6 o'clock position and