Lincoln Navigator: Glass, Frames and Mechanisms / Fixed Glass. General Procedures
Special Tool(s) / General Equipment
| Power Caulk Gun | |
| Power Fixed Glass Removal Tool | |
| Cold Knife | |
| Knife | |
| Vacuum Cleaner |
Materials
| Name | Specification |
|---|---|
| Sika® SikaTack® MACH 60 / Sika® SikaTack® MACH 30 / Dow® BETASEAL™ Express | - |
| Sika Tack ASAP Urethane Adhesive | - |
| Motorcraft® Ultra-Clear Spray Glass Cleaner ZC-23 |
ESR-M14P5-A |
| Bare Metal Etch Primer BETAPRIME 5201 |
- |
| Sika® Aktivator PRO / Dow® BETAPRIME™ 5504G / Sika® Primer-207 | - |
Repair
-
NOTE: Some interior trim, exterior trim and/or components may require removal based on the tools and removal method used.
NOTE: In some instances repair methods may be combined to achieve the best results.
NOTE: If any of the following conditions exist, the fixed glass must be discarded. A new fixed glass is required.
- The fixed glass is the windshield and equipped with Advanced Head Up Display (AHUD).
- The fixed glass is the windshield glass and equipped with a camera bracket.
- The fixed glass is the windshield glass and equipped with adhesive mouldings.
-
Cold knife method – uses the cold knife to cut the
urethane from the outside of a vehicle provided the blade can reach the
bead.
Use the General Equipment: Cold Knife
-
Power tool method – uses various power tools from inside the vehicle using a cutting or paddle type blade.
Use the General Equipment: Power Fixed Glass Removal Tool
-
Piano wire method – uses the piano wire to cut the
urethane from inside and outside of a vehicle using an assistant.
-
When using the cold knife method, apply tape to protect
the perimeter of the window opening from paint damage. Multiple layers
of tape may be required.
-


NOTICE: New or reused fixed glass must be installed within 2 hours of cutting the urethane adhesive. Exposed cut surfaces of urethane become oxidized and inactive beyond 2 hours, reducing the effectiveness of the repair bond.
NOTICE: To avoid rust formation, use extreme care not to scratch the paint or primer or damage the pinch weld during glass removal.
NOTICE: Take precautions to prevent damage to other components when cutting urethane.
NOTE: If any of the following conditions exist, the fixed glass must be discarded. A new fixed glass is required.
- The fixed glass is the windshield and equipped with Advanced Head Up Display (AHUD).
- The fixed glass is the windshield glass and equipped with a camera bracket.
- The fixed glass is the windshield glass and equipped with adhesive mouldings.
NOTE: Fixed glass may have locating pins that vary in location. It may be necessary to cut these pins with a utility knife.
Remove the fixed glass.
Use the General Equipment: Power Fixed Glass Removal Tool
Use the General Equipment: Cold Knife
Use the General Equipment: Knife
-
 WARNING:
Repair any corrosion found on the pinch weld. The
pinch weld is a structural component of the vehicle. Corrosion left
unrepaired may reduce the structural integrity of the vehicle. Failure
to follow this instruction may result in serious injury to vehicle
occupant(s).
WARNING:
Repair any corrosion found on the pinch weld. The
pinch weld is a structural component of the vehicle. Corrosion left
unrepaired may reduce the structural integrity of the vehicle. Failure
to follow this instruction may result in serious injury to vehicle
occupant(s).
NOTICE: New or reused fixed glass must be installed within 2 hours of cutting the urethane adhesive. Exposed cut surfaces of urethane become oxidized and inactive beyond 2 hours, reducing the effectiveness of the repair bond.
NOTE: Avoid scratching the pinch weld. Repair all minor scratches or exposed metal on the pinch weld following manufacturer's instructions for the product being used. Use the same brand pinch weld primer, glass primer and urethane adhesive.
NOTE: Touching the adhesive surface impairs the rebonding.
NOTE: Make sure the mating surfaces are clean and free of foreign material.
NOTE: If equipped with Advanced Head Up Display (AHUD) and replacing the windshield glass, it must have locating pins and spacers to ensure correct alignment. Do not use a replacement windshield glass, without locating pins and spacers.
NOTE: If replacing the windshield glass and equipped with a camera bracket, it must have locating pins and spacers to ensure correct alignment. Do not use a replacement windshield glass, without locating pins and spacers.
Prep the pinch weld area to install the new or reused fixed glass.
-
Trim or shave down the original urethane adhesive on
pinch weld flange and on glass (if reused) using a utility knife,
leaving a 1 mm to 2 mm (0.04 in to 0.08 in) base on the parts, only when
final installation is within 2 hours.
-
Remove any foreign material or dirt from the pinch weld using a soft brush or vacuum.
Use the General Equipment: Vacuum Cleaner
-
Trim or shave down the original urethane adhesive on
pinch weld flange and on glass (if reused) using a utility knife,
leaving a 1 mm to 2 mm (0.04 in to 0.08 in) base on the parts, only when
final installation is within 2 hours.
-
NOTE: Minimize applying bare metal primer over areas with remaining urethane adhesive and observe a minimum flash time of 10 minutes.
If the paint layer was damaged on the pinch weld extending into bare metal, apply bare metal primer to those areas only.
Material: Bare Metal Etch Primer / BETAPRIME 5201
-
NOTE: Minimize applying primer over areas with remaining urethane adhesive and observe a minimum flash time of 10 minutes.
Apply primer as necessary.
-
Apply primer to those areas only previously primed with primer.
Material: Sika® Aktivator PRO / Dow® BETAPRIME™ 5504G / Sika® Primer-207
-
If the clearcoat layer was damaged on the pinch weld
but not extending into bare metal, apply primer to those areas only.
Material: Sika® Aktivator PRO / Dow® BETAPRIME™ 5504G / Sika® Primer-207
-
Apply primer to those areas only previously primed with primer.
-
NOTE: This step only applies when installing a new fixed glass.
Clean the inside of the new fixed glass with glass cleaner.
Material: Motorcraft® Ultra-Clear Spray Glass Cleaner / ZC-23 (ESR-M14P5-A)
-
NOTE: This step only applies when installing a new fixed glass.
Apply primer according to the manufacturer's instructions to the new fixed glass. Allow at least 10 minutes to dry.
Material: Sika® Aktivator PRO / Dow® BETAPRIME™ 5504G / Sika® Primer-207
-
NOTE: This step only applies to reusable fixed glass.
Visually inspect and remove remaining urethane adhesive from the glass leaving a thin layer to bond with the new urethane adhesive bead.
-
NOTE: This step only applies to reusable fixed glass.
Apply primer according to the manufacturer's instructions to the fixed glass anywhere the urethane adhesive was completely removed. Allow at least 10 minutes to dry.
Material: Sika® Aktivator PRO / Dow® BETAPRIME™ 5504G / Sika® Primer-207
-
Cut the urethane adhesive applicator tip to specification.
Material: Sika® SikaTack® MACH 60 / Sika® SikaTack® MACH 30 / Dow® BETASEAL™ Express
Material: Sika Tack ASAP Urethane Adhesive
 |
-
NOTICE: Make sure the urethane bead is uniform to prevent air and water leaks.
NOTE: The fixed glass must be installed within 10 minutes of applying the urethane adhesive.
NOTE: Use a power caulk gun that applies the urethane adhesive with less effort and a continuous bead.
Apply a urethane adhesive bead.
-
Start and end at the original overlap points to prevent air and water leaks.
-
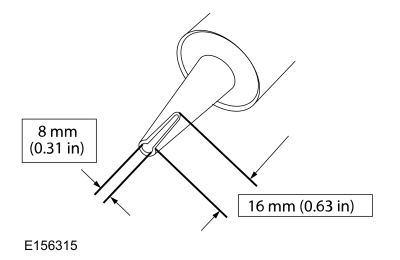
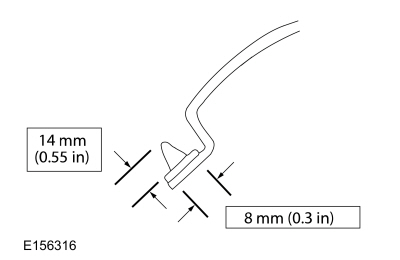
Apply a urethane adhesive bead 14 mm (0.551 in) high
and 8 mm (0.314 in) wide on top of the existing trimmed urethane
adhesive bead on the pinch weld.
Use the General Equipment: Power Caulk Gun
Material: Sika® SikaTack® MACH 60 / Sika® SikaTack® MACH 30 / Dow® BETASEAL™ Express
Material: Sika Tack ASAP Urethane Adhesive
-
Make sure there are no gaps in the bead.
-
Start and end at the original overlap points to prevent air and water leaks.
 |
-
NOTICE: The door windows must be left open during the adhesive curing time.
Open the vehicle windows to prevent the air pressure of closing doors from compromising the urethane adhesive bond.
-
WARNING:
Do not drive vehicle until the urethane adhesive
seal has cured. Follow urethane adhesive manufacturer's curing
directions. Inadequate or incorrect curing of the urethane adhesive seal
will adversely affect glass retention. Failure to follow these
instructions may result in serious injury to vehicle occupant(s).
NOTE: If equipped, the adhesive strip backings must be removed from the A-pillar mouldings before installing the fixed glass.
NOTE: If equipped with Advanced Head Up Display (AHUD) and replacing the windshield glass, it must have locating pins and spacers to ensure correct alignment. Do not use a replacement windshield glass, without locating pins and spacers.
NOTE: If replacing the windshield glass and equipped with a camera bracket, it must have locating pins and spacers to ensure correct alignment. Do not use a replacement windshield glass, without locating pins and spacers.
NOTE: If equipped with Advanced Head Up Display (AHUD) and replacing the windshield glass, make sure the gap from the windshield to the A-pillar is 2.7mm (0.106 in) to maximum of 4.7mm (0.185 in) on each side.
NOTE: If equipped with Advanced Head Up Display (AHUD) and replacing the windshield glass, make sure the gap from the windshield to the roof is 2.0mm (0.079 in) to maximum of 4.0mm (0.157 in) on each side.
Install the fixed glass to the vehicle.
-
Install the fixed glass, pressing firmly by hand to ensure a good bond.
-
Secure the fixed glass in the correct position with tape until the urethane adhesive has cured.
-
Install the fixed glass, pressing firmly by hand to ensure a good bond.
-
If necessary, remove excess uncured urethane adhesive from the interior and exterior surface of the fixed glass.
Material: Motorcraft® Ultra-Clear Spray Glass Cleaner / ZC-23 (ESR-M14P5-A)
-
Install any removed components as needed.
-
If equipped, carry out the IPMA (image processing module A) camera alignment.
Refer to: Lane Keeping System - Overview (419-07 Lane Keeping System, Description and Operation).
-
If equipped with Advanced Head Up Display (AHUD) and the
windshield was replaced, carry out the Advanced Head Up Display (AHUD)
Module calibration.
Refer to: Head Up Display (HUD) Module Calibration (419-03B Collision Warning and Collision Avoidance System, General Procedures).
 Glass, Frames and Mechanisms. Diagnosis and Testing
DTC Chart: Driver Door Module (DDM)
Diagnostics in this manual assume a certain skill level and knowledge of Ford-specific diagnostic practices. REFER to: Diagnostic Methods (100-00 General Information, Description and Operation)...
 Heated Window Grid Wire Repair. General Procedures
Materials
Name
Specification
Motorcraft® Ultra-Clear Spray Glass CleanerZC-23
ESR-M14P5-A
Motorcraft® Rear Window Defroster RepairPM-11
WSB-M4J58-B
Motorcraft® Lacquer Touch-Up PaintPMPC-19500-XXXXA, PMPM-19500-XXXXG, PMPP-19500-XXXXA
ESR-M2P100-C
Inspection
Using a bright lamp in the vehicle, inspect the gri..
Other information:
Lincoln Navigator 2018-2026 Workshop Manual: Stay in Neutral - No Start. General Procedures
Activation NOTE: The following steps should be used when the engine will crank but not start. NOTE: If the vehicle has a discharged battery, an external power source is required. If the battery discharges while in Stay in Neutral Mode, the Park Lock Pawl Solenoid will release and transmission will return to Park. Do not tow the vehicle in this mode. Apply the..
Lincoln Navigator 2018-2026 Workshop Manual: Front Seat Cushion Blower Motor. Removal and Installation
Removal NOTE: Driver seat shown, passenger seat similar. Raise the seat to the full up position. Depower the SRS . Refer to: Supplemental Restraint System (SRS) Depowering (501-20B Supplemental Restraint System, General Procedures). Remove the front seat cushion blower motor. Disconnect the..
Categories
- Manuals Home
- 4th Gen Lincoln Navigator Service Manual (2018 - 2026)
- Front Seat. Removal and Installation
- Rear View Mirrors - System Operation and Component Description. Description and Operation
- Front Bumper Cover. Removal and Installation
- Vehicle Dynamics Control Module (VDM). Removal and Installation
- SYNC Module [APIM]. Removal and Installation
Axle Tube Bearing. Removal and Installation
Special Tool(s) / General Equipment
 205-123
(T78P-1177-A)
205-123
(T78P-1177-A)
Installer, Axle Shaft Oil Seal
 308-047
(T77F-1102-A)
308-047
(T77F-1102-A)
Remover, Bearing Cup Slide Hammer