Lincoln Navigator: Glass, Frames and Mechanisms / Driver Door Window Control Switch. Removal and Installation
Removal
-
Remove the driver door trim panel.
Refer to: Front Door Trim Panel (501-05 Interior Trim and Ornamentation, Removal and Installation).
-
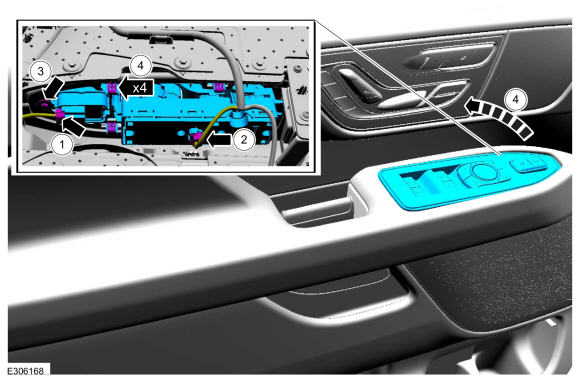
Remove the driver door window control switch bezel assembly.
-
Disconnect the driver door lock control switch electrical connector.
-
Disconnect the driver door window control switch electrical connector.
-
Remove the screw from driver door window control switch bezel assembly.
-
Release the retaining clips and remove the driver door window control switch bezel assembly.
-
Disconnect the driver door lock control switch electrical connector.
 |
-
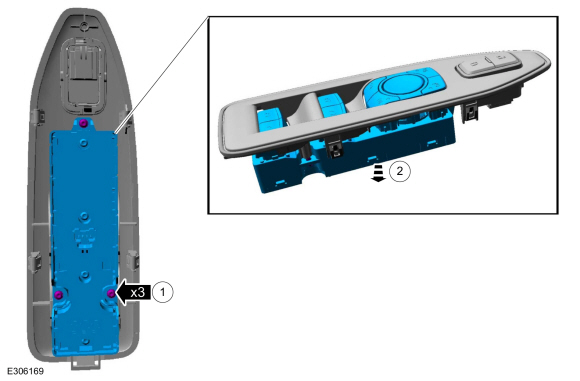
NOTE: This step is only necessary when installing a new component.
Remove the driver door window control switch.
-
Remove the screws from driver door window control switch.
-
Remove the driver door window control switch.
-
Remove the screws from driver door window control switch.
 |
Installation
-
To install, reverse the removal procedure.
 Power Door Window Initialization. General Procedures
Initialization
NOTE:
NOTE:
Initialization is required to learn both the full UP
and full DOWN positions and the profile of the glass as it travels
through the glass channel...
 Front Door Glass Run and Bracket. Removal and Installation
Removal
NOTE:
LH side shown, RH side similar.
Remove the front door latch.
Refer to: Front Door Latch (501-14 Handles, Locks, Latches and Entry Systems, Removal and Installation)...
Other information:
Lincoln Navigator 2018-2026 Workshop Manual: Passenger Side Temperature Door Actuator. Removal and Installation
Removal NOTE: Removal steps in this procedure may contain installation details. Remove the instrument panel. Refer to: Instrument Panel (501-12 Instrument Panel and Console, Removal and Installation). Disconnect the electrical connector, remove the retainers and the passenger side temperature door actuator...
Lincoln Navigator 2018-2026 Workshop Manual: Overhead Console. Removal and Installation
Removal Release the clips and remove the overhead console. Disconnect the electrical connectors. Installation To install, reverse the removal procedure. NOTE: This step is only necessary when installing a new overhead console assembly...
Categories
- Manuals Home
- 4th Gen Lincoln Navigator Service Manual (2018 - 2026)
- Vehicle Dynamics Control Module (VDM). Removal and Installation
- SYNC Module [APIM]. Removal and Installation
- Front Bumper Cover. Removal and Installation
- Power Running Board (PRB). Diagnosis and Testing
- Brake Service Mode Activation and Deactivation. General Procedures
Front Stabilizer Bar Link. Removal and Installation
Removal
NOTICE: Suspension fasteners are critical parts that affect the performance of vital components and systems. Failure of these fasteners may result in major service expense. Use the same or equivalent parts if replacement is necessary. Do not use a replacement part of lesser quality or substitute design. Tighten fasteners as specified.
NOTE: Removal steps in this procedure may contain installation details.
With the vehicle in NEUTRAL, position it on a hoist.Refer to: Jacking and Lifting (100-02 Jacking and Lifting, Description and Operation).
NOTICE: Do not use power tools to remove or install the stabilizer bar