Lincoln Navigator: Engine Cooling - 3.5L EcoBoost (272kW/370PS) / Degas Bottle. Removal and Installation
Special Tool(s) / General Equipment
| Fluid Suction Gun | |
| Hose Clamp Remover/Installer | |
| Locking Pliers |
Materials
| Name | Specification |
|---|---|
| Motorcraft® Yellow Concentrated Antifreeze/Coolant VC-13-G |
WSS-M97B57-A1 |
| Motorcraft® Orange Concentrated Antifreeze/Coolant VC-3-B |
WSS-M97B44-D |
Removal
 WARNING:
Always allow the engine to cool before opening the cooling
system. Do not unscrew the coolant pressure relief cap when the engine
is operating or the cooling system is hot. The cooling system is under
pressure; steam and hot liquid can come out forcefully when the cap is
loosened slightly. Failure to follow these instructions may result in
serious personal injury.
WARNING:
Always allow the engine to cool before opening the cooling
system. Do not unscrew the coolant pressure relief cap when the engine
is operating or the cooling system is hot. The cooling system is under
pressure; steam and hot liquid can come out forcefully when the cap is
loosened slightly. Failure to follow these instructions may result in
serious personal injury.
NOTE: Removal steps in this procedure may contain installation details.
-


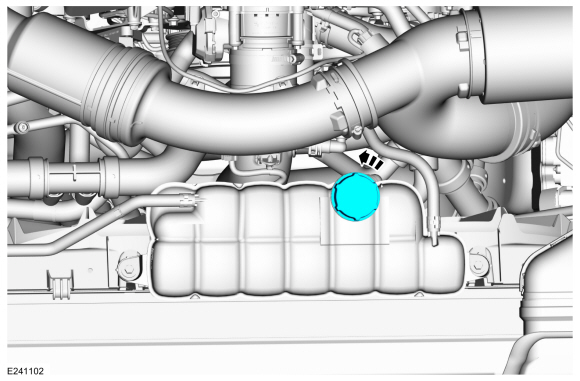
Release the cooling system pressure by slowly turning the degas bottle cap between 2 and 3 turns and remove the degas bottle cap.
WARNING:
When releasing the cooling system pressure, cover the coolant expansion tank cap with a thick cloth.
 |
-
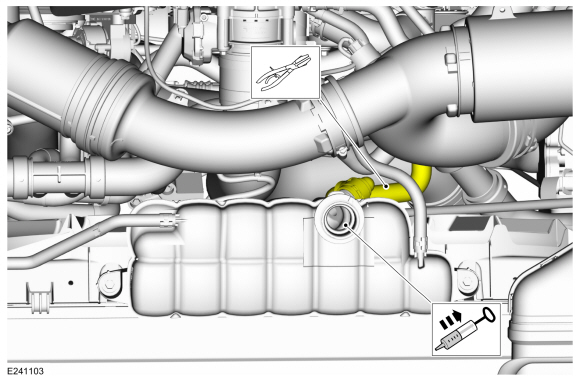
Using general tools, clamp the lower expansion tank hose and syphon the engine coolant from the expansion tank.
Use the General Equipment: Fluid Suction Gun
Use the General Equipment: Locking Pliers
 |
-
-
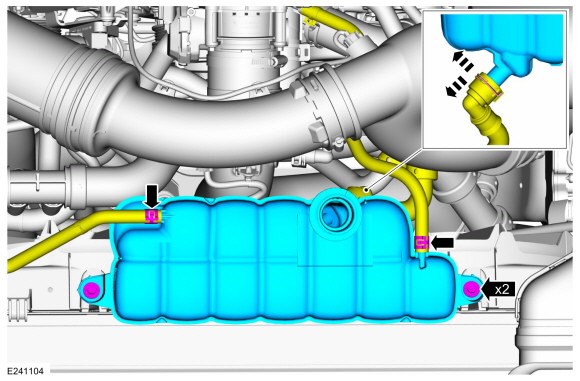
Release the clamps and disconnect the upper coolant hoses.
Use the General Equipment: Hose Clamp Remover/Installer
-
Remove the spring clip and disconnect the lower coolant hose.
-
Remove the bolts and the degas bottle.
Torque: 62 lb.in (7 Nm)
-
Release the clamps and disconnect the upper coolant hoses.
 |
Installation
-
To install, reverse the removal procedure.
-
NOTICE: Use Motorcraft® Orange Antifreeze/Coolant for vehicles built up to 08-July-2018 and Motorcraft® Yellow Antifreeze/Coolant for vehicles built from 09-July-2018. Failure to use the correct coolant can degrade corrosion protection.
Fill the degas bottle with the recommended coolant mixture and fill level.
Material: Motorcraft® Orange Concentrated Antifreeze/Coolant / VC-3-B (WSS-M97B44-D)
Material: Motorcraft® Yellow Concentrated Antifreeze/Coolant / VC-13-G (WSS-M97B57-A1)
 Cooling Module. Removal and Installation
Special Tool(s) /
General Equipment
Hose Clamp Remover/Installer
Removal
NOTE:
Removal steps in this procedure may contain installation details...
 Radiator. Removal and Installation
Removal
NOTE:
Removal steps in this procedure may contain installation details.
Drain the cooling system.
Refer to: Engine Cooling System Draining, Vacuum Filling and Bleeding
(303-03 Engine Cooling - 3...
Other information:
Lincoln Navigator 2018-2026 Workshop Manual: Interior Rear View Mirror. Removal and Installation
Special Tool(s) / General Equipment Interior Trim Remover Removal NOTE: Removal steps in this procedure may contain installation details. Mirror Types Mirror type 1 Remove the interior rear view mirror...
Lincoln Navigator 2018-2026 Workshop Manual: Voice Microphone. Removal and Installation
Removal Vehicles equipped with dual voice microphones Lower the headliner. Refer to: Headliner - Lowering (501-05 Interior Trim and Ornamentation, Removal and Installation). Disconnect the electrical connector...
Categories
- Manuals Home
- 4th Gen Lincoln Navigator Service Manual (2018 - 2026)
- Transmission Fluid Drain and Refill. General Procedures
- All Terrain Control Module (ATCM). Removal and Installation
- Body Control Module (BCM). Removal and Installation
- Liftgate Trim Panel. Removal and Installation
- Body and Paint
Rear Drive Halfshafts. Diagnosis and Testing
Preliminary Inspection
Visually inspect the CV joints, housing, boots, and clamps for obvious signs of mechanical damage.If an obvious cause for an observed or reported concern is found, correct the cause (if possible) before proceeding to the next step
If the cause is not visually evident, verify the symptom and REFER to Symptom Chart: NVH.