Lincoln Navigator: Rear Drive Axle/Differential - Vehicles With: Ford 9.75 Inch Ring Gear / Axle Assembly. Removal and Installation
Special Tool(s) / General Equipment
| Flat Headed Screw Driver | |
| Transmission Jack | |
| Cable Ties | |
| Tire Lever |
Removal
 WARNING:
Do not apply heat or flame to the shock absorber or strut
tube. The shock absorber and strut tube are gas pressurized and could
explode if heated. Failure to follow this instruction may result in
serious personal injury.
WARNING:
Do not apply heat or flame to the shock absorber or strut
tube. The shock absorber and strut tube are gas pressurized and could
explode if heated. Failure to follow this instruction may result in
serious personal injury.
WARNING:
Keep all body parts clear of shock absorbers or strut rods.
Shock absorbers or struts can extend unassisted. Failure to follow this
instruction may result in serious personal injury.
NOTICE: Suspension fasteners are critical parts that affect the performance of vital components and systems. Failure of these fasteners may result in major service expense. Use the same or equivalent parts if replacement is necessary. Do not use a replacement part of lesser quality or substitute design. Tighten fasteners as specified.
NOTE: Removal steps in this procedure may contain installation details.
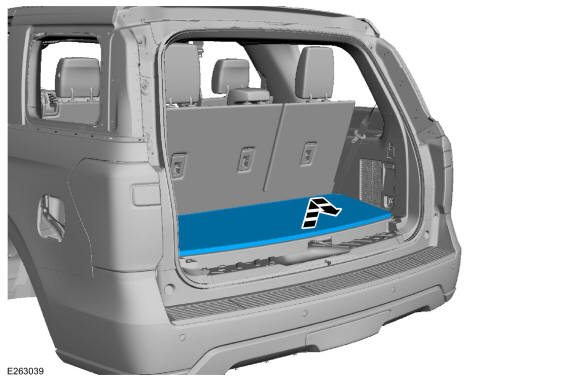
-
Remove the load floor cover.
 |
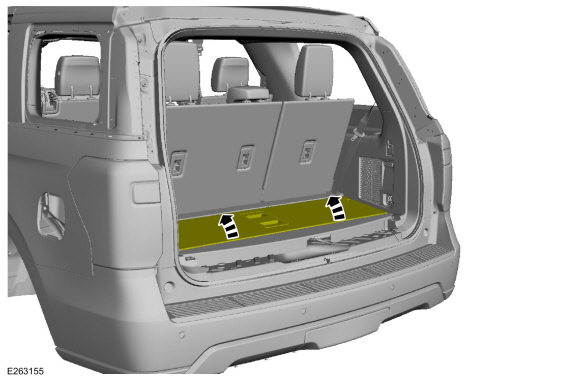
-
Position the load floor storage compartment cover up.
 |
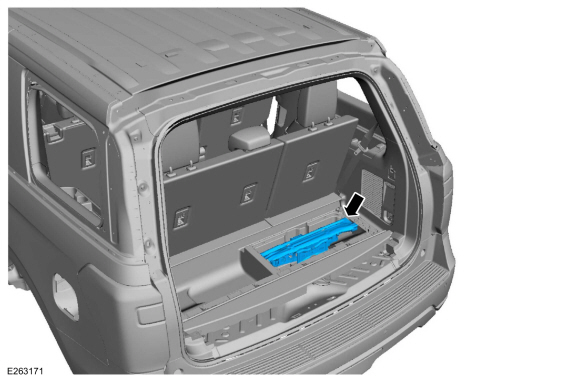
-
Remove the vehicle jack assembly.
 |
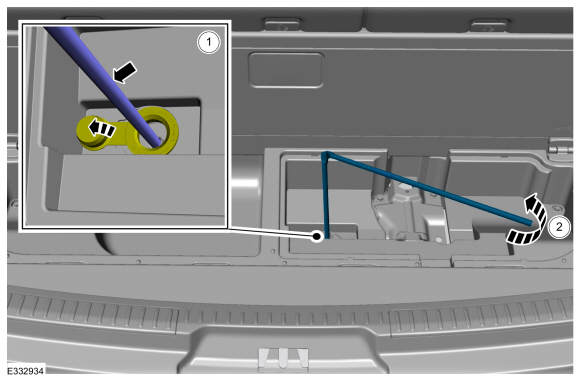
-
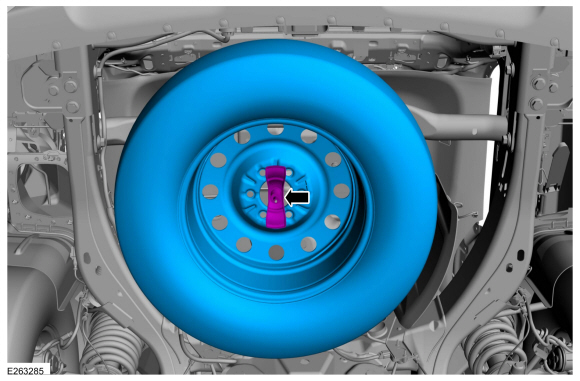
Remove the swivel wrench from the tool kit bag, open the
spare tire winch access plug at the bottom of the compartment for the
jack and tools tray.
-
-
Insert the swivel wrench through the access hole in the floor to engage the winch.
-
Turn the handle counterclockwise until the tire lowers to the ground and the cable is slightly slack.
-
Insert the swivel wrench through the access hole in the floor to engage the winch.
 |
-
NOTE: Slide the retainer through the center of the spare tire wheel and remove the spare tire wheel.
Remove the spare wheel.
Torque: 59 lb.ft (80 Nm)
 |
-
Drain the differential fluid.
Refer to: Differential Draining and Filling (205-02 Rear Drive Axle/Differential - Vehicles With: Ford 9.75 Inch Ring Gear, General Procedures).
-
Remove the rear halfshafts.
Refer to: Rear Halfshaft (205-05 Rear Drive Halfshafts, Removal and Installation).
-
Remove the rear stabilizer bar.
Refer to: Rear Stabilizer Bar (204-02 Rear Suspension, Removal and Installation).
-
Remove the muffler.
Refer to: Muffler (309-00 Exhaust System - 3.5L EcoBoost (272kW/370PS), Removal and Installation).
-
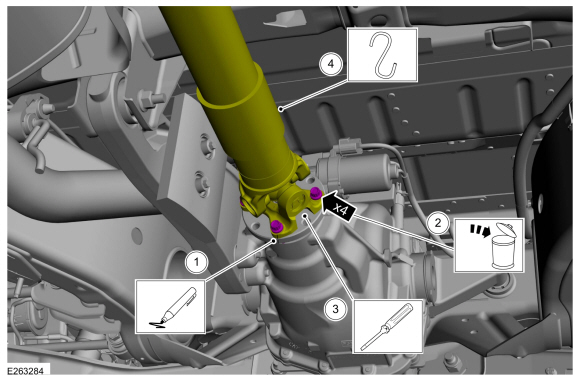
-
Index-mark the driveshaft flange to the pinion flange to maintain alignment during installation.
-
Remove and discard the driveshaft flange to pinion flange bolts.
Torque: 76 lb.ft (103 Nm)
-
NOTICE: The driveshaft flange fits tightly on the pinion flange pilot. Never hammer on the driveshaft or any of its components to disconnect the driveshaft from the pinion flange. Pry only in the area shown, with a suitable tool, to disconnect the driveshaft flange from the pinion flange or damage to the component may occur.
Using a large flat headed screwdriver or tire lever, separate the driveshaft flange from the pinion flange.
Use the General Equipment: Flat Headed Screw Driver
Use the General Equipment: Tire Lever
-
Support the driveshaft.
Use the General Equipment: Cable Ties
-
Index-mark the driveshaft flange to the pinion flange to maintain alignment during installation.
 |
-
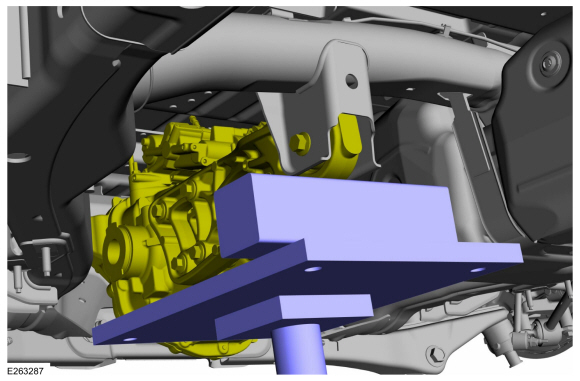
Using the transmission jack support the rear axle assembly.
Use the General Equipment: Transmission Jack
 |
Vehicles equipped electronic limited-slip differential
-
NOTE: Ensure the eLSD wiring harnesses disconnect prior to lowering the axle.
Position aside the eLSD HCU electrical wiring harness.
-
Disconnect the HCU electrical connectors.
-
Detach the HCU electrical wiring harness retainers.
-
Disconnect the HCU electrical connectors.
 |
All vehicles
-
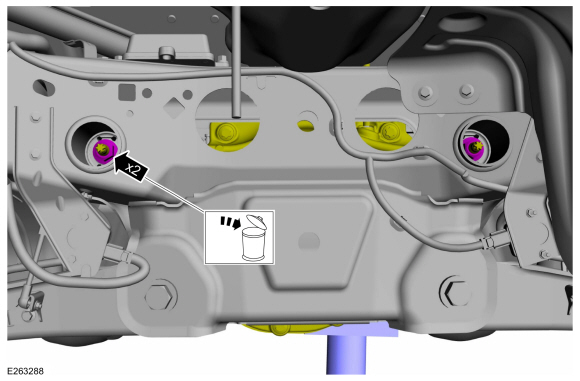
Remove and discard the rear differential mounting nuts.
Torque: 98 lb.ft (133 Nm)
 |
-
Remove and discard the nut and bolt.
Torque: 98 lb.ft (133 Nm)
 |
-
Gently down the transmission jack. Pull forward and remove the rear axle assembly.
 |
Installation
-
To install, reverse the removal procedure.
 Ring Gear Backlash Adjustment - Vehicles With: Electronic Limited-Slip Differential. General Procedures
Special Tool(s) /
General Equipment
205-220Installer, Differential ShimTKIT-1985-FH
307-003
(T57L-500-B)
Holding Fixture, Transmission
Dial Indicator
Copper Hammer
Adjustment
Remove the rear axle assembly...
 Differential Carrier. Removal and Installation
Special Tool(s) /
General Equipment
205-220Installer, Differential ShimTKIT-1985-FH
307-003
(T57L-500-B)
Holding Fixture, Transmission
Materials
Name
Specification
Motorcraft® Ultra Silicone SealantTA-29
WSS-M4G323-A8
Removal
Remove the rear drive axle assembly
Refer to: Axle Assembly (205-02 Rear Drive Axle..
Other information:
Lincoln Navigator 2018-2026 Workshop Manual: Fuel Control. Diagnosis and Testing
Diagnostic Trouble Code (DTC) Chart Diagnostics in this manual assume a certain skill level and knowledge of Ford-specific diagnostic practices. REFER to: Diagnostic Methods (100-00 General Information, Description and Operation). Module DTC Description Action PCM P0087:00 Fuel Rail/System Pressure - Too Low (Bank 1): No Sub Type Information GO to Pinpoint Test DD ..
Lincoln Navigator 2018-2026 Workshop Manual: Battery. Diagnosis and Testing
General Equipment Diagnostic Battery Charger Use Ford approved battery test equipment listed in the Ford Warranty and Policy Manual. Diagnostics in this manual assume a certain skill level and knowledge of Ford-specific diagnostic practices. REFER to: Diagnostic Methods (100-00 General Information, Description and Operation). Diagnostic Trouble Code (DTC) Chart..
Categories
- Manuals Home
- 4th Gen Lincoln Navigator Service Manual (2018 - 2026)
- Rear Bumper. Removal and Installation
- Head Up Display (HUD) Module Calibration. General Procedures
- Telematics Control Unit (TCU) Module. Removal and Installation
- Body and Paint
- Body Control Module (BCM). Removal and Installation
Differential Case Runout Check. General Procedures
Special Tool(s) / General Equipment
 205-1016
Installer, Differential Bearing
TKIT-2014D-ROW2
TKIT-2014D-FL_ROW
 205-153
(T80T-4000-W)
205-153
(T80T-4000-W)
Handle
 205-D061
(D83T-4205-C2)
205-D061
(D83T-4205-C2)
Step Plate Dial Indicator Three Leg Puller Punch