Lincoln Navigator: Rear Drive Axle/Differential - Vehicles With: Ford 9.75 Inch Ring Gear / Drive Pinion. Removal and Installation
Special Tool(s) / General Equipment
 |
205-024
(T67P-4616-A)
Installer, Drive Pinion Bearing Cup |
 |
205-090
(T75L-1165-B)
Plate, Bearing/Oil Seal |
 |
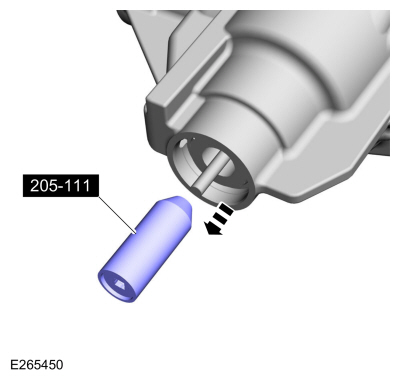
205-111
(T76P-4020-A11)
Handle |
 |
205-159
(T80T-4020-F42)
Adapter for 205-S156 Pinion Depth Gauge T98T-1000-LM-1 TKIT-1998-LM (NavigatoR) |
 |
205-160
(T80T-4020-F43)
Adapter for 205-S156 Pinion Depth Gauge |
 |
205-229
(T85T-4209-AH)
Protector, Drive Pinion Thread TKIT-1985-FH-1 |
 |
205-377
(T97T-4020-A)
Gauge Tube, Drive Pinion TKIT-1998-LM (NavigatoR) TKIT-1997-F/FLM/LT |
 |
205-383
(T97T-4020-B)
Depth Gauge/Aligner, Drive Pinion TKIT-1998-LM (NavigatoR) TKIT-1997-F/FLM/LT |
 |
205-488 Installer, Drive Pinion Bearing TKIT-1999S-FLM/LT |
 |
205-852 Inner Pinion Bearing Cup Installer TKIT-2006UP-FLM TKIT-2006UP-ROW |
 |
205-937 Adapter, Pinion Aligning TKIT-2009C-F TKIT-2009C-ROW |
 |
205-D064
(D84L-1123-A)
Puller, Bearing |
 |
307-003
(T57L-500-B)
Holding Fixture, Transmission |
 |
308-391 Installer, Input Shaft Bearing Cup TKIT-1999-F/FLM/LT |
| Rubber Mallet | |
| Hydraulic Press | |
| Punch | |
| Copper Hammer | |
Removal
-
Remove the differential carrier.
Refer to: Differential Carrier (205-02 Rear Drive Axle/Differential - Vehicles With: Ford 9.75 Inch Ring Gear, Removal and Installation).
Refer to: Differential Carrier - Vehicles With: Electronic Limited-Slip Differential (205-02 Rear Drive Axle/Differential - Vehicles With: Ford 9.75 Inch Ring Gear, Removal and Installation).
-
Remove the drive pinion seal.
Refer to: Drive Pinion Seal (205-02 Rear Drive Axle/Differential - Vehicles With: Ford 9.75 Inch Ring Gear, Removal and Installation).
-
Remove the drive pinion outer shim.
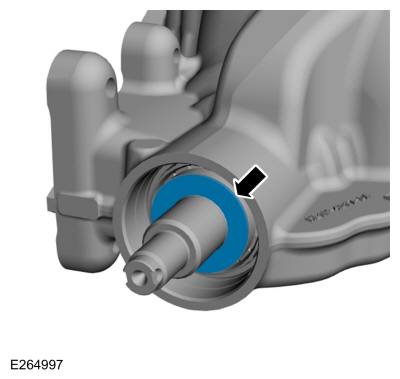 |
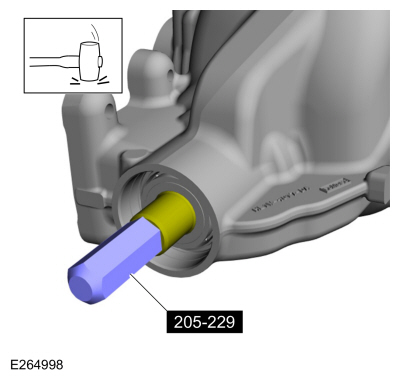
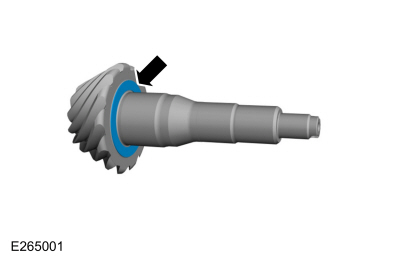
-
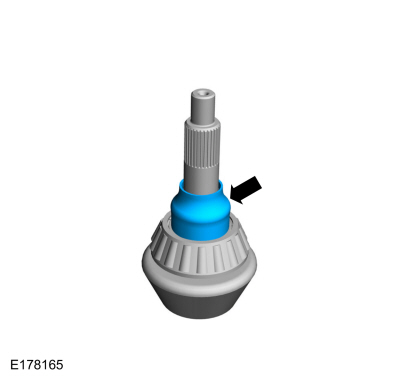
Using the special tool and a soft face mallet, tap the drive pinion outer bearing.
Use Special Service Tool: 205-229 (T85T-4209-AH) Protector, Drive Pinion Thread.
Use the General Equipment: Rubber Mallet
 |
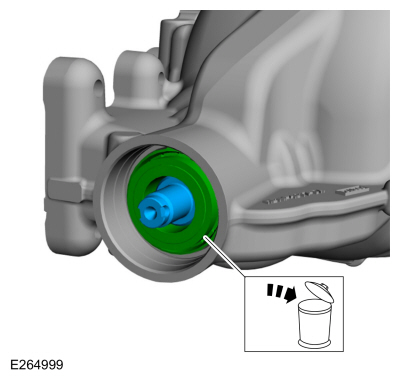
-
Remove the drive pinion and remove and discard the drive pinion outer bearing.
 |
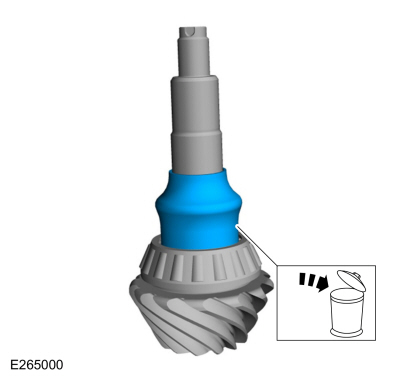
-
Remove and discard the drive pinion collapsible spacer.
 |
-
Using the special tool and a hydraulic press, remove and discard the inner drive pinion bearing.
Use Special Service Tool: 205-D064 (D84L-1123-A) Puller, Bearing.
Use the General Equipment: Hydraulic Press
 |
-
Remove the inner drive pinion bearing shim.
 |
-
Using the general equipment, remove and discard the 2 drive pinion bearing cups.
Use the General Equipment: Punch
Use the General Equipment: Copper Hammer
 |
Installation
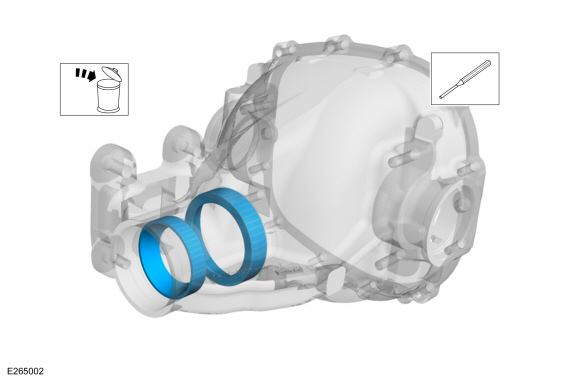
-
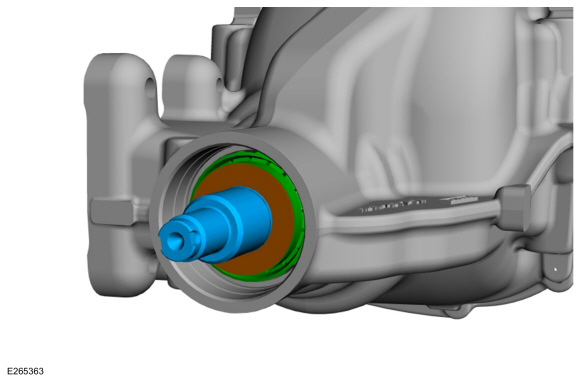
NOTE: Make sure the drive pinion bearing cups are seated correctly or damage to the components may occur.
Using the special tools, install the new inner and new outer drive pinion bearing cups.
Use Special Service Tool: 205-024 (T67P-4616-A) Installer, Drive Pinion Bearing Cup. , 205-852 Inner Pinion Bearing Cup Installer. , 308-391 Installer, Input Shaft Bearing Cup.
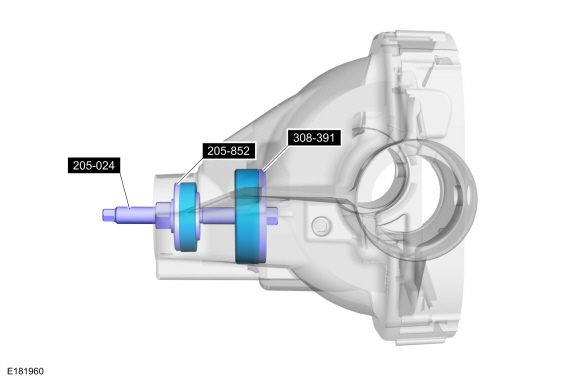 |
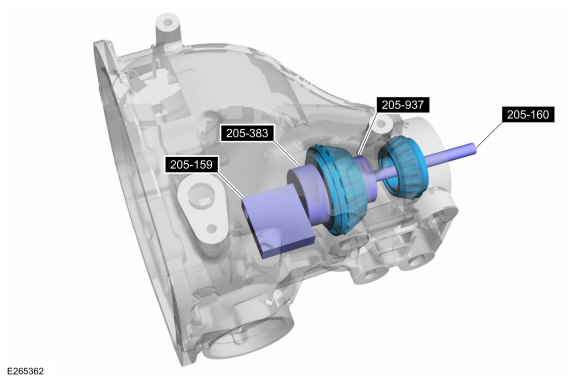
-
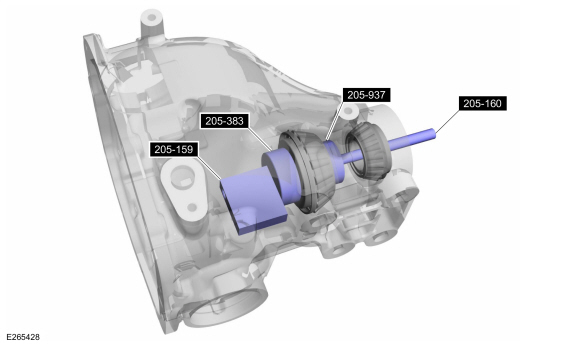
NOTICE: Use the same drive pinion bearings and the drive pinion bearing adjustment shim from the drive pinion bearing adjustment shim selection procedure for final assembly or damage to the component may occur.
NOTE: Install new drive pinion bearings without any additional lubricant since the anti-rust oil provides adequate lubricant without upsetting the drive pinion bearing preload settings.
Assemble the special tools and new bearings in the differential housing.
Use Special Service Tool: 205-159 (T80T-4020-F42) Adapter for 205-S156 Pinion Depth Gauge. , 205-160 (T80T-4020-F43) Adapter for 205-S156 Pinion Depth Gauge. , 205-383 (T97T-4020-B) Depth Gauge/Aligner, Drive Pinion. , 205-937 Adapter, Pinion Aligning.
 |
-
-
NOTE: This step duplicates final drive pinion bearing preload.
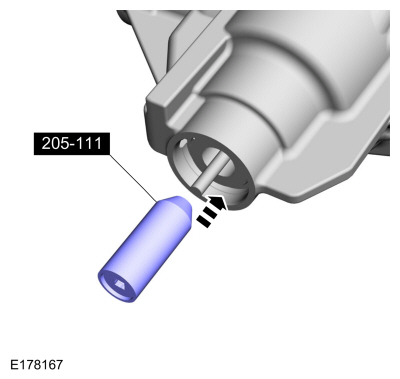
Tighten the special tool to the specified torque.
Use Special Service Tool: 205-111 (T76P-4020-A11) Handle.
Torque: 18 lb.in (2 Nm)
-
Slowly rotate and record the rotational torque readings.
-
 |
-
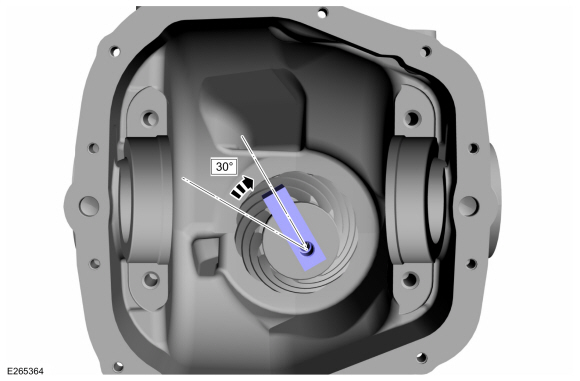
NOTE: Position the Adapter so it does not contact the housing.
NOTE: Offset the Adapter to obtain an accurate reading.
Rotate the adapter several half turns to seat the drive pinion bearings and position the adapter.
 |
-
-
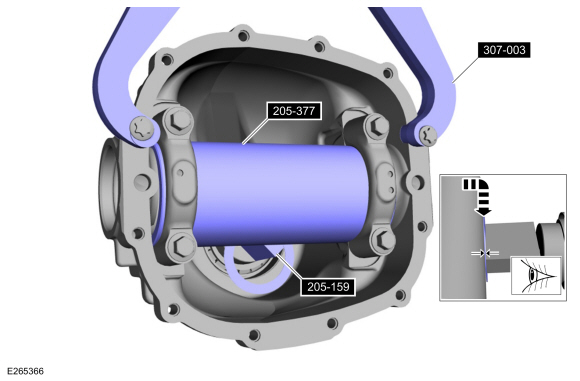
Position the special tool.
Use Special Service Tool: 205-377 (T97T-4020-A) Gauge Tube, Drive Pinion. , 205-159 (T80T-4020-F42) Adapter for 205-S156 Pinion Depth Gauge. , 307-003 (T57L-500-B) Holding Fixture, Transmission.
-
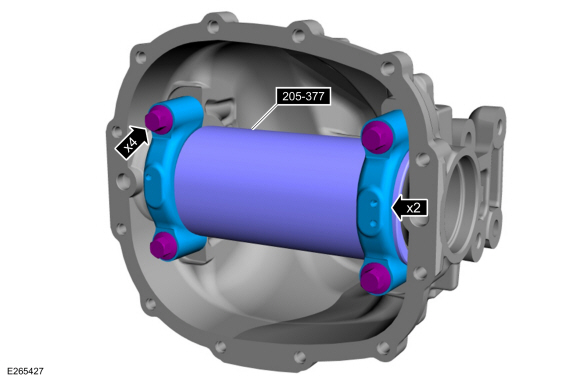
Install the differential bearing caps and differential bearing cap bolts.
Torque: 83 lb.ft (112 Nm)
-
Position the special tool.
 |
-
NOTE: Drive pinion bearing adjustment shims must be flat and clean.
NOTE: A slight drag should be felt for correct drive pinion bearing adjustment shim selection. Do not attempt to force the drive pinion bearing adjustment shim between the gauge block and the gauge tube. This will minimize selection of a drive pinion bearing adjustment shim thicker than required, which results in a deep tooth contact in the final assembly of integral axle assemblies.
Use a drive pinion bearing adjustment shim as a gauge for drive pinion bearing adjustment shim selection.
Use Special Service Tool: 205-377 (T97T-4020-A) Gauge Tube, Drive Pinion. , 205-159 (T80T-4020-F42) Adapter for 205-S156 Pinion Depth Gauge. , 307-003 (T57L-500-B) Holding Fixture, Transmission.
 |
-
-
NOTE: The differential bearing caps need to stay in the correct orientation for installation.
Remove the differential bearing cap bolts and differential bearing caps, remove the special tools.
Use Special Service Tool: 205-377 (T97T-4020-A) Gauge Tube, Drive Pinion.
-
 |
-
Remove the special tool.
Use Special Service Tool: 205-111 (T76P-4020-A11) Handle.
 |
-
Remove the special tools.
Use Special Service Tool: 205-159 (T80T-4020-F42) Adapter for 205-S156 Pinion Depth Gauge. , 205-383 (T97T-4020-B) Depth Gauge/Aligner, Drive Pinion. , 205-937 Adapter, Pinion Aligning. , 205-160 (T80T-4020-F43) Adapter for 205-S156 Pinion Depth Gauge.
 |
-
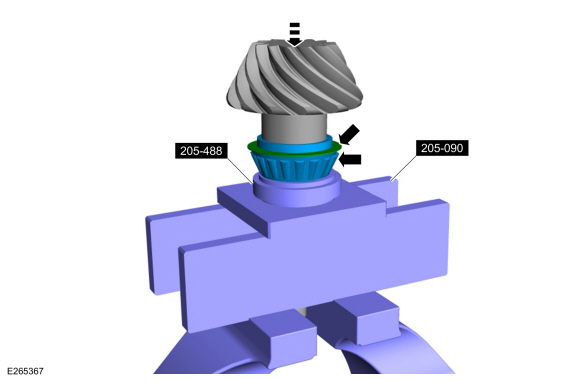
NOTE: The differential bearing caps need to stay in the correct orientation for installation.
Install the drive pinion inner bearing and selected drive pinion bearing adjustment shim until they are firmly seated on the drive pinion.
Use Special Service Tool: 205-090 (T75L-1165-B) Plate, Bearing/Oil Seal. , 205-488 Installer, Drive Pinion Bearing.
Use the General Equipment: Hydraulic Press
 |
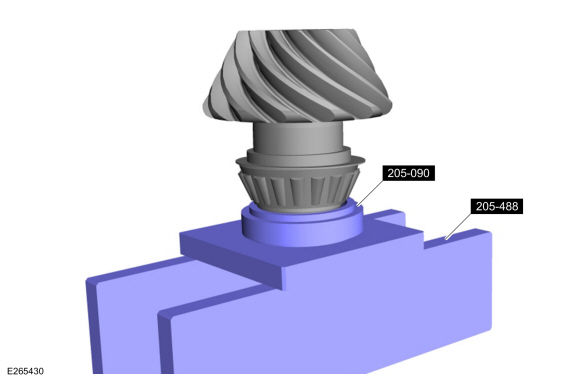
-
Remove the special tools.
Use Special Service Tool: 205-090 (T75L-1165-B) Plate, Bearing/Oil Seal. , 205-488 Installer, Drive Pinion Bearing.
 |
-
Install the new drive pinion collapsible spacer.
 |
-
Install the new outer differential pinion bearing,
differential outer differential pinion shim and the differential pinion.
 |
-
NOTE: When installing the drive pinion flange and pinion nut with no differential carrier installed, the drag torque (torque to turn) should be 2 to 3 Nm (16-29 in-lbs).
Install the drive pinion seal.
Refer to: Drive Pinion Seal (205-02 Rear Drive Axle/Differential - Vehicles With: Ford 9.75 Inch Ring Gear, Removal and Installation).
-
Install the differential carrier.
Refer to: Differential Carrier (205-02 Rear Drive Axle/Differential - Vehicles With: Ford 9.75 Inch Ring Gear, Removal and Installation).
Refer to: Differential Carrier - Vehicles With: Electronic Limited-Slip Differential (205-02 Rear Drive Axle/Differential - Vehicles With: Ford 9.75 Inch Ring Gear, Removal and Installation).
 Differential Housing Cover. Removal and Installation
Special Tool(s) /
General Equipment
Transmission Jack
Materials
Name
Specification
Motorcraft® Ultra Silicone SealantTA-29
WSS-M4G323-A8
Removal
Remove the rear axle assembly...
 Drive Pinion Flange. Removal and Installation
Special Tool(s) /
General Equipment
205-126
(T78P-4851-A)
Holding Fixture, Drive Pinion Flange
205-233
(T85T-4851-AH)
Installer, Drive Pinion FlangeTKIT-1985-FH-1
Three Leg Puller
Cable Ties
Punch
Materials
Name
Specification
Motorcraft® Premium Long-Life GreaseXG-1-E1
ESA-M1C75-B
Retaining Comp..
Other information:
Lincoln Navigator 2018-2026 Workshop Manual: Autolamps. Diagnosis and Testing
Diagnostic Trouble Code (DTC) Chart Diagnostics in this manual assume a certain skill level and knowledge of Ford-specific diagnostic practices. REFER to: Diagnostic Methods (100-00 General Information, Description and Operation). Module DTC Description Action BCM B1A85:11 Ambient Light Sensor: Circuit Short To Ground GO to Pinpoint Test A BCM B1A85:13 ..
Lincoln Navigator 2018-2026 Workshop Manual: Driver Side Footwell Air Discharge Temperature Sensor. Removal and Installation
Removal NOTE: Removal steps in this procedure may contain installation details. Remove the climate control housing. Refer to: Climate Control Housing (412-00 Climate Control System - General Information, Removal and Installation). Disconnect the electrical connector and remove the driver side footwell air discharge temperature sensor. ..
Categories
- Manuals Home
- 4th Gen Lincoln Navigator Service Manual (2018 - 2026)
- Vehicle Dynamics Control Module (VDM). Removal and Installation
- Windshield Washer Pump. Removal and Installation
- Body and Paint
- Neutral Flat Tow Activation and Deactivation. General Procedures
- SYNC Module [APIM]. Removal and Installation
Front Stabilizer Bar Link. Removal and Installation
Removal
NOTICE: Suspension fasteners are critical parts that affect the performance of vital components and systems. Failure of these fasteners may result in major service expense. Use the same or equivalent parts if replacement is necessary. Do not use a replacement part of lesser quality or substitute design. Tighten fasteners as specified.
NOTE: Removal steps in this procedure may contain installation details.
With the vehicle in NEUTRAL, position it on a hoist.Refer to: Jacking and Lifting (100-02 Jacking and Lifting, Description and Operation).
NOTICE: Do not use power tools to remove or install the stabilizer bar