Lincoln Navigator: Engine - 3.5L EcoBoost (272kW/370PS) / Crankshaft Rear Seal. Removal and Installation
Materials
| Name | Specification |
|---|---|
| Motorcraft® High Performance Engine RTV Silicone TA-357 |
WSE-M4G323-A6 |
| Engine Oil - SAE 5W-30 - Synthetic Blend Motor Oil XO-5W30-Q1SP |
WSS-M2C946-B1 |
Removal
NOTICE: During engine repair procedures, cleanliness is extremely important. Any foreign material, including any material created while cleaning gasket surfaces that enters the oil passages, coolant passages or the oil pan, may cause engine failure.
-
Remove the flexplate.
Refer to: Flexplate (303-01 Engine - 3.5L EcoBoost (272kW/370PS), Removal and Installation).
-
Remove the crankshaft sensor ring and the engine-to-transmission spacer plate.
 |
-
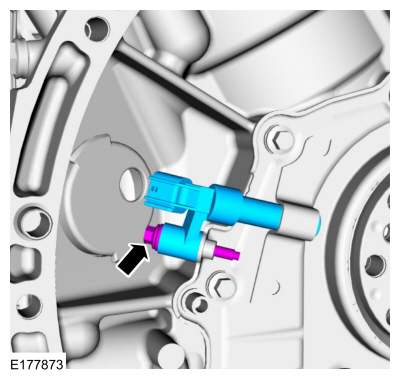
Disconnect the CKP sensor electrical connector.
 |
-
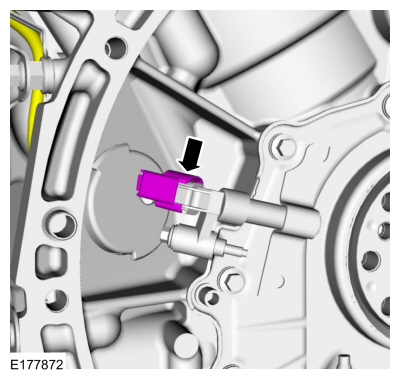
Remove the bolt and the CKP sensor.
 |
-
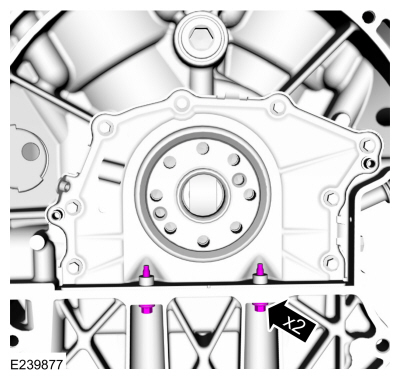
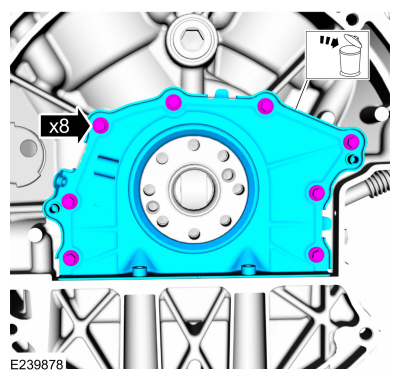
Remove the oil pan-to-crankshaft rear seal bolts.
 |
-
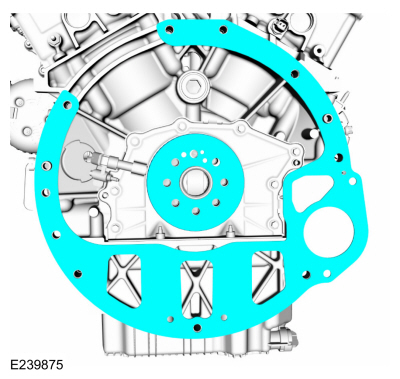
Remove the bolts and the crankshaft rear seal retainer. Discard the crankshaft rear seal retainer.
 |
-
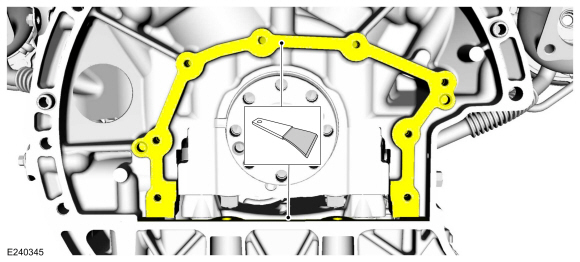
Clean and prepare the RTV sealing surface.
Refer to: RTV Sealing Surface Cleaning and Preparation (303-00 Engine System - General Information, General Procedures).
 |
Installation
-
NOTICE: Failure to use Motorcraft® High Performance Engine RTV Silicone may cause the engine oil to foam excessively and result in serious engine damage.
NOTE: The crankshaft rear seal retainer must be installed and the bolts tightened within 10 minutes of sealant application.
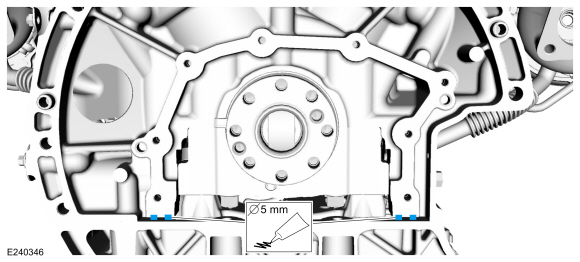
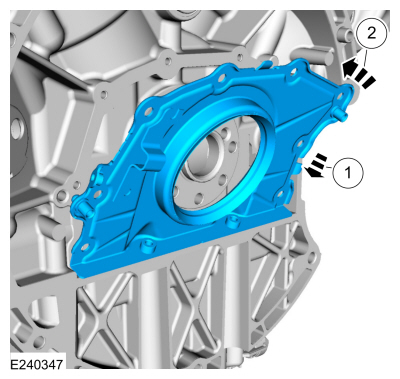
Apply 5 mm (0.196 in) bead of silicone sealant.
Material: Motorcraft® High Performance Engine RTV Silicone / TA-357 (WSE-M4G323-A6)
 |
-
NOTICE: Failure to use Motorcraft® High Performance Engine RTV Silicone may cause the engine oil to foam excessively and result in serious engine damage.
NOTE: The crankshaft rear seal retainer must be installed and the bolts tightened within 10 minutes of sealant application.
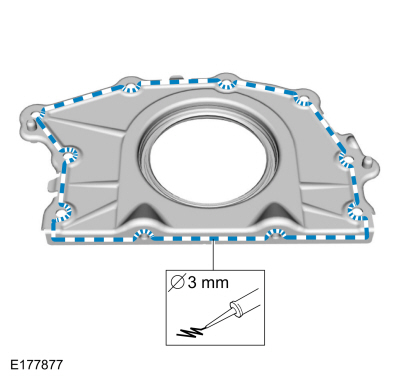
Apply 3 mm (0.11 in) bead of silicone sealant.
Material: Motorcraft® High Performance Engine RTV Silicone / TA-357 (WSE-M4G323-A6)
 |
-
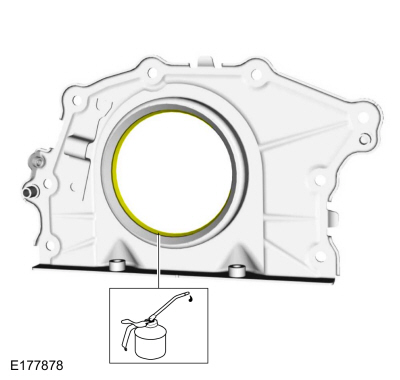
Lubricate the crankshaft rear seal with clean engine oil.
Material: Engine Oil - SAE 5W-30 - Synthetic Blend Motor Oil / XO-5W30-Q1SP (WSS-M2C946-B1)
 |
-
-
Install the crankshaft rear seal retainer at an
angle above the oil pan flange to avoid scraping off the sealer.
-
Tilt the seal retainer up and onto the rear of the cylinder block.
-
Install the crankshaft rear seal retainer at an
angle above the oil pan flange to avoid scraping off the sealer.
 |
-
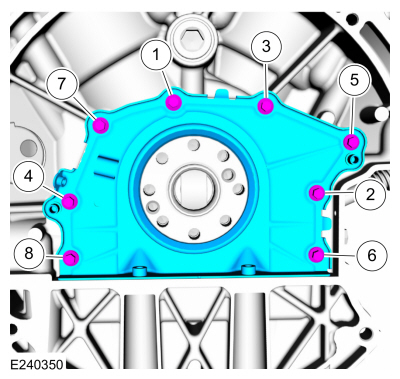
Install the bolts and tighten in sequence shown.
Torque: 89 lb.in (10 Nm)
 |
-
Install the oil pan-to-crankshaft rear seal bolts.
Torque: 89 lb.in (10 Nm)
|
-
Install the CKP sensor and the bolt.
Torque: 62 lb.in (7 Nm)
|
-
Connect the CKP sensor electrical connector.
|
-
Install the engine-to-transmission spacer plate and the crankshaft sensor ring.
|
-
Install the flexplate.
Refer to: Flexplate (303-01 Engine - 3.5L EcoBoost (272kW/370PS), Removal and Installation).
 Crankshaft Pulley. Removal and Installation
Special Tool(s) /
General Equipment
303-102Installer, Crankshaft Pulley
Strap Wrench
Three Leg Puller
Removal
NOTICE:
During engine repair procedures, cleanliness is extremely
important...
 Cylinder Head LH. Removal and Installation
Special Tool(s) /
General Equipment
Long Nose Pliers
Materials
Name
Specification
Motorcraft® Silicone Gasket RemoverZC-30-A, AZC-30-C
-
Motorcraft® Metal Surface Prep WipesZC-31-B
-
Removal
NOTICE:
During engine repair procedures, cleanliness is extremely
important...
Other information:
Lincoln Navigator 2018-2026 Workshop Manual: Piston Ring End Gap. General Procedures
Special Tool(s) / General Equipment Feeler Gauge Check NOTE: Refer to the appropriate Section 303-01 for the specification. NOTE: Use care when fitting piston rings to avoid possible damage to the piston ring or the cylinder bore...
Lincoln Navigator 2018-2026 Workshop Manual: Transmission Cooling. Diagnosis and Testing
Diagnostics in this manual assume a certain skill level and knowledge of Ford-specific diagnostic practices. REFER to: Diagnostic Methods (100-00 General Information, Description and Operation). Inspection and Verification NOTICE: When internal wear/damage occurs in the transmission, metal particles and clutch plate material can travel into the torque converter and the transmiss..
Categories
- Manuals Home
- 4th Gen Lincoln Navigator Service Manual (2018 - 2026)
- Brake Service Mode Activation and Deactivation. General Procedures
- Transmission Fluid Level Check. General Procedures
- Identification Codes. Description and Operation
- Rear Bumper. Removal and Installation
- Front Seat. Removal and Installation
Front Driveshaft. Removal and Installation
Special Tool(s) / General Equipment
Crimping ToolMaterials
Name Specification Motorcraft® Premium Long-Life GreaseXG-1-E1 ESA-M1C75-B
Removal
With the vehicle in NEUTRAL, position the vehicle on a hoist.Refer to: Jacking and Lifting (100-02 Jacking and Lifting, Description and Operation).
Remove the bolts and the transmission shield.