Lincoln Navigator: Intake Air Distribution and Filtering - 3.5L EcoBoost (272kW/370PS) / Charge Air Cooler (CAC) Outlet Pipe. Removal and Installation
Removal
NOTICE: The turbocharger compressor vanes can be damaged by even the smallest particles. When removing any turbocharger or engine air intake system component, ensure that no debris enters the system. Failure to do so may result in damage to the turbocharger.
NOTE: Removal steps in this procedure may contain installation details.
-
With the vehicle in NEUTRAL, position it on a hoist.
Refer to: Jacking and Lifting (100-02 Jacking and Lifting, Description and Operation).
-
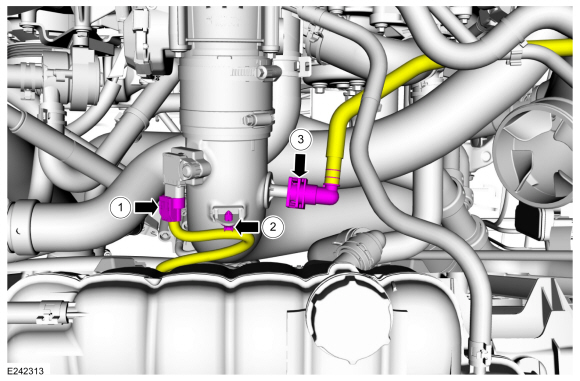
Remove the air cleaner outlet pipe RH .
Refer to: Air Cleaner Outlet Pipe RH (303-12 Intake Air Distribution and Filtering - 3.5L EcoBoost (272kW/370PS), Removal and Installation).
-
Release the clip and disconnect the CAC outlet pipe.
 |
-
-
Disconnect the turbocharger boost pressure sensor electrical connector.
-
Detach the retainer and position the wiring harness aside.
-
Disconnect the quick release coupling.
Refer to: Quick Release Coupling (310-00 Fuel System - General Information - 3.5L EcoBoost (272kW/370PS)) .
-
Disconnect the turbocharger boost pressure sensor electrical connector.
 |
-
Loosen the clamp, disconnect and remove the CAC outlet pipe.
Torque: 44 lb.in (5 Nm)
 |
Installation
-
Inspect the turbocharger or engine air intake system components and clean, if necessary.
-
To install, reverse the removal procedure.
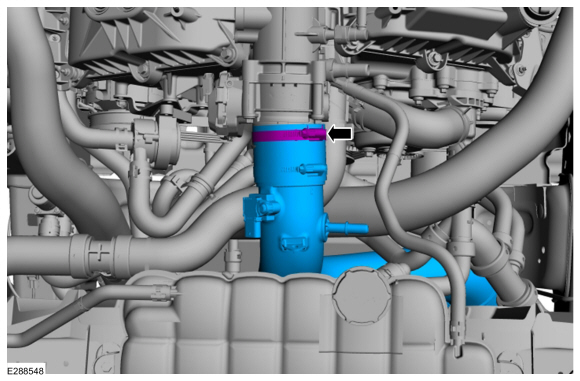
 Charge Air Cooler (CAC) Intake Pipe. Removal and Installation
Removal
NOTICE:
The turbocharger compressor vanes can be damaged by even the
smallest particles. When removing any turbocharger or engine air intake
system component, ensure that no debris enters the system...

Other information:
Lincoln Navigator 2018-2026 Workshop Manual: Front Door. Removal and Installation
Special Tool(s) / General Equipment Door Lift Removal NOTE: Removal steps in this procedure may contain installation details. NOTE: LH side shown, RH side similar. Open the door. Remove the check arm bolt. Torque: 17 lb.ft (23 Nm) Disconn..
Lincoln Navigator 2018-2026 Workshop Manual: Liftgate Release Switch. Removal and Installation
Removal Remove the reversing lamp assembly. Refer to: Reversing Lamp (417-01 Exterior Lighting, Removal and Installation). Disconnect the coaxial cable connector. Remove the screws and the bracket. Remove the rear housing. Disconnect the electrical c..
Categories
- Manuals Home
- 4th Gen Lincoln Navigator Service Manual (2018 - 2026)
- Brake Service Mode Activation and Deactivation. General Procedures
- SYNC Module [APIM]. Removal and Installation
- Power Running Board (PRB). Diagnosis and Testing
- Remote Function Actuator (RFA) Module. Removal and Installation
- Body and Paint
Wheel to Hub Runout Minimization. General Procedures
Check
NOTE: Wheel-to-hub optimization is important. Clearance between the wheel and hub can be used to offset or neutralize the Road Force® or run-out of the wheel and tire assembly. For every 0.001 inch of wheel-to-hub clearance, the Road Force® can be affected between 1 and 3 pounds depending on the tire stiffness.
NOTE: The example below illustrates how the clearance between the wheel and the hub can be used to offset the high spot of radial run-out or Road Force®. Following the procedure will make sure of the best optimization.
Position the wheel and tire assembly on the vehicle so that the high spot location of radial run-out or Road Force® is at the 6 o'clock position and