Lincoln Navigator: Battery, Mounting and Cables / Battery Disconnect and Connect. General Procedures
Disconnect
NOTICE: Be careful not to damage the battery monitoring sensor when removing the terminal from the battery post. Do not pry on the terminals or component damage may occur.
NOTE: When the battery is disconnected and connected, some abnormal drive symptoms may occur while the vehicle relearns its adaptive strategy. The vehicle may need to be driven to allow the PCM to relearn the adaptive strategy values.
NOTE: When disconnecting the battery ground cable to interrupt power to the vehicle electrical system, disconnect the battery ground cable only. It is not necessary to disconnect the positive battery cable.
NOTE: Removal steps in this procedure may contain installation details.
-
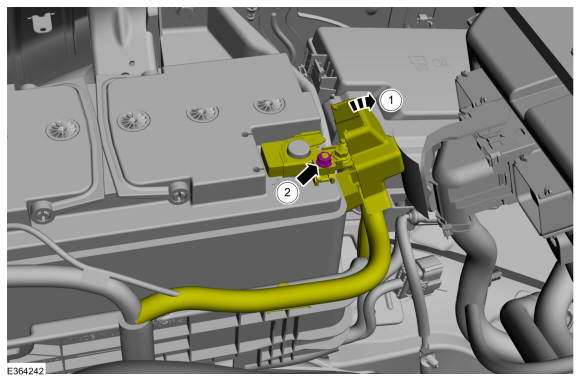
Loosen, but do not remove the nut. Position the negative battery cable aside.
Torque: 55 lb.in (6.2 Nm)
 |
-
-
Position the positive battery cable terminal cover aside.
-
Loosen, but do not remove the nut. Position the positive battery cable aside.
Torque: 55 lb.in (6.2 Nm)
-
Position the positive battery cable terminal cover aside.
 |
Connect
-
To connect, reverse the disconnect procedure.
-
If the vehicle is equipped with power running boards, make sure to enable the running boards in the IPC message center.
-
For vehicles with window one-touch open and close front windows, perform the power door window initialization.
Refer to: Power Door Window Initialization (501-11 Glass, Frames and Mechanisms, General Procedures).
 Battery Charging. General Procedures
Charging
NOTE:
Batteries will discharge due to normal parasitic key
off-loads when the vehicle is on a dealer lot or parked by the customer
for an extended period of time...
 Battery Drain Check. General Procedures
Check
NOTE:
No factory-equipped vehicle should have more than a 25 mA
(0.025 amp) – 50 mA (0.050) draw depending on the vehicle's accessories...
Other information:
Lincoln Navigator 2018-2026 Workshop Manual: Overhead Speaker. Removal and Installation
Removal NOTE: Removal steps in this procedure may contain installation details. Lower the headliner. Refer to: Headliner - Lowering (501-05 Interior Trim and Ornamentation, Removal and Installation). NOTE: LHF overhead speaker is shown, all other overhead speakers are similar...
Lincoln Navigator 2018-2026 Workshop Manual: Engine Component View. Description and Operation
Engine Upper Item Part Number Description 1 94249424 Intake manifold 2 9H4869H486 Intake manifold gasket 3 9H4879H487 Port injection fuel rail RH 4 9H4879H487 Port injection fuel rail LH 5 9F7979F797 Direct injection fuel rail RH 6 9F7979F797 Direct injection fue..
Categories
- Manuals Home
- 4th Gen Lincoln Navigator Service Manual (2018 - 2026)
- Front Seat. Removal and Installation
- Remote Function Actuator (RFA) Module. Removal and Installation
- SYNC Module [APIM]. Removal and Installation
- Power Running Board (PRB). Diagnosis and Testing
- Vehicle Dynamics Control Module (VDM). Removal and Installation
Wheel to Hub Runout Minimization. General Procedures
Check
NOTE: Wheel-to-hub optimization is important. Clearance between the wheel and hub can be used to offset or neutralize the Road Force® or run-out of the wheel and tire assembly. For every 0.001 inch of wheel-to-hub clearance, the Road Force® can be affected between 1 and 3 pounds depending on the tire stiffness.
NOTE: The example below illustrates how the clearance between the wheel and the hub can be used to offset the high spot of radial run-out or Road Force®. Following the procedure will make sure of the best optimization.
Position the wheel and tire assembly on the vehicle so that the high spot location of radial run-out or Road Force® is at the 6 o'clock position and