Lincoln Navigator: Front Drive Axle/Differential / Front Drive Axle. Diagnosis and Testing
Symptom Chart(s)
Diagnostics in this manual assume a certain skill level and knowledge of Ford-specific diagnostic practices.
REFER to: Diagnostic Methods (100-00 General Information, Description and Operation).
Symptom Chart - Differential
Symptom Chart - Differential
| Condition | Actions |
|---|---|
| Axle overheating | GO to Pinpoint Test A |
| Broken gear teeth on the ring gear or pinion | GO to Pinpoint Test A |
| Differential side gears/pinion gears are scored | GO to Pinpoint Test C |
| Front axle does not engage | GO to Pinpoint Test D |
| Gray or milky axle lubricant in low mileage vehicles | GO to Pinpoint Test E |
| Lubricant leaking from the pinion seal, axle shaft oil seals or support arm to the housing | GO to Pinpoint Test F |
Symptom Chart: NVH
Symptom Chart
| Condition | Actions |
|---|---|
| Axle howling or whine | GO to Pinpoint Test G |
| Driveline clunk — occurs as the vehicle starts to move forward following a stop | GO to Pinpoint Test I |
| Grinding, popping or chattering – noise from the rear axle when the vehicle is turning | GO to Pinpoint Test J |
| Grunting — normally associated with a shudder experienced during acceleration from a complete stop | GO to Pinpoint Test K |
| Howl – can occur at various speeds and driving conditions. Affected by acceleration and deceleration | GO to Pinpoint Test L |
| Chuckle – heard at coast/ deceleration. Also described as knock | GO to Pinpoint Test M |
| Knock – noise occurs at various speeds. Not affected by acceleration or deceleration | GO to Pinpoint Test N |
| Scraping noise – a continuous low pitched noise starting at low speed | GO to Pinpoint Test O |
| Driveline shudder – occurs during acceleration from a slow speed or stop | GO to Pinpoint Test P |
Global Customer Symptom Code (GCSC) Chart
Diagnostics in this manual assume a certain skill level and knowledge of Ford-specific diagnostic practices.
REFER to: Diagnostic Methods (100-00 General Information, Description and Operation).
| Symptom | Action |
|---|---|
| Start/Run/Move > Running > Overheats > Always | GO to Pinpoint Test A |
| Start/Run/Move > Running > Overheats > Always | GO to Pinpoint Test B |
| Start/Run/Move > Moving > No Engagement > Both (FWD and REV) | GO to Pinpoint Test D |
| Start/Run/Move > Moving > 4 x 4 Function > Inoperative | GO to Pinpoint Test D |
| Start/Run/Move > Fluids > Axle > Consumption | GO to Pinpoint Test A |
| Start/Run/Move > Fluids > Axle > Consumption | GO to Pinpoint Test B |
| Start/Run/Move > Fluids > Axle > Consumption | GO to Pinpoint Test C |
| Start/Run/Move > Fluids > Axle > Visible Leak | GO to Pinpoint Test A |
| Start/Run/Move > Fluids > Axle > Visible Leak | GO to Pinpoint Test B |
| Start/Run/Move > Fluids > Axle > Visible Leak | GO to Pinpoint Test C |
| Start/Run/Move > Fluids > Axle > Visible Leak | GO to Pinpoint Test F |
| Start/Run/Move > Fluids > Axle > Visible Leak | GO to Pinpoint Test G |
| Start/Run/Move > Fluids > Axle > Visible Leak | GO to Pinpoint Test H |
| Start/Run/Move > Fluids > Axle > Contamination | GO to Pinpoint Test A |
| Start/Run/Move > Fluids > Axle > Contamination | GO to Pinpoint Test B |
| Start/Run/Move > Fluids > Axle > Contamination | GO to Pinpoint Test C |
| Start/Run/Move > Fluids > Axle > Contamination | GO to Pinpoint Test E |
| Start/Run/Move > Noise > Moving/Driving > Always | GO to Pinpoint Test G |
| Start/Run/Move > Noise > Moving/Driving > Always | GO to Pinpoint Test H |
| Start/Run/Move > Noise > Moving/Driving > Always | GO to Pinpoint Test I |
| Start/Run/Move > Noise > Moving/Driving > Always | GO to Pinpoint Test J |
| Start/Run/Move > Noise > Moving/Driving > Always | GO to Pinpoint Test K |
| Start/Run/Move > Noise > Moving/Driving > Always | GO to Pinpoint Test L |
| Start/Run/Move > Noise > Moving/Driving > Always | GO to Pinpoint Test M |
| Start/Run/Move > Noise > Moving/Driving > Always | GO to Pinpoint Test N |
| Start/Run/Move > Noise > Moving/Driving > Always | GO to Pinpoint Test O |
| Start/Run/Move > Vibration > Moving/Driving > Intermittent | GO to Pinpoint Test P |
Pinpoint Tests
|
Normal Operation and Fault Conditions
REFER to: Front Drive Axle and Differential (205-03 Front Drive Axle/Differential, Description and Operation). Possible Sources
|
||||
| A1 CHECK AXLE LUBRICANT LEVEL | ||||
Is the lubricant level low?
|
||||
| A2 CHECK AXLE CONDITION | ||||
Was damage found?
|
||||
| A3 INSPECT THE RING AND PINION GEAR | ||||
Does the ring and pinion have a wear pattern?
|
||||
| A4 INSPECT ALL THE AXLE GEARS FOR WEAR OR DAMAGE | ||||
Was wear or damage found?
|
||||
| A5 INSPECT THE RING GEAR FOR SCORING | ||||
Was a wear pattern found on the ring and pinion?
|
|
Normal Operation and Fault Conditions
REFER to: Front Drive Axle and Differential (205-03 Front Drive Axle/Differential, Description and Operation). Broken gear teeth on the ring or pinion gear can be the result of vehicle overloading, insufficient axle lubricant, contaminated axle lubricant, or incorrect axle lubricant. Possible Sources
|
||||
| B1 INSPECT THE RING GEAR OR PINION GEARS FOR BROKEN GEAR TEETH | ||||
Was wear or damage found?
|
|
Normal Operation and Fault Conditions
REFER to: Front Drive Axle and Differential (205-03 Front Drive Axle/Differential, Description and Operation). Scoring on the pinion gear or side gears can be the result of insufficient axle lubricant, contaminated axle lubricant, or incorrect axle lubricant. Possible Sources
|
||||
| C1 CHECK AXLE LUBRICANT LEVEL AND CONDITION | ||||
Is the lubricant level low or contaminated?
|
||||
| C2 INSPECT THE DIFFERENTIAL SIDE GEARS/PINION GEARS FOR SCORING | ||||
Was wear or damage found?
|
|
Normal Operation and Fault Conditions
REFER to: Front Drive Axle and Differential (205-03 Front Drive Axle/Differential, Description and Operation). Possible Sources
|
||||
| D1 CHECK THE ELD (ELECTRONIC LOCKING DIFFERENTIAL) DIAGNOSTIC TROUBLE CODES (DTCS) | ||||
Are there any DTC s present?
|
|
Normal Operation and Fault Conditions
REFER to: Front Drive Axle and Differential (205-03 Front Drive Axle/Differential, Description and Operation). Possible Sources
|
||||
| E1 INSPECT AXLE HOUSING AND VENT | ||||
Was any damage or leaks found?
|
|
Normal Operation and Fault Conditions
REFER to: Front Drive Axle and Differential (205-03 Front Drive Axle/Differential, Description and Operation). Possible Sources
|
||||
| F1 INSPECT AXLE VENT | ||||
Was blockage found?
|
||||
| F2 INSPECT THE PINION SEAL AND DUST SLINGER | ||||
Was any damage found?
|
|
Normal Operation and Fault Conditions
REFER to: Front Drive Axle and Differential (205-03 Front Drive Axle/Differential, Description and Operation). Possible Sources
|
||||
| G1 CHECK THE LUBRICANT LEVEL | ||||
Is the lubricant level low?
|
||||
| G2 INSPECT AXLE HOUSING FOR DAMAGE | ||||
Was any damage found?
|
||||
| G3 INSPECT RING AND PINION GEAR CONTACT | ||||
Was any damage found?
|
|
Normal Operation and Fault Conditions
REFER to: Front Drive Axle and Differential (205-03 Front Drive Axle/Differential, Description and Operation). Possible Sources
|
||||
| H1 CHECK THE LUBRICATION LEVEL | ||||
Is the lubricant level low?
|
||||
| H2 CHECK FOR EXCESSIVE AXLE BACKLASH | ||||
Is there excessive axle backlash?
|
|
Normal Operation and Fault Conditions
REFER to: Front Drive Axle and Differential (205-03 Front Drive Axle/Differential, Description and Operation). Possible Sources
|
||||
| I1 INSPECT PINION GEARS | ||||
Was any damage found?
|
|
Normal Operation and Fault Conditions
REFER to: Front Drive Axle and Differential (205-03 Front Drive Axle/Differential, Description and Operation). Possible Sources
|
||||
| J1 INSPECT THE DIFFERENTIAL CARRIER AND THE COMPONENTS OF THE DIFFERENTIAL CARRIER | ||||
Was any damage found?
|
|
Normal Operation and Fault Conditions
REFER to: Front Drive Axle and Differential (205-03 Front Drive Axle/Differential, Description and Operation). Possible Sources
|
||||
| K1 CHECK FOR LOOSE BOLTS | ||||
Are any bolts loose?
|
|
Normal Operation and Fault Conditions
REFER to: Front Drive Axle and Differential (205-03 Front Drive Axle/Differential, Description and Operation). Possible Sources
|
||||
| L1 INSPECT RING AND PINION, BEARING PRELOAD AND FOR GEAR DAMAGE | ||||
Was ring and pinion or bearing preload out of specification?
|
|
Normal Operation and Fault Conditions
REFER to: Front Drive Axle and Differential (205-03 Front Drive Axle/Differential, Description and Operation). Possible Sources
|
||||
| M1 INSPECT RING AND PINION CONTACT AND FOR DAMAGED TEETH ON RING AND PINION | ||||
Was any damage found?
|
|
Normal Operation and Fault Conditions
REFER to: Front Drive Axle and Differential (205-03 Front Drive Axle/Differential, Description and Operation). Possible Sources
|
||||
| N1 INSPECT FOR TOOTH DAMAGE ON RING AND PINION | ||||
Was any damage found?
|
|
Normal Operation and Fault Conditions
REFER to: Front Drive Axle and Differential (205-03 Front Drive Axle/Differential, Description and Operation). Possible Sources
|
||||
| O1 INSPECT PINION BEARINGS | ||||
Was wear or damage found?
|
|
Normal Operation and Fault Conditions
REFER to: Front Drive Axle and Differential (205-03 Front Drive Axle/Differential, Description and Operation). Possible Sources
|
||||
| P1 CHECK THE AXLE MOUNTS AND THE REAR SUSPENSION FOR DAMAGE OR WEAR | ||||
Was wear or damage found?
|
||||
| P2 CHECK THE REAR AXLE FOR LOOSE BOLTS | ||||
Were any bolts loose?
|
||||
| P3 CHECK FOR CORRECT DRIVELINE ANGLES | ||||
Are the driveline angles correct?
|
Analysis of Leakage
Clean up the leaking area enough to identify the exact source.
Test drive (after clean) to build up pressure and see seep and weep coming back or not.
A plugged front axle housing vent can cause excessive pinion seal lip wear due to internal pressure buildup.
If lubricant leakage, seepage or weepage observed then GO to Pinpoint Test F
Verify the differential lubricant level is at the correct level.
REFER to: Differential Fluid Level Check (205-03 Front Drive Axle/Differential, General Procedures).
Axle Vent
A plugged vent will cause excessive seal lip wear due to internal pressure buildup. If a leak occurs, check the vent. If the vent cannot be cleared, install a new vent.
Drive Pinion Seal
Leaks at the drive pinion seal originate from the following causes:
- Damaged seal
- Worn seal journal surface
A new drive pinion flange must be installed if any of these conditions exist.
- Any damage to the seal bore (dings, dents, gouges or other imperfections) distorts the seal casing and allows leakage past the outer edge of the drive pinion seal.
- The drive pinion seal can be torn, cut or gouged if it is not installed correctly. The spring that holds the drive pinion seal against the pinion flange may be knocked out and allow fluid to pass the lip.
- Metal chips trapped at the sealing lip can cause oil leaks. These can cause a wear groove on the drive pinion flange and result in pinion seal wear.
- When a seal leak occurs, install a new drive pinion seal and check the vent to make sure it is clean and free of foreign material.
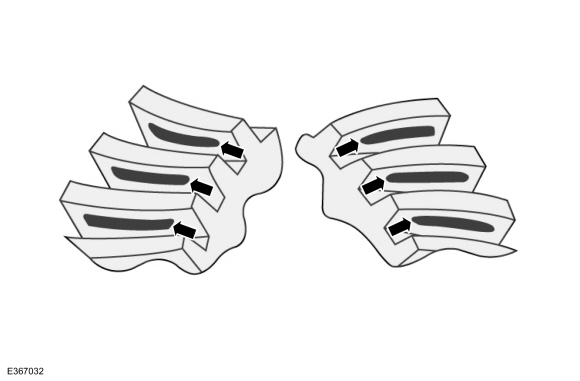
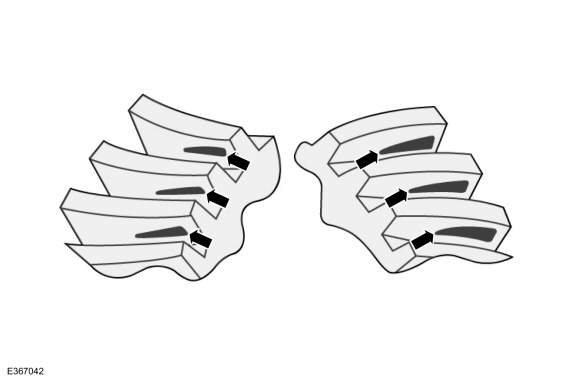
Contact Pattern
In general, desirable ring gear tooth patterns must have the following characteristics:
- Drive pattern on the drive side ring gear well centered on the tooth. There should be some clearance between the pattern and the top of the tooth.
- Coast pattern on the coast side ring gear well centered on the tooth, but may be slightly toward the toe. There should be some clearance between the pattern and the top of the tooth.
Acceptable ring gear tooth patterns for all axles.
Correct backlash with a thicker pinion position shim required.
Correct backlash with a thinner pinion position shim required.
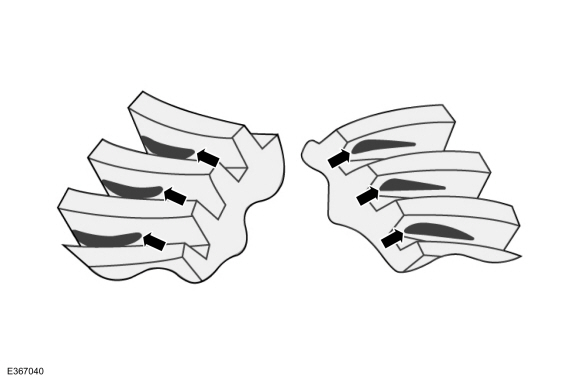
Pinion position correct. Decrease backlash.
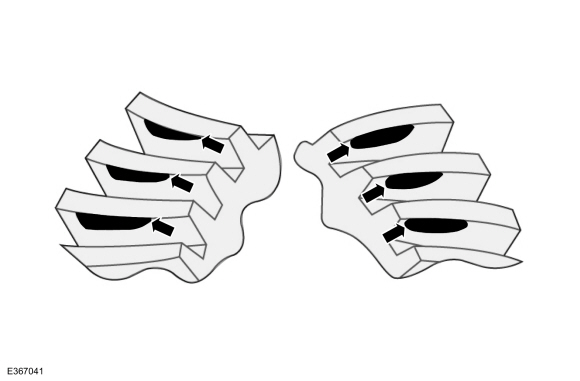
Pinion position correct. Increase backlash.
 Front Drive Axle and Differential. Description and Operation
The front drive axle consists of:
A cast-aluminum center section, a removable cast-aluminum
axle housing tube and a differential housing cover...
 Differential Case Runout Check. General Procedures
Special Tool(s) /
General Equipment
205-1016Installer, Differential BearingTKIT-2014D-ROW2TKIT-2014D-FL_ROW
205-153
(T80T-4000-W)
Handle
205-D061
(D83T-4205-C2)
Step Plate
Dial Indicator
Three Leg Puller
Punch
Copper Hammer
Check
Remove the differential...
Other information:
Lincoln Navigator 2018-2026 Workshop Manual: Air Conditioning (A/C) Compressor Inlet Line. Removal and Installation
Removal NOTICE: During the removal or installation of components, cap, tape or otherwise appropriately protect all openings and tubes/fittings to prevent the ingress of dirt or other contamination. Remove caps, tape and other protective materials prior to installation...
Lincoln Navigator 2018-2026 Workshop Manual: Battery. Diagnosis and Testing
General Equipment Diagnostic Battery Charger Use Ford approved battery test equipment listed in the Ford Warranty and Policy Manual. Diagnostics in this manual assume a certain skill level and knowledge of Ford-specific diagnostic practices...
Categories
- Manuals Home
- 4th Gen Lincoln Navigator Service Manual (2018 - 2026)
- Telematics Control Unit (TCU) Module. Removal and Installation
- Rear View Mirrors - System Operation and Component Description. Description and Operation
- Front Bumper Cover. Removal and Installation
- Liftgate Trim Panel. Removal and Installation
- Remote Function Actuator (RFA) Module. Removal and Installation
Front Stabilizer Bar Link. Removal and Installation
Removal
NOTICE: Suspension fasteners are critical parts that affect the performance of vital components and systems. Failure of these fasteners may result in major service expense. Use the same or equivalent parts if replacement is necessary. Do not use a replacement part of lesser quality or substitute design. Tighten fasteners as specified.
NOTE: Removal steps in this procedure may contain installation details.
With the vehicle in NEUTRAL, position it on a hoist.Refer to: Jacking and Lifting (100-02 Jacking and Lifting, Description and Operation).
NOTICE: Do not use power tools to remove or install the stabilizer bar