Lincoln Navigator: Handles, Locks, Latches and Entry Systems / Exterior Rear Door Handle. Removal and Installation
Removal
NOTE: LH side shown, RH side similar.
NOTE: Removal steps in this procedure may contain installation details.
-
Remove the rear door trim panel.
Refer to: Rear Door Trim Panel (501-05 Interior Trim and Ornamentation, Removal and Installation).
-
Remove the watershield.
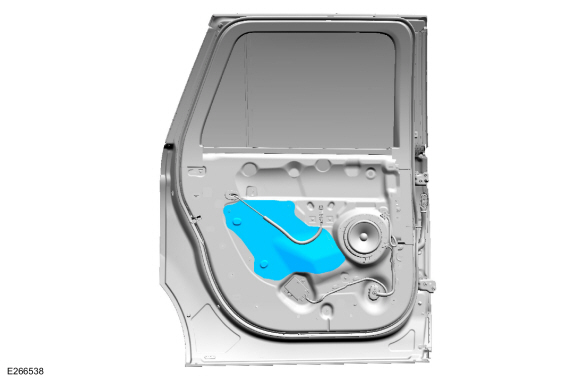 |
-
NOTE: The rear door is shown transparent for clarity.
Disconnect the exterior rear door handle electrical connector.
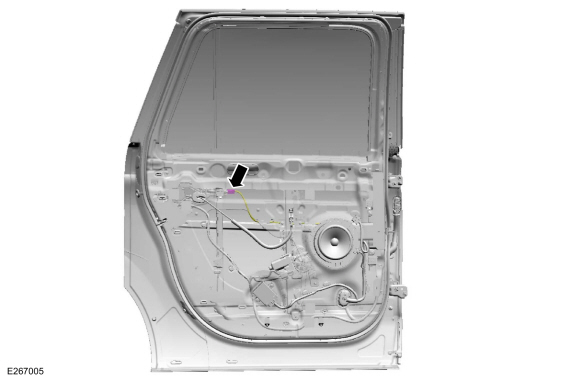 |
-
Remove the exterior rear door handle access plug.
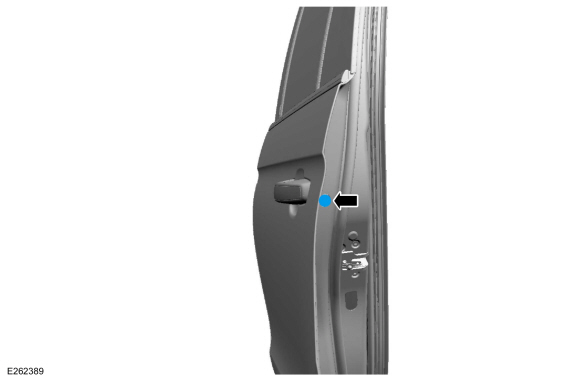 |
-
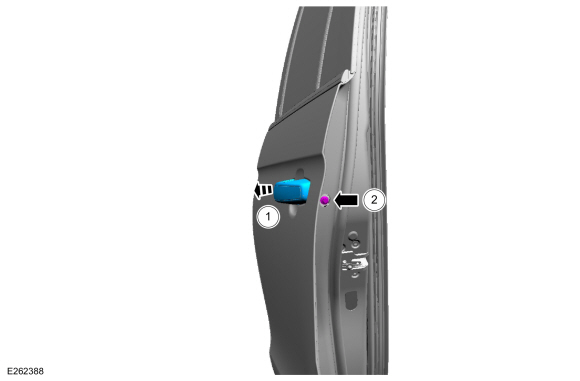
Remove the exterior rear door handle.
-
Hold the exterior rear door handle open.
-
Turn the release screw enough to release the
exterior rear door handle and remove the exterior rear door handle.
Torque: 62 lb.in (7 Nm)
-
Hold the exterior rear door handle open.
 |
Installation
-
To install, reverse the removal procedure.
-
NOTE: This step is only necessary when installing a new component.
If equipped with Phone as a Key, using the diagnostic scan tool, carry out the RFA module self test.
 Exterior Front Door Handle Reinforcement. Removal and Installation
Removal
NOTE:
LH side shown, RH side similar.
Remove the front door latch.
Refer to: Front Door Latch (501-14 Handles, Locks, Latches and Entry Systems, Removal and Installation)...
 Exterior Rear Door Handle Reinforcement. Removal and Installation
Removal
NOTE:
LH side shown, RH side similar.
Remove the rear door latch.
Refer to: Rear Door Latch (501-14 Handles, Locks, Latches and Entry Systems, Removal and Installation)...
Other information:
Lincoln Navigator 2018-2026 Workshop Manual: Brake Caliper Anchor Plate. Removal and Installation
Removal NOTE: Removal steps in this procedure may contain installation details. Remove the brake pads. Refer to: Brake Pads (206-04 Rear Disc Brake, Removal and Installation). Remove the bolts and the anchor plate...
Lincoln Navigator 2018-2026 Workshop Manual: Air Cleaner Outlet Pipe. Removal and Installation
Removal NOTICE: The turbocharger compressor vanes can be damaged by even the smallest particles. When removing any turbocharger or engine air intake system component, ensure that no debris enters the system. Failure to do so may result in damage to the turbocharger...
Categories
- Manuals Home
- 4th Gen Lincoln Navigator Service Manual (2018 - 2026)
- All Terrain Control Module (ATCM). Removal and Installation
- Head Up Display (HUD) Module Calibration. General Procedures
- Rear View Mirrors - System Operation and Component Description. Description and Operation
- Front Bumper Cover. Removal and Installation
- Body and Paint
Front Driveshaft. Removal and Installation
Special Tool(s) / General Equipment
Crimping ToolMaterials
Name Specification Motorcraft® Premium Long-Life GreaseXG-1-E1 ESA-M1C75-B
Removal
With the vehicle in NEUTRAL, position the vehicle on a hoist.Refer to: Jacking and Lifting (100-02 Jacking and Lifting, Description and Operation).
Remove the bolts and the transmission shield.