Lincoln Navigator: Voltage Converter/Inverter / Direct Current/Alternating Current (DC/AC) Inverter - Overview. Description and Operation
Overview
The DC - AC inverter converts 12 volts DC to 110 volts AC to power AC devices rated 150 watts or less.
 Direct Current/Alternating Current (DC/AC) Inverter - Component Location. Description and Operation
..
 Direct Current/Alternating Current (DC/AC) Inverter - System Operation and Component Description. Description and Operation
System Diagram
Item
Description
1
PCM
2
BCM
3
Direct Current/Alternating Current (DC/AC) Inverter
4
AC Power Outlet Socket
System Operation
Network Message Chart
Broadcast Message
Originating Module
Message Purpose
..
Other information:
Lincoln Navigator 2018-2026 Workshop Manual: Air Distribution Door Actuator. Removal and Installation
Removal NOTE: Removal steps in this procedure may contain installation details. Remove the steering column opening trim panel. Remove the bolts and the steering column reinforcement panel. Torque: 80 lb.in (9 Nm) Disconnect the air distribution door actuator electrical..
Lincoln Navigator 2018-2026 Workshop Manual: Instrument Panel and Interior Switches Illumination - System Operation and Component Description. Description and Operation
System Operation System Operation Overview - Dimmable Illumination Dimmable illumination provides backlighting to switches and control components when the parking lamps are on. The level of intensity for the dimmable backlit components is adjusted by using the instrument panel dimmer switch to increase or decrease intensity. The BCM is the master module that controls the dimmab..
Categories
- Manuals Home
- 4th Gen Lincoln Navigator Service Manual (2018 - 2026)
- Transmission Fluid Drain and Refill. General Procedures
- Front Seat. Removal and Installation
- Body and Paint
- Windshield Washer Pump. Removal and Installation
- Rear Bumper. Removal and Installation
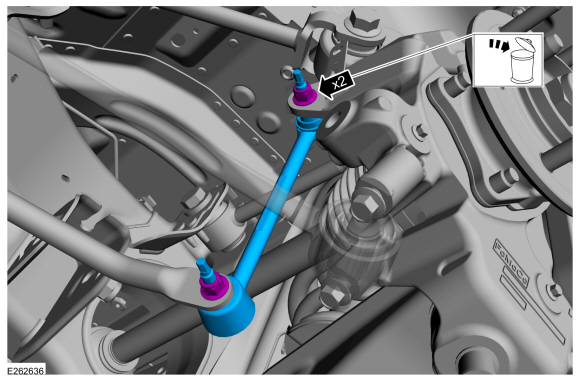
Rear Stabilizer Bar Link. Removal and Installation
Removal
NOTE: Removal steps in this procedure may contain installation details.
With the vehicle in NEUTRAL, position it on a hoist.Refer to: Jacking and Lifting (100-02 Jacking and Lifting, Description and Operation).
NOTE: Use the hex-holding feature to prevent the stud from turning while removing the nut.
Remove and discard the 2 rear stabilizer bar link nuts and remove the rear stabilizer bar link.Torque: 46 lb.ft (63 Nm)