Lincoln Navigator: Automatic Transmission - 10-Speed Automatic Transmission – 10R80 / D Clutch. Description and Operation
Overview
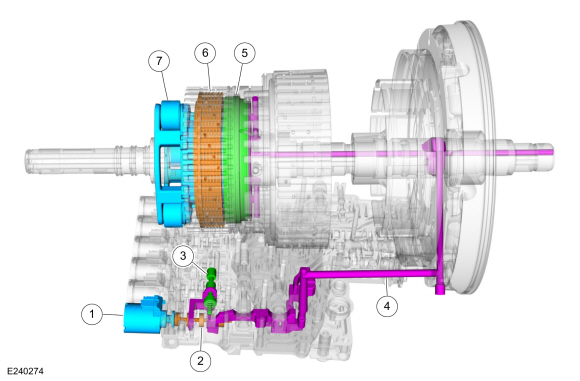
| Item | Description |
| 1 | SSD |
| 2 | D clutch control valve |
| 3 | Clutch gain control valve |
| 4 | D clutch apply circuit |
| 5 | D clutch piston |
| 6 | D clutch assembly |
| 7 | Planetary carrier No. 3 |
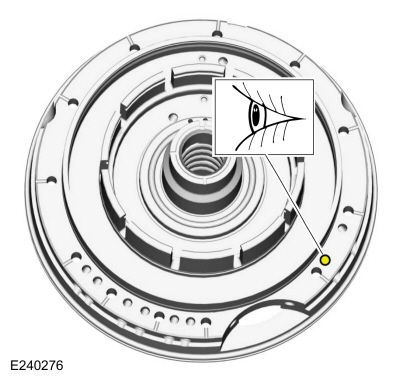
Planetary carrier No. 3 is located in the CDF clutch and planetary carrier assembly. Planetary carrier No. 3 is connected to the D clutch. When the D clutch applies, the planetary carrier No. 3 may be connected to ring gear No. 2.
D Clutch Exploded View
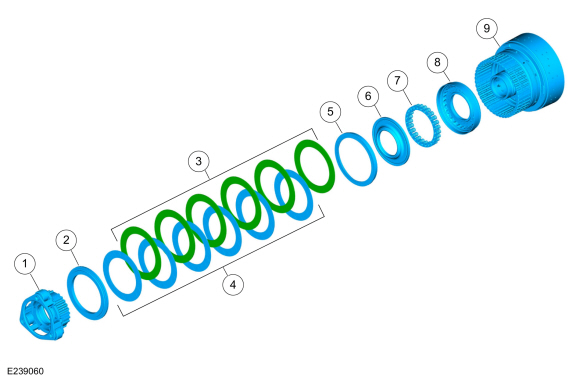
| Item | Description |
| 1 | Planetary carrier No. 3 |
| 2 | D clutch pressure plate |
| 3 | D clutch steel plates |
| 4 | D clutch friction plates |
| 5 | D clutch apply ring |
| 6 | D clutch balance dam |
| 7 | D clutch piston return spring |
| 8 | D clutch piston |
| 9 | CDF clutch cylinder |
D Clutch Hydraulic Circuits
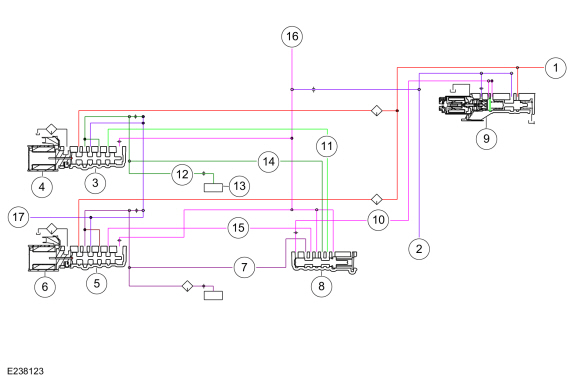
| Item | Description |
| 1 | Line pressure |
| 2 | Pump output |
| 3 | D clutch control valve |
| 4 | SSD |
| 5 | E clutch control valve |
| 6 | SSE |
| 7 | E clutch apply pressure to clutch gain control valve |
| 8 | Clutch gain control valve |
| 9 | LPC solenoid |
| 10 | LPC pressure |
| 11 | D clutch feedback pressure |
| 12 | Apply pressure to mechanical D clutch |
| 13 | Mechanical D clutch |
| 14 | D clutch apply pressure to clutch gain control valve |
| 15 | E clutch feedback pressure |
| 16 | Elevated exhaust pressure |
| 17 | Clutch exhaust |
D Clutch Hydraulic Operation 5th-6th Shift
Line pressure is supplied to the D clutch control valve. LPC pressure is supplied to the gain control valve. LPC pressure positions the gain control valve to the right end of the valve bore. As SSD turns on, it moves the D clutch control valve allowing regulated line pressure to flow to the mechanical D clutch.
D Clutch Hydraulic Operation 2nd-3rd, 4th-5th, and 9th-10th Shifts
Line pressure is supplied to the D clutch control valve. LPC pressure is supplied to the gain control valve. The LPC pressure is low and the gain control valve stays in the default position at the left end of the valve bore. As SSD turns on, it moves the D clutch control valve allowing regulated line pressure to flow to the mechanical D clutch.
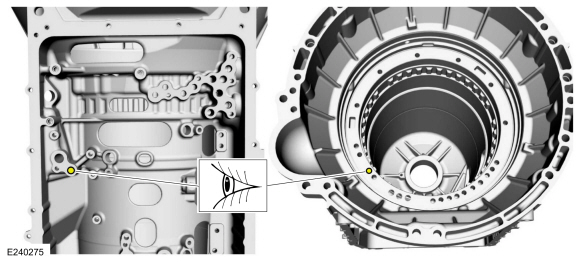
D Clutch Hydraulic Passages

 E Clutch. Description and Operation
Overview
Item
Description
1
SSE
2
E clutch control valve
3
Clutch gain control valve
4
E clutch apply circuit
5
E clutch piston
6
E clutch assembly
7
Shell and sun gear..
Other information:
Lincoln Navigator 2018-2026 Workshop Manual: Vehicle Dynamics Control Module (VDM). Removal and Installation
Removal NOTICE: Electronic modules are sensitive to static electrical charges. If exposed to these charges, damage may result. NOTE: Removal steps in this procedure may contain installation details. NOTE: The current PMI process must begin with the current VDM installed. If the current VDM does not respond to the diagnostic scan tool, the tool may prompt for As-Bu..
Lincoln Navigator 2018-2026 Workshop Manual: Steering Wheel and Column Electrical Components. Diagnosis and Testing
Diagnostic Trouble Code (DTC) Chart Diagnostics in this manual assume a certain skill level and knowledge of Ford-specific diagnostic practices. REFER to: Diagnostic Methods (100-00 General Information, Description and Operation). Module DTC Description Action BCM B108A:01 Start Button: General Electrical Failure GO to Pinpoint Test A BCM B108A:24 Start..
Categories
- Manuals Home
- 4th Gen Lincoln Navigator Service Manual (2018 - 2026)
- Front Seat. Removal and Installation
- Windshield Washer Pump. Removal and Installation
- Body Control Module (BCM). Removal and Installation
- Transmission Fluid Drain and Refill. General Procedures
- SYNC Module [APIM]. Removal and Installation
Rear Drive Halfshafts. Diagnosis and Testing
Preliminary Inspection
Visually inspect the CV joints, housing, boots, and clamps for obvious signs of mechanical damage.If an obvious cause for an observed or reported concern is found, correct the cause (if possible) before proceeding to the next step
If the cause is not visually evident, verify the symptom and REFER to Symptom Chart: NVH.