Lincoln Navigator: Climate Control System - General Information / Air Conditioning (A/C) Compressor. Removal and Installation
Removal
NOTICE: If installing a new A/C compressor due to an internal failure of the old unit, carry out the following procedures to remove contamination from the A/C system. Failure to remove contamination from the A/C system, if present, will result in poor A/C performance and/or damage to the new A/C compressor and other components.
- If A/C flushing equipment is available, carry out flushing of the A/C system prior to installing a new A/C compressor.
- If A/C flushing equipment is not available, replace all contaminated components after a new A/C compressor has been installed.
- Install a new Thermostatic Expansion Valve (TXV) as directed by the A/C flushing.
- Install a new receiver drier element as directed by the A/C flushing.
NOTICE: During the removal of components, cap, tape or otherwise appropriately protect all openings to prevent the ingress of dirt or other contamination. Remove protective materials prior to installation.
NOTE: Installation of a new receiver drier element is not required when repairing the A/C system except when there is physical evidence of system contamination from a failed A/C compressor or damage to the receiver drier element.
NOTE: A new A/C compressor may come equipped with an A/C clutch disc and hub, A/C compressor pulley and A/C clutch field coil already installed. If these components are not pre-installed, it will be necessary to transfer these parts from the old A/C compressor to the new compressor prior to installation of the A/C compressor if suitable for reuse.
NOTE: Removal steps in this procedure may contain installation details.
-
Recover the refrigerant.
Refer to: Air Conditioning (A/C) System Recovery, Evacuation and Charging (412-00 Climate Control System - General Information, General Procedures).
-
Remove the RH air cleaner outlet pipe.
Refer to: Air Cleaner Outlet Pipe RH (303-12 Intake Air Distribution and Filtering - 3.5L EcoBoost (272kW/370PS), Removal and Installation).
-
Remove the RH
CAC intake pipe.
Refer to: Charge Air Cooler (CAC) Intake Pipe (303-12 Intake Air Distribution and Filtering - 3.5L EcoBoost (272kW/370PS), Removal and Installation).
-
Remove the A/C compressor belt.
Refer to: Air Conditioning (A/C) Compressor Belt (303-05 Accessory Drive - 3.5L EcoBoost (272kW/370PS), Removal and Installation).
-
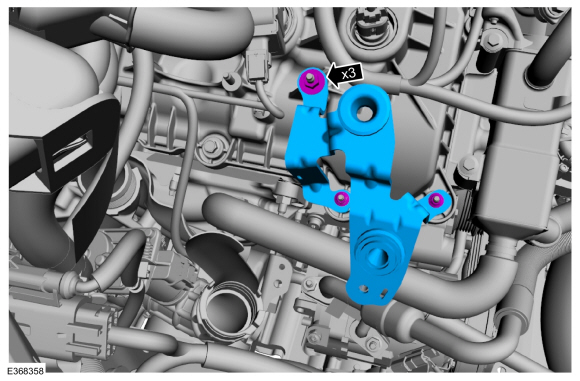
Remove the retainers and remove the support bracket.
Torque: 53 lb.in (6 Nm)
 |
-
Remove the battery tray.
Refer to: Battery Tray (414-01 Battery, Mounting and Cables, Removal and Installation).
-
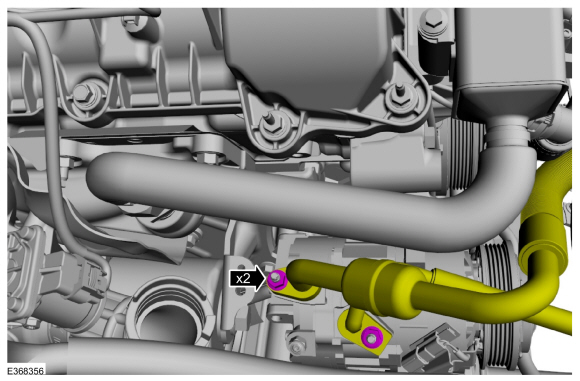
Remove the A/C compressor inlet and outlet line retainers and disconnect the fittings.
-
Make sure to cover any open ports to prevent debris from entering the system.
Torque: 133 lb.in (15 Nm)
-
Make sure to cover any open ports to prevent debris from entering the system.
 |
-
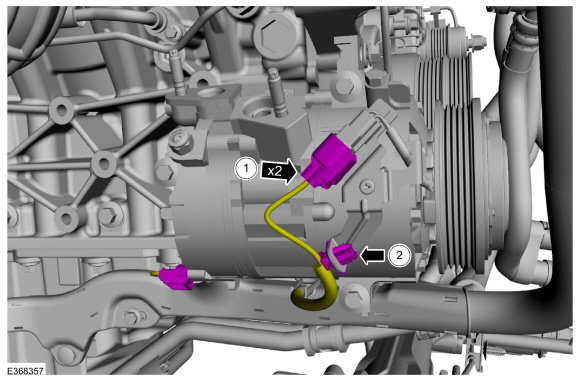
NOTE: Frame removed for clarity.
-
Disconnect the electrical connectors.
-
Detach the wiring harness retainer and position aside the wiring harness.
-
Disconnect the electrical connectors.
 |
-
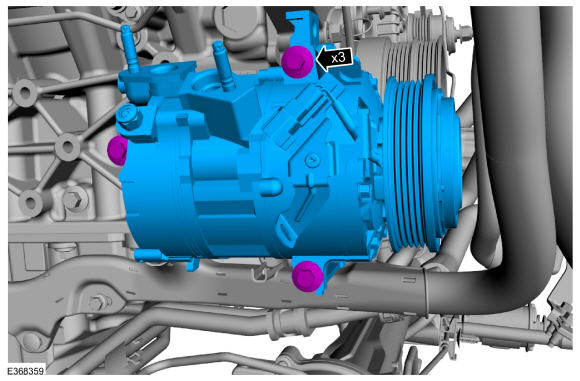
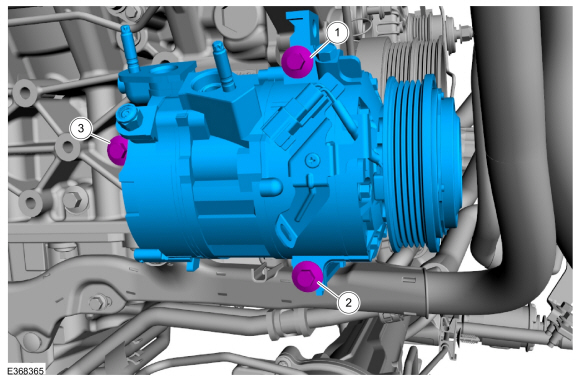
NOTE: Frame removed for clarity.
Remove the bolts and the A/C compressor.
 |
Installation
-
To install, reverse the removal procedure.
-
NOTE: Frame removed for clarity.
Tighten the A/C compressor bolts in the sequence shown.
Torque: 18 lb.ft (25 Nm)
 |
-
NOTICE: Only use the specified material to lubricate the seals.
Install and lubricate new O-ring seals. Refer to the appropriate.
Refer to: Specifications (412-00 Climate Control System - General Information, Specifications).
-
Lubricate the refrigerant system with the correct amount of clean PAG oil..
Refer to: Refrigerant Oil Adding (412-00 Climate Control System - General Information, General Procedures).
 Air Conditioning (A/C) Clutch and Air Conditioning (A/C) Clutch Field Coil. Removal and Installation
Special Tool(s) /
General Equipment
Snap Ring Pliers
Removal
NOTE:
Removal steps in this procedure may contain installation details...
 Air Conditioning (A/C) Compressor Inlet Line. Removal and Installation
Removal
NOTICE:
During the removal or installation of components, cap, tape
or otherwise appropriately protect all openings and tubes/fittings to
prevent the ingress of dirt or other contamination...
Other information:
Lincoln Navigator 2018-2026 Workshop Manual: Vehicle Dynamic Suspension - Component Location. Description and Operation
Item Description 1 Front Shock Absorber (2 required) 2 Front height sensor (2 required) 3 VDM 4 Rear height sensor (2 required) 5 Rear Shock Absorber (2 required) ..
Lincoln Navigator 2018-2026 Workshop Manual: Valve Cover LH. Removal and Installation
Special Tool(s) / General Equipment 205-142 (T80T-4000-J) Installer, Differential Bearing Cone 205-153 (T80T-4000-W) Handle 303-1247VCT Spark Plug Tube Seal Remover and InstallerTKIT-2006UF-FLMTKIT-2006UF-ROW Materials Name Specification Motorcraft® High Performance Engine RTV SiliconeTA-357 WSE-M4G323-A6 Motorcra..
Categories
- Manuals Home
- 4th Gen Lincoln Navigator Service Manual (2018 - 2026)
- Transmission Fluid Drain and Refill. General Procedures
- Rear Bumper. Removal and Installation
- Transmission Fluid Level Check. General Procedures
- Remote Function Actuator (RFA) Module. Removal and Installation
- Rear View Mirrors - System Operation and Component Description. Description and Operation
Differential Case Runout Check. General Procedures
Special Tool(s) / General Equipment
 205-1016
Installer, Differential Bearing
TKIT-2014D-ROW2
TKIT-2014D-FL_ROW
 205-153
(T80T-4000-W)
205-153
(T80T-4000-W)
Handle
 205-D061
(D83T-4205-C2)
205-D061
(D83T-4205-C2)
Step Plate Dial Indicator Three Leg Puller Punch