Lincoln Navigator: Multifunction Electronic Modules / Radio Transceiver Module (RTM). Removal and Installation
Materials
| Name | Specification |
|---|---|
| 3M™ Super-Fast Repair Adhesive 04747 |
- |
Removal
NOTE: Removal steps in this procedure may contain installation details.
-
NOTE: If installing a new module, it is necessary to upload the module configuration information to the diagnostic scan tool prior to removing the module. This information must be downloaded into the new module after installation.
Carry out the PMI procedure for the RTM .
-
Lower the headliner.
Refer to: Headliner - Lowering (501-05 Interior Trim and Ornamentation, Removal and Installation).
-
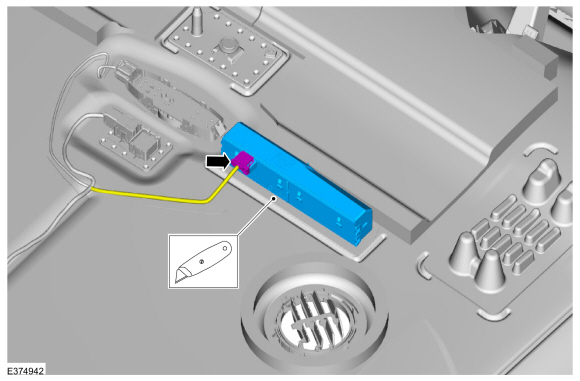
Using a knife, carefully cut the RTM -to-headliner adhesive and remove the RTM .
-
Disconnect the electrical connector.
-
Disconnect the electrical connector.
 |
Installation
-
NOTE: Obtain the specified adhesive commercially. Depending on the headliner and optional wire harness(es), the purchase of multiple tubes is suggested.
-
Position the RTM onto the new headliner, making sure the harness has enough length to connect to the RTM .
-
Apply the adhesive in the same location as the factory installed adhesive on the RTM to avoid any NVH concern(s).
Material: 3M™ Super-Fast Repair Adhesive / 04747
-
Position the RTM onto the new headliner, making sure the harness has enough length to connect to the RTM .
-
To install, reverse the removal procedure.
-
Using the previous diagnostic scan tool session, carry out the PMI procedure for the RTM .
 Passenger Door Module (PDM). Removal and Installation
Removal
NOTE:
Removal steps in this procedure may contain installation details.
NOTE:
LH (left-hand) side DDM (driver door module) shown...

Other information:
Lincoln Navigator 2018-2026 Workshop Manual: Remote Function Actuator (RFA) Module. Removal and Installation
Removal NOTE: This step is only necessary when installing a new component. NOTE: If installing a new module, it is necessary to upload the module configuration information to the diagnostic scan tool prior to removing the module. This information must be downloaded into the new module after installation. Using a diagnostic scan tool, begin the PMI process for the ..
Lincoln Navigator 2018-2026 Workshop Manual: Timing Chain. Removal and Installation
Special Tool(s) / General Equipment 303-1655Tool, Camshaft Holding Removal NOTICE: During engine repair procedures, cleanliness is extremely important. Any foreign material, including any material created while cleaning gasket surfaces, that enters the oil passages, coolant passages or the oil pan may cause engine failure. RH and LH timing chains ..
Categories
- Manuals Home
- 4th Gen Lincoln Navigator Service Manual (2018 - 2026)
- Vehicle Dynamics Control Module (VDM). Removal and Installation
- All Terrain Control Module (ATCM). Removal and Installation
- Head Up Display (HUD) Module Calibration. General Procedures
- SYNC Module [APIM]. Removal and Installation
- Front Bumper Cover. Removal and Installation
Front Stabilizer Bar Link. Removal and Installation
Removal
NOTICE: Suspension fasteners are critical parts that affect the performance of vital components and systems. Failure of these fasteners may result in major service expense. Use the same or equivalent parts if replacement is necessary. Do not use a replacement part of lesser quality or substitute design. Tighten fasteners as specified.
NOTE: Removal steps in this procedure may contain installation details.
With the vehicle in NEUTRAL, position it on a hoist.Refer to: Jacking and Lifting (100-02 Jacking and Lifting, Description and Operation).
NOTICE: Do not use power tools to remove or install the stabilizer bar