Lincoln Navigator: Multifunction Electronic Modules / Passenger Door Module (PDM). Removal and Installation
Removal
-
NOTE: Removal steps in this procedure may contain installation details.
NOTE: LH (left-hand) side DDM (driver door module) shown. RH (right-hand) side PDM (passenger door module) similar.
NOTE: If installing a new module, it is necessary to upload the module configuration information to the diagnostic scan tool prior to removing the module. This information must be downloaded into the new module after installation.
Using a diagnostic scan tool, begin the PMI process for the PDM following the on-screen instructions.
-
Remove RH front door trim panel.
Refer to: Front Door Trim Panel (501-05 Interior Trim and Ornamentation, Removal and Installation).
-
-
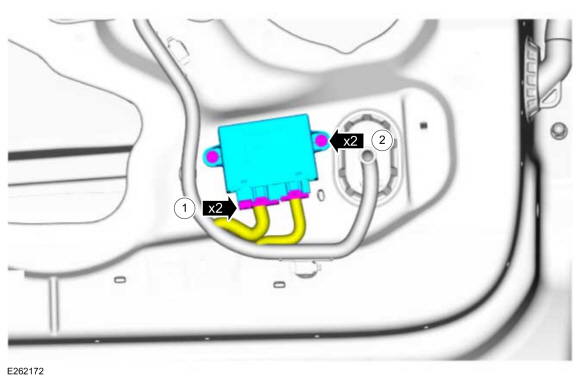
Disconnect the electrical connectors.
-
Remove the retainers and the PDM .
-
Disconnect the electrical connectors.
 |
Installation
-
To install, reverse the removal procedure.
-
Using a diagnostic scan tool, complete the PMI process for the PDM following the on-screen instructions.
-
Perform the power door window initialization procedure.
Refer to: Power Door Window Initialization (501-11 Glass, Frames and Mechanisms, General Procedures).
 Driver Door Module (DDM). Removal and Installation
Removal
NOTE:
Removal steps in this procedure may contain installation details.
NOTE:
If installing a new module, it is necessary to
upload the module configuration information to the diagnostic scan tool
prior to removing the module...
 Radio Transceiver Module (RTM). Removal and Installation
Materials
Name
Specification
3M™ Super-Fast Repair Adhesive04747
-
Removal
NOTE:
Removal steps in this procedure may contain installation details...
Other information:
Lincoln Navigator 2018-2026 Workshop Manual: Wheel Studs. Removal and Installation
Special Tool(s) / General Equipment 211-023 (T74P-3044-A1) C-Frame and Screw Removal NOTICE: Suspension fasteners are critical parts that affect the performance of vital components and systems. Failure of these fasteners may result in major service expense...
Lincoln Navigator 2018-2026 Workshop Manual: Locks, Latches and Entry Systems. Diagnosis and Testing
DTC Chart: BCM Diagnostics in this manual assume a certain skill level and knowledge of Ford-specific diagnostic practices. REFER to: Diagnostic Methods (100-00 General Information, Description and Operation). DTC Description Action B10AB:00 Remote Keyless Entry Synchronization: No Sub Type ..
Categories
- Manuals Home
- 4th Gen Lincoln Navigator Service Manual (2018 - 2026)
- Rear View Mirrors - System Operation and Component Description. Description and Operation
- All Terrain Control Module (ATCM). Removal and Installation
- Rear Bumper. Removal and Installation
- Brake Service Mode Activation and Deactivation. General Procedures
- Head Up Display (HUD) Module Calibration. General Procedures
Diagnostic Methods. Description and Operation
This document provides critical diagnostic knowledge required for successful repair outcomes. It identifies technical competencies expected by users of this manual.
Ford Diagnostic Assumptions
Ford diagnostics assume the vehicle concern described by the test title is currently present. Exceptions to this rule are noted in each test. Do not replace modules or other components as directed by a diagnostic if the concern is not present at the time of testing.