Lincoln Navigator: Body Repairs - Vehicle Specific Information and Tolerance Checks / Body Panel Sectioning. General Procedures
Special Tool(s) / General Equipment
| Self-Piercing Rivet (SPR) Remover/Installer | |
| Belt Sander | |
| Blind Rivet Gun | |
| Air Body Saw | |
| MIG/MAG Welding Equipment |
Materials
| Name | Specification |
|---|---|
| Seam Sealer TA-2-B, 3M™ 08308, LORD Fusor® 803DTM |
- |
Repair
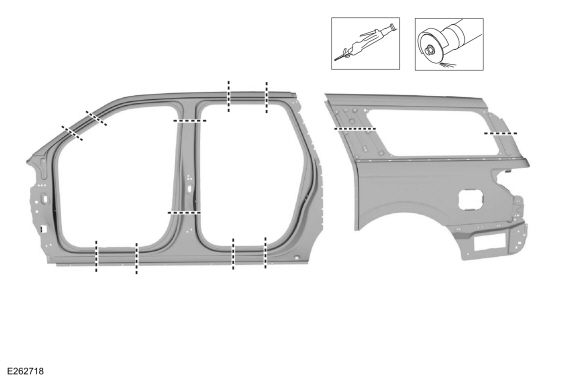
NOTICE: Do not begin removal of the vehicle body side until the replacement panel is available for reference.
NOTICE: Do not carry out body side sectioning repairs in areas of door hinge, safety restraints or striker anchoring points. Welding within 50 mm (1.96 in) of door hinge or striker locations may compromise structural integrity during a collision.
NOTE: The following illustrations are intended as a general guideline and are not all inclusive. Adjust to meet repair needs.
NOTE: LH side shown, RH side similar.
 |
-
Restore the vehicle dimensionally to pre-damage condition.
Refer to: Body and Frame (501-26 Body Repairs - Vehicle Specific Information and Tolerance Checks, Description and Operation).
-
As a general rule, sectioning cut points should be chosen to result in the smallest repair area possible.
-
Detrim the vehicle as necessary and remove any SPR or FDS from the area to be repaired.
Use the General Equipment: Self-Piercing Rivet (SPR) Remover/Installer
Use the General Equipment: Belt Sander
-
Only remove as much of the outer body side as necessary.
Use the General Equipment: Air Body Saw
-
NOTE: During assembly, use a SPR where possible. This will produce a higher quality repair.
Where possible, create a lap-joint backer plate from an unused portion of the old or replacement panel. This will create a stronger joint.
Refer to: Joining Techniques (501-25 Body Repairs - General Information, General Procedures).
Use the General Equipment: Self-Piercing Rivet (SPR) Remover/Installer
Use the General Equipment: Blind Rivet Gun
Use the General Equipment: MIG/MAG Welding Equipment
-
Rough finish all sectioning joints with a fibre-based
body filler, final finish sectioning joints and plug welds with a
conventional body filler.
-
Properly seal all joints to prevent moisture intrusion.
Water and moisture migrate toward horizontal joints and corrosion tends
to occur more rapidly in these areas.
Material: Seam Sealer / TA-2-B, 3M™ 08308, LORD Fusor® 803DTM
-
Proceed with the refinishing process using a Ford approved paint system and manufacturers recommendations.
-
Restore corrosion protection.
Refer to: Corrosion Prevention (501-25 Body Repairs - General Information, General Procedures).
-
Reinstall vehicle trim as necessary.


Other information:
Lincoln Navigator 2018-2026 Workshop Manual: Turbocharger Controls. Diagnosis and Testing
Diagnostic Trouble Code (DTC) Chart Diagnostics in this manual assume a certain skill level and knowledge of Ford-specific diagnostic practices. REFER to: Diagnostic Methods (100-00 General Information, Description and Operation). Module DTC Description Action PCM P0034:00 Turbocharger/Supercharger Bypass Valve 'A' Control Circuit Low: No Sub Type Information GO to..
Lincoln Navigator 2018-2026 Workshop Manual: Instrument Panel Cluster (IPC) Lens. Removal and Installation
Removal Remove the IPC . Refer to: Instrument Panel Cluster (IPC) (413-01 Instrumentation, Message Center and Warning Chimes, Removal and Installation). Release the tabs and remove the IPC lens. Installation To install, reverse the removal procedure. ..
Categories
- Manuals Home
- 4th Gen Lincoln Navigator Service Manual (2018 - 2026)
- Liftgate Trim Panel. Removal and Installation
- Front Seat. Removal and Installation
- Body Control Module (BCM). Removal and Installation
- Rear View Mirrors - System Operation and Component Description. Description and Operation
- Body and Paint
Differential Case Runout Check. General Procedures
Special Tool(s) / General Equipment
 205-1016
Installer, Differential Bearing
TKIT-2014D-ROW2
TKIT-2014D-FL_ROW
 205-153
(T80T-4000-W)
205-153
(T80T-4000-W)
Handle
 205-D061
(D83T-4205-C2)
205-D061
(D83T-4205-C2)
Step Plate Dial Indicator Three Leg Puller Punch