Lincoln Navigator: Engine Cooling - 3.5L EcoBoost (272kW/370PS) / Block Heater. Removal and Installation
Removal
NOTE: Removal steps in this procedure may contain installation details.
-
Drain the cooling system.
Refer to: Engine Cooling System Draining, Vacuum Filling and Bleeding (303-03 Engine Cooling - 3.5L EcoBoost (272kW/370PS), General Procedures).
-
Remove the following items:
-
Remove the air cleaner outlet pipe.
Refer to: Air Cleaner Outlet Pipe (303-12 Intake Air Distribution and Filtering - 3.5L EcoBoost (272kW/370PS), Removal and Installation).
-
Remove the air cleaner.
Refer to: Air Cleaner (303-12 Intake Air Distribution and Filtering - 3.5L EcoBoost (272kW/370PS), Removal and Installation).
-
Remove the LH air cleaner outlet pipe.
Refer to: Air Cleaner Outlet Pipe LH (303-12 Intake Air Distribution and Filtering - 3.5L EcoBoost (272kW/370PS), Removal and Installation).
-
Remove the air cleaner outlet pipe.
-
Remove the engine appearance cover retainers, release
the engine appearance cover from the rear retainers and then remove the
engine appearance cover.
 |
-
Disconnect the block heater electrical connector and the retainer.
 |
-
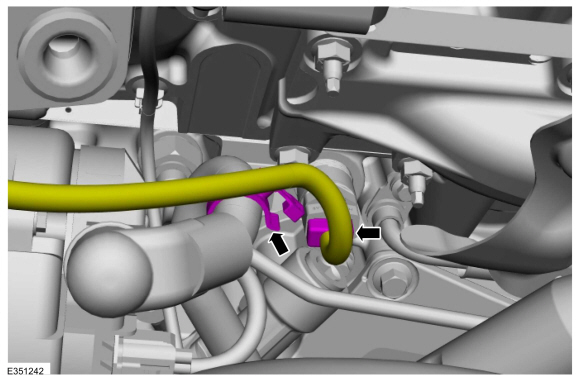
NOTE: Be prepared to collect escaping fluid.
Remove the block heater.
Torque: 41 lb.ft (55 Nm)
 |
Installation
-
If a new block heater cord has to be installed, install a new block heater cord.
 |
-
To install, reverse the removal procedure.
-
Fill and bleed the cooling system.
Refer to: Engine Cooling System Draining, Vacuum Filling and Bleeding (303-03 Engine Cooling - 3.5L EcoBoost (272kW/370PS), General Procedures).
 Engine Cooling System Flushing. General Procedures
Materials
Name
Specification
Motorcraft® Premium Cooling System FlushVC-1
ESR-M14P7-A
Flushing
WARNING:
Always allow the engine to cool before opening the cooling
system...
 Coolant Pump. Removal and Installation
Special Tool(s) /
General Equipment
Hose Clamp Remover/Installer
Materials
Name
Specification
Motorcraft® Yellow Concentrated Antifreeze/CoolantVC-13-G
WSS-M97B57-A1
Motorcraft® Orange Concentrated Antifreeze/CoolantVC-3-B
WSS-M97B44-D
Removal
Drain the cooling system...
Other information:
Lincoln Navigator 2018-2026 Workshop Manual: Rear Floor Panel Crossmember. Removal and Installation
Special Tool(s) / General Equipment 6.5 mm Drill Bit Polydrive Bit Socket Rivet Gun Self-Piercing Rivet (SPR) Remover/Installer Belt Sander Locking Pliers Materials Name Specification Metal Bonding AdhesiveTA-1, TA-1-B, 3M™ 08115, LORD Fusor® 108B, Henkel Teroson EP 5055 - Seam SealerTA-2-B, 3M™ 08308, ..
Lincoln Navigator 2018-2026 Workshop Manual: Hood. Removal and Installation
Removal NOTE: Removal steps in this procedure may contain installation details. NOTE: RH side shown, LH side similar. On both sides. Index-mark the hood hinge location to aid in hood installation. NOTICE: Support the hood before removing the strut. Failure to follow this direction may result in damage to the comp..
Categories
- Manuals Home
- 4th Gen Lincoln Navigator Service Manual (2018 - 2026)
- Liftgate Trim Panel. Removal and Installation
- Transmission Fluid Level Check. General Procedures
- Rear View Mirrors - System Operation and Component Description. Description and Operation
- Rear Bumper. Removal and Installation
- Transmission Fluid Drain and Refill. General Procedures
Rear Stabilizer Bar Link. Removal and Installation
Removal
NOTE: Removal steps in this procedure may contain installation details.
With the vehicle in NEUTRAL, position it on a hoist.Refer to: Jacking and Lifting (100-02 Jacking and Lifting, Description and Operation).
NOTE: Use the hex-holding feature to prevent the stud from turning while removing the nut.
Remove and discard the 2 rear stabilizer bar link nuts and remove the rear stabilizer bar link.Torque: 46 lb.ft (63 Nm)
