Lincoln Navigator: Battery and Charging System / Accessory Charging
- Wireless Accessory Charging Module (WACM) - System Operation and Component Description. Description and Operation
- Wireless Accessory Charging Module (WACM). Diagnosis and Testing
- Wireless Accessory Charging Module (WACM). Removal and Installation
 Direct Current/Direct Current (DC/DC) Converter Control Module. Removal and Installation
Removal
NOTE:
If installing a new module, it is necessary to
upload the module configuration information to the scan tool prior to
removing the module...
 Wireless Accessory Charging Module (WACM) - System Operation and Component Description. Description and Operation
System Operation
System Diagram
E370300
*.sttxt {
visibility: hidden;
}
*.stcallout {
visibility: visible;
}
1
APIM
2
BCM
3
ACM
..
Other information:
Lincoln Navigator 2018-2026 Workshop Manual: Exterior Lighting. Description and Operation
System Operation Headlamps Overview The LED headlamp system consists of multiple non-replaceable Light Emitting Diodes (LEDs) focused through projector lenses. Headlamp low beams illuminate through both the inner and outer lenses. When high beams are selected, the outer lens Light Emitting Diodes (LEDs) illuminate with an increased intensity. The LED DRL /front parking l..
Lincoln Navigator 2018-2026 Workshop Manual: Transmission Fluid Drain and Refill. General Procedures
Special Tool(s) / General Equipment Fluid Suction Gun Universal Fluid Dispenser Materials Name Specification Motorcraft® MERCON® ULV Automatic Transmission FluidXT-12-QULV WSS-M2C949-A, MERCON® ULV Draining NOTE: It is not necessary to remove the transmission fluid filter to drain the transmission fluid. Remove the ..
Categories
- Manuals Home
- 4th Gen Lincoln Navigator Service Manual (2018 - 2026)
- Remote Function Actuator (RFA) Module. Removal and Installation
- Neutral Flat Tow Activation and Deactivation. General Procedures
- Identification Codes. Description and Operation
- Front Seat. Removal and Installation
- Transmission Fluid Drain and Refill. General Procedures
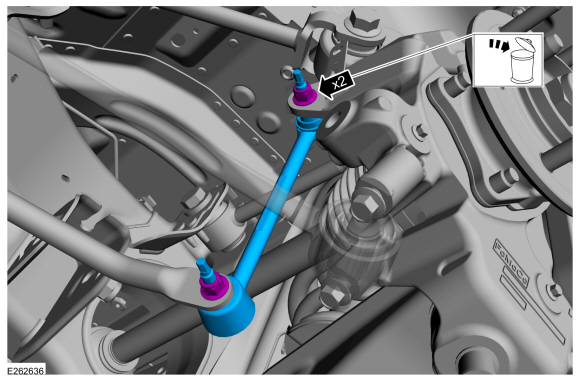
Rear Stabilizer Bar Link. Removal and Installation
Removal
NOTE: Removal steps in this procedure may contain installation details.
With the vehicle in NEUTRAL, position it on a hoist.Refer to: Jacking and Lifting (100-02 Jacking and Lifting, Description and Operation).
NOTE: Use the hex-holding feature to prevent the stud from turning while removing the nut.
Remove and discard the 2 rear stabilizer bar link nuts and remove the rear stabilizer bar link.Torque: 46 lb.ft (63 Nm)